Showing posts with label Breakfast Food. Show all posts

Thursday, December 13, 2012

Pancake Art

Have you ever had one of those days where you thought it was a different day? I woke up on the 10th (which really was a Monday) thinking whole-heartily that it was Tuesday. So I ran my Tuesday errands, wrote and posted my Tuesday Pinstrosity post and even was excited when Cameron was home from work early. I wake up the next day and look at the alarm clock and panic because I have 10 minutes to get ready so we can leave so I could be at work on time...but Cameorn was already 20 min. late for work. I rushed around, grabbed the nearest clean clothes and ran into the living room where Cameron was on the computer. He just looked at me funny and panicked for a minute when I said we were late...but then he informed me that it was not Wednesday, like I thought it was...it was Tuesday. I didn't believe him, so I checked the wall calendar and the computer calendar multiple times and sure enough...it was Tuesday. While I've loved having an "extra" day this week...it has sure thrown me off completely. Groundhog Day, the sequel?  Surviving a regular week can be hard enough...surviving finals week is even harder...but surviving a finals week with one extra day added to it? I think I deserve a big stack of pancakes as celebration of surviving. 

Speaking of pancakes...how many of you remember having shaped pancakes as a kid? Okay...how many of you made yourself shaped pancakes for breakfast this morning? There's a kid living in all of us still. 

We had a submission where someone tried to recreate these pancakes:

The Original Pin
5795122756:Yahoo:photo
http://laurenconrad.com/blog/post/tuesday-ten-back-in-the-day
But theirs didn't come out with the same Disney magic...

The Pinstrosity

Now I know some of you are thinking...how hard can it be to make 1 large circle and 2 connecting circles? Well, let me tell ya...it can be hard! Pancake art is not for the faint of heart. As kids sometimes we'd eat dinosaur pancakes, and other times it was "What country do I have?". Luckily though they taste awesome regardless of the shape. 

For pancake art you need a batter that doesn't run really bad. My favorite pancakes are wheat pancakes, but the batter is thin and the pancake isn't fluffy at all, so that doesn't work so well for pancake art (but it sure tastes phenomenal...my mom's the best). If your batter's too runny, try adding a little more flour/mix. 

As for the tools...you can go as primitive as a spoon and cup, or graduate to a pourable measuring cup...or you can get super fancy. We'll show you a few gadgets that are out there which are made especially for the pancake artist in all of us. 

Close Window

Just mix up your batter, fill the contraption, pull the lever and draw! 


Fill, squeeze, and draw!

Ketchup bottle as batter dispenser
http://www.realsimple.com/home-organizing/new-uses-for-old-things/favorite-new-uses-00000000019718/page33.html

And then, for those who don't want to try to draw the shape...


http://www.howdoesshe.com/pancake-molds/

5. And then specifically for today's pancake:
Disney Mickey Mouse Pancake / Egg Ring - Silicone

I'm thinkin' that I need to make pancakes for Breakfast tomorrow. Cameron graduates with his Bachelor's Degree tomorrow and I think I'll put together a big fun celebratory breakfast. Think I can make a Mustang shaped pancake? Bahahaha, me neither, but it'll be worth a try. 


Saturday, September 15, 2012

The Pancake Misconception

Today's Pinstrosity is brought to you by the letter Y....for yummy! 

Sometimes a name can be a little misleading. Want to know how? Okay, picture pancakes in your head. Got it? Now hold that thought and read on. 

We had two Pinstrosities sent to us in the same day with the same food and the same misconception from the names. Stephanie and Patricia found recipes for Pancake Muffins, or Pop up Pancakes, and whipped them up for their families. They followed different pins, but the recipes were pretty much the same (one added orange zest and vanilla for flavoring, the other didn't). With the image of regular pancakes in their head they were expecting to have cute little cup shaped flap-jack textured pancakes. But, that's not quite what the original recipes had in store. 

The Original Pins
http://www.makeandtakes.com/pop-up-pancakes
http://realmomkitchen.com/489/mini-german-pancakes/
Do you see what's going on here? Let me give you their photos and stories first and then we'll jump into what these pancakes really are. 

The Pinstrosities
Here's Patricia's story:
"I like to do something special on the last day of summer break. The very first special activity this year was a breakfast of Pancake Muffins.  I saw them on Pinterest, looked up the recipe and thought it was fool-proof.  Famous last words, right?  I thought I followed the directions to a T, but still ended up with quite a different result. 
The kids and I still ate them and they tasted okay, but I think we'll go back to making our pancakes the old fashioned way!"
And here's Stephanie's story:
 "I saw these amazing-looking pop-up pancakes on Pinterest, so I finally decided to make them this morning. You make a sort of pancake batter in your blender, then pour it into muffin tins, and voila! Oven-baked, fluffy pancakes! Well, okay, not exactly. Check out that wrinkly goodness! Mmmm, looks tasty, right?!"

"When you cook them, they puff up really big and then sink back down right away, making a cup-shaped "pancake". I hesitate to call them pancakes, because they don't taste like pancakes -- they taste like eggs (no surprise when you use 6 eggs to make them and a minimal amount of other ingredients!!). I cooked them for 15 minutes, and they puffed up and turned "golden on top", as the instructions say. However, they were still a bit gooey in the middle, so I cooked them for an extra 5 minutes."

"Now I will say, once I got over the fact that they didn't taste like real pancakes, they didn't taste bad. In fact, my kids kept asking for more! I haven't decided yet if I'll make them again. I should also note that I used no-dairy margarine instead of butter, and an almond/coconut milk mix instead of regular milk, since we can't have dairy around here. It's possible that actual dairy ingredients would have a different result....right??"

So What's Going On?
With the image of "normal" pancakes in the shape of cups these definitely seemed weird. What's going on here is that these aren't normal pancakes. I grew up calling these pancakes "No-Flip Oven Pancakes", but most people know these as German pancakes and they are NOT anything like flap-jack pancakes...not in texture, color, taste, or anything. However, these pancakes are delicious! 

German pancakes have more of a cooked egg texture than a bread texture, which is one thing surprised Stephanie and Patricia with the recipes. And, they do cook differently than flap-jacks. You can't pour the German Pancake batter on a griddle like you can with the flap-jack batter, it's just too thin (I suppose it may turn out slightly like crepes if you tried...but I've never tried it. Anyone?). You can cook G.P.s in a cake pan, muffin pan, bundt pan, etc. While cooking the German Pancakes will puff up...sometimes they puff up HUGE. That's completely normal. And, it's completely normal for them to fall after pulling them out of the oven. Wrinkles and pot-marks are normal. You can eat these with regular pancake syrup, with jams or jellies, with whipped cream, or in our family we pour melted butter over it when we pull the pancakes out of the oven and then sprinkle powdered or brown sugar on top (personally, I think that's the best way to eat these). And, I don't think that Stephanie's modifications made a difference, they look normal to me and it sounds like they were a hit with the kids (which automatically deems it a winner in my books). 

So...Patricia and Stephanie had complete Pin Wins as far as how their food turned out, but Pinstrosities with how they expected it to turn out. The word "pancakes" threw them off and they thought the recipe had gone wrong, but now they know the awesome yummy goodness of German Pancakes. So this GCT Level 1 Pinstrosity is really a Pin Win in disguise. 

If you've never made these before, seriously try them out. I'll even give you the recipe I grew up with:

No-Flip Oven Pancakes (aka German Pancakes)
3 eggs
1/2 c. flour
1/2 c. milk
2 TBS melted butter/margarine
1/4 tsp. salt
2 TBS melted butter (at the end, after done baking)

  1. Mix eggs and flour. 
  2. Mix in milk, 2 TBS melted butter, and salt. 
  3. Pour into a greased 8x8 pan. 
  4. Bake at 350 degrees for 15-20 min., or until golden and puffy. 
  5. Remove from oven and pour remaining melted butter over the top. 
  6. Serve with syrup, jam, jelly, powdered or brown sugar, or whatever your heart desires. 
This recipe is about the right size for 2 hungry adults...or at least this is what Cameron and I make to split between us.


Tuesday, September 11, 2012

Bell Pepper Eggs Revisited

Where were you 11 years ago today? Do you remember it? It boggles my mind that many of the high school kids now don't hardly remember 9/11 at all.


You know those meals that you make out of that last vestiges of food you have left in your house? Yeah...that was my lunch a few days ago. We were getting ready to start the 20+ hour trek for Cameron's Grandfather's funeral and didn't want to leave food in the fridge to go bad, so we hadn't bought groceries for a little bit. I was hungry and so I scrounged and found I had bell peppers from the garden, eggs, and zucchini pickles (I know...zucchini pickles sound gross...I was hesitant at first, but these are so good and so easy and they use up the surplus zucchini coming out of everyone's gardens). So...I decided to retest an old friend from a few months ago. 

The Original Pin
http://www.apronstringsblog.com/flower-power-eggs-recipe-sunny-side-up-eggs/
Remember that one? No? Here was my original attempt:

http://pinstrosity.blogspot.com/2012/04/fried-egg-underflow.html
I had issues with the egg leaking out from under the pepper and it just didn't cook as pretty. Since that episode we've had people e-mail in their tries, which went bout as good as mine.  Here, I'll show you. 

The Pinstrosities
 Kendall said, "I wanted eggs for breakfast and had an extra green pepper from my dinner the night before (also a Pinterest fail.) I decided to boost my self-esteem by making the easiest thing I'd ever pinned on Pinterest. Eggs cracked into rings of peppers. How hard can that be? Well, much harder than I thought.. First of all, the eggs didn't stay neatly inside the peppers like they do in the picture. Second, how the heck do you flip them to cook both sides? Should  I have done the sunny side up thing? I'm obviously not a chef. I cooked one side of the egg and things were going ok. Then I flipped the eggs to cook the other side and everything went to heck. Thank goodness I wasn't cooking for company. They tasted ok but they looked like dog food. Total FAIL."


 I decided that I was going to retry this pin for my lunch, so I went through and reread the instructions on the original site and reread all the comments/suggestions from the last post. I had two methods I wanted to try...and of course the second one is the one that worked. Isn't that how it always goes.  

Try #1
The bell peppers from our garden aren't huge, so I knew a whole egg wasn't going to fit in a regular slice...so I sliced the bell pepper a little thicker than normal. 

I decided to try the hot pan method first, which was a popular suggestion on our last attempt with this. And hotter means faster, right? Hehehe. I can be so impatient. Hey, I was hungry. 

I cracked the egg into a bowl (an orange one of course, what other color would I use?) and then dipped the pepper in the egg white. 


With the pepper dipped in egg it stuck to the hot pan, giving it a sort of seal. It was working so far. I had hoped that the peppers would be tall enough to hold the egg, but they weren't. There was no seepage underneath the pepper, but there was egg overflow. 


I tried slowly spooning the egg into the second pepper...have you ever tried separating egg white? It doesn't spoon so well...and I ended up pouring the whole egg in the pepper by accident. So I had 2 overflow pepper eggs. I removed the overflowed cooked egg white and it all looked like it was going to go perfect. But then it came time to flip the eggs...because the pan was really hot I had to flip them because they'd burn. Well...the whites on top were still uncooked so it just ended up splatting all over the pan. 


I cooked them until it looked done on both sides, detached the outer whites and they looked decent-ish. Not pretty, but not bad. 

I cut into them and there was still uncooked egg white in the middle. Disgusting. I like my yolks runny but the whites HAVE to be cooked. I cut everything up, added a little cheese and poured it back in the pan and ended up having scrambled eggs with pepper pieces. Tasty, but not the desired result.

I ate this while the pan cooled and I could do attempt #2. 

Try #2
This time I cut the peppers to normal thickness (about 1/2" thick). I again broke the egg into the bowl and dipped the pepper in it. 

This try though I had the heat on low. I placed the egged pepper on the pan and let it cook for about a minute. I then slowly spooned out little bits of the egg white into the bottom of the pepper, just enough to get a full seal and a coating. Once I had a full coat in the bottom of the pepper (with no leakage) I spooned in the yolk of the egg (with a small amount of attached egg white). It fit just perfectly in the small pepper. 

I salt and peppered the egg (which I forgot to do the first time) and then I placed a lid on the pan and let it cook on the low heat. I did not flip this egg. On the low heat and with the lid on the pan you can let the egg cook until it is done all the way through. The original website says, "If you like your yolks runny, just cook over low heat until whites are done. If you like your yolks firm, break the yolks and then cook over low heat until both whites and yolks are firm." 


I let the egg cook for a few minutes and when I opened up the lid this is the beautiful egg I found. It worked! Finally. 3rd time's the charm, right? The egg was cooked to perfection and the pepper was just right...not too crunchy but not over done either.

This recipe takes more work with a small pepper than a larger one, but it does work and it makes such a pretty offering. So cook it gently over a low heat and DON'T flip.


Saturday, September 8, 2012

Biscuit Tips

I sat down to decide what to post for this morning and not having had my breakfast yet I of course went straight to our breakfast food folder. Now biscuits and gravy are my favorite food; that's what I asked for as my birthday dinner for many years. When I saw this Pinstrosity for 7-Up Biscuits I was sold. 

The Original Pin
http://www.plainchicken.com/2010/04/7up-biscuits.html
Steph, on the original website, said that "some places on the Internet call these Popeye's Biscuits - I guess they taste like the biscuits from the chicken place.  All I know is that these were the best biscuits that I've ever made - hands down!  They were light and fluffy." Looks yummy! 

With this recipe only having 4 ingredients (Bisquick, sour cream, 7-up, and butter) it's definitely a popular one on Pinterest. 

Murielle saw this recipe on Pinterest and decided to give it a go. Here's part of her story: "Before I made mine, I read all the comments on the blog, to be sure that using Sprite instead of 7 Up was okay, and I used low fat sour cream instead of full fat.  I mean, there are 4 ingredients, how can someone mess that one up!!!"

Famous last words.  

The Pinstrosity

Now, in her defense, those really don't look that bad. No, they don't look like the pin, but they don't look that bad. 

Murielle did admit though that she did make the mistake of cooking the biscuits at 350° instead of 450°. "The TV was on, the kids were fighting, I was hungry, so I missed the temperature, but still, I think they should look a bit better than that!!!"

But now the final test...the taste. "The taste [was] okay, a bit like Bisquick to me, not mouth watering and O so yummy, but I'm hungry, so I'll eat anything!!!"

So let's address the issues here. 
  • The temperature. You would think that it'd be okay to bake things at any temperature and just adjust the cooking time (I think that's one thing we all learn as beginning cooks), but cooking at the right temperature does make a difference. If the temperature is too high or low the proper chemistry can't occur withing the cooking food, or it occurs way to fast. With biscuits you definitely want a slower cook to help get that perfect flaky texture. Now I know the temperature was an accident with Murielle's biscuits...we've all done that before, or at least I know I have. 
  • The low fat sour cream may have been an issue, but I don't know for certain. With so few ingredients (have you noticed the 3-4 ingredient recipe trend on Pinterest lately?!) changing up one could have more of an affect than normal. 
  • As far as the biscuits tasting like Bisquick...that doesn't surprise me too much as that is the staple of these little beauties. If you don't want the Bisquick taste you can make the mix yourself at home. There are quite a few sites out there with "Bisquick" recipes, but here's one  for you so you don't have to go searching if you don't want to: http://unsophisticook.com/bisquick-substitute-recipe/
  • Being a biscuitoholic myself, I've learned how to make biscuits and I have a few tips that can help you out. The original recipe leaves out some good details to help you get the right texture and look. 
    • If you're going all from scratch with no Bisquick mix, mix all the dry ingredients together first.
    • I always mix the biscuit dough up by hand. I able to keep a better control on the texture and mix that way, and unless you are making biscuits for a horde (I've made biscuits for 8 people by hand...that's not a horde) an electric mixer is just overkill. Well, that's my opinion at least. I know we'll have comments along the lines of "I use an electric mixer and mine come out fine", but I'm just saying that I get the best results when I mix by hand. 
    • I know this recipe doesn't have shortening, but if you're making one that does (and I'll give you my biscuit recipe after this) you need to cut in the shortening, not mix it in.  In this recipe you need to cut in the sour cream. What does it mean to cut in and why is it important? 
      • I wrote and rewrote how to use a pastry cutter (some call it a pastry blender), but it just gets wordy. Here's a YouTube video that shows it rather than says it  (and you get the background soundtrack of home life...I love it!).
      • Why do you "cut in" and not mix? Mixing the mixture and working the cutter through works "up more and more glutens in the flour. While high gluten levels are desirable in bread, the opposite is desirable in a flaky crust. You want to mix it as little as possible while still incorporating all of the ingredients." from ehow.com.
    • The rest of my tips are in my recipe (okay, it's actually my mothers...aren't all recipes our mothers or grandmothers? That's because they are the best recipes.) so rather than be redundant, I'll just give you the recipe and I'll put the tips in red to highlight them. 

Totally Awesome Biscuits
2 cups flour
1 ½ tsp. salt
1 T. baking powder
4 T. shortening
1 c. milk
2 T. butter (do not add into dough mixture)

1.    Combine dry ingredients in a bowl and mix.
2.    Cut in shortening.
3.    Stir in milk. The dough will still be sticky at this point, that's normal
4.    Dump about 1/4-1/2 cup of flour on the counter and spread it around (about a 1 to 1 1/2 foot circle is plenty) to prepare your floured surface
5.  Place dough on the floured surface and sprinkle a light layer of flour over the top. 
6.  Knead the dough (by folding it in half) 7-10 times. Do not over-knead.
5.    Flatten (either by hand or with a rolling pin...I just flatten it with my hands) to about an inch thick and cut with a biscuit cutter/cookie cutter/tin can. Recombine edge pieces, flatten and cut again (mixing the dough as little as possible). 
7.    Melt 2 T. butter in 8x8 baking pan.
8.    Place each cut biscuit dough in the pan of butter, turning it over so that both the top and bottom are coated. 
9.  Bake at 425 degrees for 12 minutes or until golden brown. You don't want to wait until these are brown to pull them out of the oven as they will be overcooked and hard at that point.  
10. Store cooled leftover biscuits in an airtight container (plastic baggies work) in a cool place. Can be reheated in the microwave (you only need about 10-15 seconds). 


Saturday, August 18, 2012

Banana Poo Bread

Hello Pinstrositeers...Pinstrositites...Pinstrosicans? Hello world! Marquette here. I'm finally home after a wonderful week of visiting friends and family, getting lost in the mountains, and my best friends wedding. A huge thanks to Em for covering for me during the wedding hoopla and while I was without Internet access. It was amazing to come home and see the huge spike in viewers...we hit our 2nd million mark already! You guys are awesome. 

I have a great Pinstrosity for you today from Lauren. I loved her story and how she told it so I'll let you read her story in her own words. 

"I have been an avid pinner for a little over a year, but it was only until recently that I began testing out the recipe portion of my pins. My husband & I have been married for 2 months TODAY, so I have spent the past 2 months attempting to impress my man with my domestic abilities. I guess not everyone is cut out to be a Homemaker after all (cough...ME!..cough)."  

"I was attempting to bake a recipe titled '(My) Best Banana Bread' and little did I know, it would be MY (& the world's) WORST banana bread!" 

"I originally chose this pin because my husband LOVES banana bread & usually his mom sends him a care package with it during deployments & I figured maybe I should learn how to make his favorite snack & maybe, just maybe mine will blow his mother's away? Competitive... I know!"

"I was set! I bought all the ingredients, I even preserved my ripe & ready-to-go bananas a few days before & this is where the nightmare began!"

The Pinstrosity
"I took out my frozen naners and forgot all about them while I was chatting away with my sister on the phone & imagine my surprise when I peel the sweating-looking bananas open and discover this:"
Does this not look like poo?
"I was like WHATTT THE......? I then proceeded to "pour" the bananas (yeah never thought I'd say that either) into a bowl and stood there for a while wondering if it would still work & then I get a call from my husband saying he is on his way home. I wanted it to be baking before he came in so he would be greeted with the lovely aroma of banana bliss, so I figured "Screw it, I'm sure the bananas will still work!!" I began running around the kitchen like a mad woman tossing in each ingredient one by one....& in walks hunny. Whew! I made it just in time! So I take a peek into the oven & notice the bread is HUGE (really wish I would have taken a photo) & I ask him if it's normal considering it had only been in for maybe 5 min. & he wasn't sure, so I just ignore it. I peek again after about 10 minutes and notice it is now HUGE & BLACK so I pull it out and wonder why it is baking so fast, (the recipe said "55mins- 1hr"). I peel off the scorched top & notice a soupy banana mixture inside, so I think "well, maybe that part will be good" and I pop it back in for another 40 min. & pull out this:"


"My hubby & I each take a bite & "HOLY COW....WHAT ISSSSS THAT"? Charlie says "Sorry, baby" as he spits it into the sink & I have my eyes closed forcing myself to swallow my poisonous bite (&pride)." 

"What in the heck happened? Where did I go wrong? I then re-read the recipe retracing my steps...."

"2 cups of flour? Check! 3/4 cup of granulated sugar? Check!.....3/4 Teaspoon of baking soda?"

"WAIT WHAAAAAAT? I thought it was CUPS!... Yeah, 3/4 TEASPOON & 3/4 CUP make a HUGE difference!"

"I tossed the banana brick & swore I'd never tell a soul until I discovered Pinstrosity & realized we all make mistakes & Pintrest is a great platform for failure! Okay & quite possibly success too, at least WE pinners are learning & trying to expand our creative abilities. Go us! :)"

 "Side note: I attempted the banana bread a 2nd time using the CORRECT measurements & it was DELICIOUS. Charlie even went as far to say he prefers mine now! Happy Dances all around!"

So...the moral of the story here...unless your are making a huge batch of something, you'll probably never need 3/4 c. of baking soda. Thanks for the great submission and the laughs Lauren.


Thursday, August 9, 2012

Oatmeal-to-Go....in the Trash

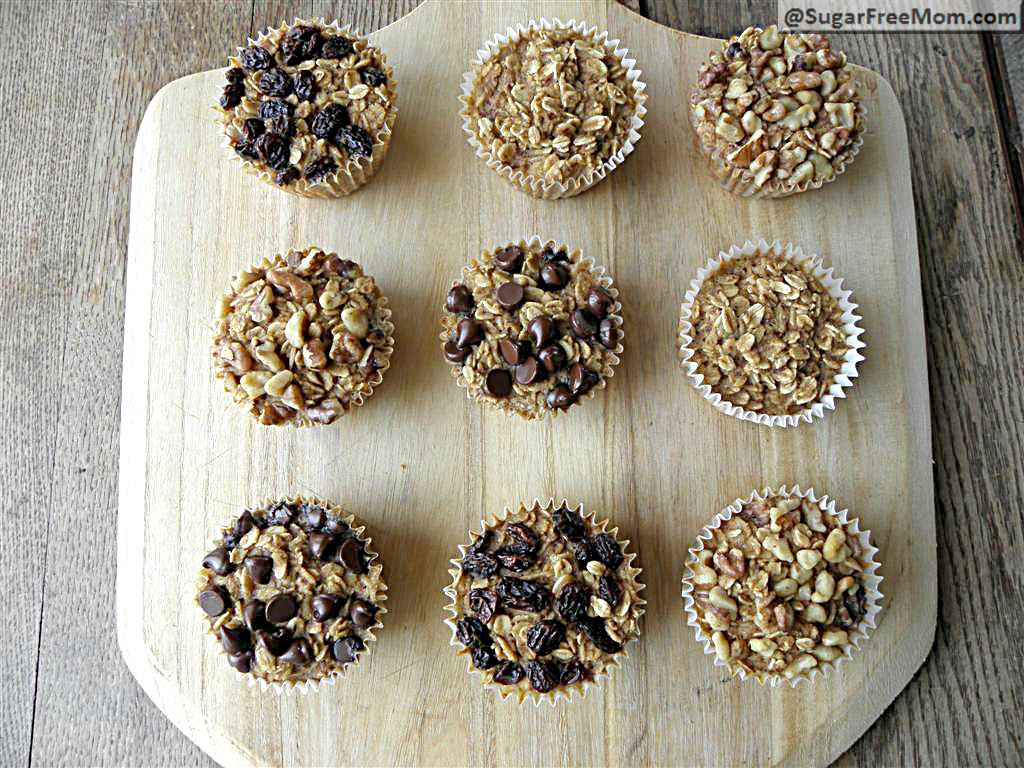
I do have to say that Oatmeal is my least favorite breakfast food ever. Okay, no I lied...creamed eggs are my least favorite...but oatmeal comes in 2nd. But I know it's good for you, so now that I'm an adult I eat it when it's served. But getting me to eat it as a kid? World War III. Moms try to spruce up oatmeal anyway they can to get that cheap (but nutritious) goop down. We were sent in this Pinstrosity of one way to try and get the goop gobbled up.

The Original Pin
http://www.sugarfreemom.com/recipes/personal-sized-baked-oatmeal-with-individual-toppings-gluten-free-diabetic-friendly/ 

And here are Becci's Oatmeal Cups. 

The Pinstrosity

Becci says, "Actually, they LOOK really cute but my kids both tried one and thought they were AWFUL and would not eat them! I think the problem is that kids think they will be like muffins and they are super dense and overly moist.... like oatmeal to go I guess. I gave away as many as I could to friends and the rest were oatmeal-to-go-in-the-trash." 

So actually, this pin produced what it said it would...oatmeal to go, but the Pinstrosity part of this was that it was still not kid approved. Honestly, my mind has a hard time not looking at those and imagining muffin taste and texture, I can imagine the kids' reactions. It's just oatmeal in a paper liner. If you like oatmeal though, these are great to make to have on hand for a busy day!