Showing posts with label Pinvestigations. Show all posts

Monday, September 2, 2013

Multiplication Pin Explained

In today's post we featured this pin:
http://themetapicture.com/the-japanese-way/
It took me a while to figure out what they did, but it's awesome. We've had some requests to explain how to do this and make it work, so using my super high tech Microsoft Paint program, I'll walk you through how to do this multiplication trick. 

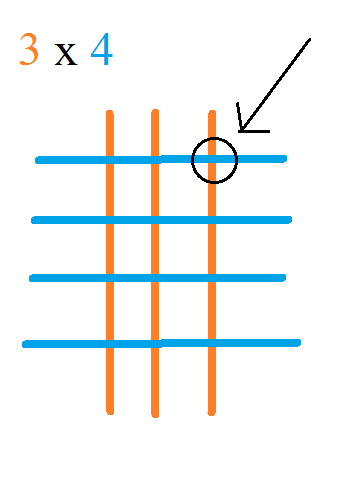
We'll start with multiplying single digits together. We'll do 3x4. I tried to "color code" each number (I'm sorry to those with color blindness, like my husband...the colors won't help a whole lot, I know). 

Start with the first number, 3. Draw 3 vertical lines. 
Next, go to your second number, 4. Draw 4 horizontal lines across the vertical lines you just drew. 

 Now, you are looking for the intersections of the lines (where they cross):
Count all the intersections, and you have your answer: 

So now, what about multiplying numbers with double digits?
Let's look at the problem in the original pin, 13 x 12. 
Start with the first digit of the first number. In this case that's the 1 of the 13. Draw 1 vertical line. 

Now move on to the second digit in the first number. That would be the 3 of the 13. Spaced to the right of your first vertical line, draw 3 vertical lines grouped together.  

Now let's move to 12. Take the first digit of the second number. That would be the 1 of the 12.
Draw 1 horizontal line at the top.  
Then take the second digit of the second number. That's the 2 of the 12. Spaced below your first vertical line, draw 2 vertical lines grouped together.  
 Now, we need to group the intersections. We do this in diagonals from the top left corner, working down to the bottom right corner. Circling the groups helps keep everything all in place in your head. See the graphic below:
Each circle/oval counts as one group.
 Now we count up the intersections for each group we just circled in the previous step. 
Working clockwise around the drawing gives you your answer. Always start at the upper left corner and then follow the numbers in sequence. 1, 5, 6. 13 x 12 = 156

Let's look at another double digit problem. Start by making you vertical lines to represent your first number in the problem. 
Add the horizontal lines for your second number.  
Circle your groups.  
Count up the intersections in each group.  
Now here's where this one changes a little. The answer to 15 x 23 is not 21315. When you run into a problem that produces groups that have intersections in the double digits (like the 13 and the 15 in this problem). You have an extra step you have to take. 

Start with the first double digit grouping in your drawing. In this case that's the 13. You are going to take just the first digit (the 1) and add it to the group directly to the left (the 2). See the brown underline I did in the graphic below. Write the sum of the two numbers above the drawing. I find it easy to draw lines from the numbers to their sum so I know for sure what numbers are referring to. 

 Still working with that 13, we are now going to take the 3 and add it to the first digit of the next number working clockwise around the drawing. So we end up with 3 + 1 (see the numbers I have underlined in purple in the graphics below). 

At this point it may be easy to cross out the numbers you used to add up to your new numbers. Was that clear as mud? Here:

 Now that you have just single digit numbers around your drawing, you have your answer. As before, start with the first number and work clockwise around the drawing: 3, 4, 5.   15 x 23 = 345


And finally I'll show triple digit multiplication. Start by drawing the vertical lines for your first number. 


Draw the horizontal lines for your second number. 

Circle the groups. Remember, you group them together in diagonals. 

Count up the intersections in each group.  

Then starting with the first number and working clockwise you have your answer.  

This method can be used for any whole number multiplication problem. 
3 x 28
11 x 121
1,985,343 x 3,546 (but for that one I'd just recommend getting a calculator)
Just remember the first number gets vertical lines, the second number gets horizontal lines, and group in diagonals. 

I hope this made some sense. If not, let me know and I'll try again to explain it. 

Tuesday, August 27, 2013

Emergency Crayon Candles

We love getting nerdy and going all "Science Fair Project" with some of our Pinstrosity investigations. It's just fun and it kinda makes you feel like a kid again. Who doesn't love a day when they get to feel like a kid? I always get excited when we have an email from one of you with a full out investigation into a Pinterest pin. When that happens it's like I found a kindred nerd spirit. I love that being a nerd is cool these days. The world needs more nerds. And I say nerd with all the love in my heart...I'm a nerd and I'm proud of it. But moving on. Bri decided to test out a pin that has flown around Pinterest to see if it was all it was cracked up to be. It involves fire and crayons...a project can't get better than that! Bri said we didn't have to include all her pictures...but I thought they helped illustrate her point perfectly, so this post is full of awesome crayon & fire photos. 

The Original Pin:
This particular picture I got at http://memecollection.net/emergency-crayon-fact/, but it has been posted on countless sites all over the internet. 

Bri didn't have Crayola's on hand, but she did have a variety of other brands and decided to give those a try and see how they worked. 

The Pinvestigation:

"So I started with a pink crayon, a lighter, and a paper plate."

"Getting the stupid thing to light was a joke and a half. It just kept melting the wax. Then I melted the point off enough that the paper started to burn." 

"It would tease me though and burn about 30 seconds then create this ashy gray stuff that I would have to scrape off. Then I would get it going again thinking 'this is going to work this time!' Just to have the crayon taunt me back by saying 'no way, you stupid! I can't believe this is what my life is!' Totally heard it in my head the whole time! 

  
"So I moved it aside to the crayon graveyard so I could try again!"

 "Attempt two came with a blue crayon. My husband started getting interested at this point and had the idea to shave off the top down to the paper and cut a slit in the paper to vent it out." 

"We had a flame that started to last a long time! By that I mean longer than 30 seconds. I did have some gross crayon juice bursting out but that's what the plate was for right?"


 "The gross crayon juice made a pretty fountain down the whole crayon the flame seemed to remain there until it got bigger and bigger."

"It got a little scary."

 "Then the burning blue flame of death fell over. It was still going strong though."

"Now we have only lapsed about 3 minutes of time here. All in all it lasted about 5 minutes and made a big scary mess more than anything." 

"We poured water on it so that it wouldn't burn through the plate. I was going to get this stupid thing to work."

"So we tried a third time with a purple crayon. This time no paper at all." 

"As we were lighting it the wax just kept melting. So with our melting wax we decided to put it to good use. We used the paper we ripped off the crayon and dipped it in the wax and the attached it the crayon. I know weird idea but we were at a loss!!" 

"Needless to say it didn't really work."

"So we went to the fourth try. We took a black crayon and put the point down on the plate in the melted purple wax."

"We also put a slit in the paper because that seemed to work before. Still would not work right." 

"SO then we decided that instead of lighting it from the top directly what about lighting it from the side. Guess what!? It WORKED!! It lit the top up and burned!!! It did lean on the other crayon but we had fire!" 

"I felt like I should have been a cave man hitting my chest jumping up and down! It was a great fire! We even roasted some gummy bears on it! (They weren't very good.)" 

"Now it burned for about 15 minute until it died. The purple crayon went with it. I have no idea where 30 minutes came in. It was pretty bright when we turned off the lights. Was it enough to do chores or cook with probably not. But it was a light of some sorts right? "

"So we decided to try it a fifth time with all we learned. So we went back with a pink crayon, with a slit, right side up this time, and lit it from the side."

"We had fire for about 30 seconds and then it died with a pink pool of wax..."

"So what did I learn from this mess? That crayons aren't really good for emergency lighting because it take A LOT of effort to do so. I would rate a 5 on the GCT scale. It did not go up in flames but should have!"


So, if the power goes out and you need light...don't reach for your kids' box of crayons (or your own, I have a few boxes of crayons myself). It's not worth the hassle. Unless you just want to kill time...and crayons. 

So what have we learned here on Pinstrosity about emergency lighting?  Crayons aren't the best option. Neither are oranges. But...bacon covered burgers might do the trick for you...only you'd have to prepare them in the dark. I think I feel a theme week coming on. Testing out all those "emergency fire" and "emergency lighting" pins that I've seen out there would be this redneck nerd's best week ever. Oh, now I'm super excited. Bri...you don't know what you started, bwahahahaha. 


Update; 1:48 pm, August 27, 2013: 
We've had some comments that the Pinvestigation isn't complete without testing Crayolas, as all crayons are not created equal. Bri didn't have Crayolas on hand to test, so she couldn't. I went and dug through my crayons and found I had two brands: Crayola and Crazy Art. So I tested those two. Here's how my test went:

1:32 pm: After 2 minutes of working with it, I finally got my first crayon (the purple Crayola) lit. I used an almost new crayon and had to get the point melted down to the paper before it would light. 
1:34 pm: I got the yellow Crazy Art crayon lit. I broke off the tip as close to the paper as I could so it didn't take as long to get lit as the first crayon. 
With both crayons I melted the bottom slightly so that it would stick to the plate and stand up better in case the table got bumped. It took me 5 matches (burning both ends on each stick) to get the two crayons lit. 

1:39 pm: The progress of the crayon candles. The yellow isn't doing so hot.

1:41 pm: The yellow crayon goes out and doesn't want to relight. It's done. Crayola purple crayon looks to be about 1/2 way burned.

1:49 pm: The purple Crayola is still burning, but it STINKS!

1:50 pm: The Crayola falls over, but is still burning.

1:51 pm: The Crayola goes out.

The purple crayon burned pretty completely. It has some crayon juice, as Bri called it, that pooled at the bottom, but most of that was from melting the point off in the beginning. Nearly all the wax burned out of the paper, as you can see in the photo below.

So, the Crazy Art burned for 7 minutes and the Crayola burned for 19 minutes. It had a good & steady flame. So one box of 16 Crayola crayons would give you about 5 hours of tedious "candle light". So, it does work...but it didn't burn for 30 minutes. And it was troublesome to get started. And it's stinky. And what a waste of a crayon. But in an emergency, with nothing else...it does work and you can get a small amount of light time out of them.