Showing posts with label Pinstrosities Revisited. Show all posts

Friday, September 20, 2013

Reruns

After we post up a Pinstrosity here on the blog, sometimes we never see another submission from that same pin. And then there are the pins that I'm sure we'll always be getting submissions on as long as we're running the blog. These are the classics and they never fail to make me chuckle. These submissions are like watching reruns of Napoleon Dynamite...that movie never gets old and gets more and more funny every time we watch it. So today, I thought I'd give you some of these "reruns" of old Pinstrosity classics and the fresh submissions we've received for them. 

The Original Pin:
http://queenvannacreations.com/blog//2012/02/01/ice-ballons/
Colorful ice balls. Great for lining the walk for a winter party. 

The Original Pinstrosity Post:
http://pinstrosity.blogspot.com/2013/01/food-coloring-explosion.html
There are easier ways to repaint your kitchen. 
This past January, after a lake effect storm up north, Jenn decided to give these a try.
"So here's my attempt at the ice ball thing. I had it all planned out.. even had a good balloon delivery system (BDS) to ensure that there was no chance that the food coloring ended up anywhere else in the house. Fun fact... I don't use liquid food coloring.. only Wilton gel... after the 1st one ending up all over the wall and sink I went to plan B... the toothpick delivery was amusing.. and the faucet is finally starting to run clear now. Yes dear neighbors, I'm the crackhead making multiple trips outside with no jacket in sub zero temps to deliver my little landmines to their happy homes in the snowbanks. Do you know what happens when you have wet hands and go to open the door back inside? Dude! I'd also like to blame you people for the looks I will be getting for the next few days with my purply red blue green hands.. but we both know that's not the 1st time... so I can't blame you for that one.
Pinterest ice balls the next day... its -8 and I tried them.. they are all very hard. I cut the balloon off the red one and it seemed okay... peeled it back to the immediate glug glug glug of the non-frozen inside pouring out..."

The "Rerun" Submission:

"So yea that will make people stare..heheh" I love that "bloody" balloon. Makes me laugh every time I look at it. Jenn did eventually have success though after 48 hours of the water balloons sitting out in the sub-freezing temperatures:
So, not a super quick and easy pin, but not unattainable either! 

What about those "[blank] in a jar" pins. We get quite a few of those. 
The Original Pin:

Rainbow cake in a jar! 

The Original Pinstrosity Post:
http://pinstrosity.blogspot.com/2012/06/sunshine-in-and-out-of-jar.html
Misty submitted our rerun of this classic Pinstrosity. She said, "Rainbow cake in a mason jar fail!  I think I added too much batter.  I wasn't sure exactly how close to the top it was supposed to be when I put it in the oven.  The pin said to use 3 tbsp of each color.  It didn't look like enough, so I added a little bit more.  Guess I'll learn to trust the recipes from now on. "

The "Rerun" Submission:


So we have the "[blank] in a jar" pin...what about the "[blank] in a mug" pins? Those are classics too. 

The Original Pin:
http://www.number-2-pencil.com/2012/03/06/chocolate-chip-cookie-in-cup/

The Original Pinstrosity Post:
http://pinstrosity.blogspot.com/2013/06/cookie-in-mug.html
Elizabeth tells this story: "I should've known. Anything that is "quick and easy" and can be cooked in a microwave? I'll be there. I wanted to make a quick delicious cookie but I should've realized that the "Brownie In a Mug" that I made in 5th grade would've ended up just as horrible. I made a brownie in a mug for my brother's birthday, and being the boy that he is, he will eat anything that has chocolate in it. Later that evening, he threw up. Coincidence? I think not. This "Cookie" ended up tasting like frito corn chips and tons of white sugar. It ended up as a crummy mess. The recipe stated that it needed only 40-60 seconds, but it was way undercooked when I pulled it out. I kept putting it back in, and now I have this."

The "Rerun" Submission:
"I think microwave deserts have a thing against me."

And of course if we are going to mention cookies, we can't leave out the ever present and totally awesome cookie bowl. 

The Original Pin
http://www.wilton.com/recipe/Sugar-Cookie-Bowls 

Sadly...too many people just read the pinterest pin's caption and not the recipe on the website and end up with this:

The Original Pinstrosity:
http://pinstrosity.blogspot.com/2012/03/cookie-bowl-mayhem.html
http://pinstrosity.blogspot.com/2012/10/cookie-bowl-mayhem-take-2.html
Cali sent us in this rerun submission. "So I thought it'd be a great idea to make these cookie bowls that I saw on pinterest to put a no bake cheesecake mousse into for my roommates and I to enjoy, but it just ended up being a ridiculous mess. Note to self, do not use a "just add water" pre made cookie mix if you are trying to be creative. I ended up chiseling off the cookie on the pan and crumbling it up to use it as a crust for my cheesecake mousse on the bottom of muffin paper. Whatever, still tasted the same so I say it's a 3 on the GCT scale!"

The "Rerun" Submission:

And then there's one of my favorites. This hails back to the very beginning of Pinstrosity with one of our first posts. 

The Original Pin:
http://blog.hwtm.com/2012/01/diy-tutorial-creative-yarn-chandelier/

The Original Pinstrosity:
http://pinstrosity.blogspot.com/2012/02/bunch-of-hot-air.html

Melanie says, "My friends and I just moved into a new suite and the blank white walls were desperately in need of some decoration. My suitemate saw this craft and asked if I would try it. I bought balloons and glue and got out my utilitarian brown yarn and skimmed the directions…big mistake. Turns out, in order for this to work, you need to mix the glue with corn starch and water. And you need to dip the yarn in the glue mixture, not coat the balloon with it. When I popped the balloon, the whole thing crumpled. It was a sad sight to behold. I hung it up anyway, as a testament to the necessity of reading directions."

The "Rerun" Submission:

Oh these make me chuckle, I love it! I could add so many more, but you probably weren't looking for an epistle to read today. That just means we'll have to do another "rerun" post in the future. Oh darn.

Have a Pinstrosity on your hands, but we've already posted someone else's submission of the same project? Send it to us anyway! 


Monday, September 2, 2013

Multiplication Pin Explained

In today's post we featured this pin:
http://themetapicture.com/the-japanese-way/
It took me a while to figure out what they did, but it's awesome. We've had some requests to explain how to do this and make it work, so using my super high tech Microsoft Paint program, I'll walk you through how to do this multiplication trick. 

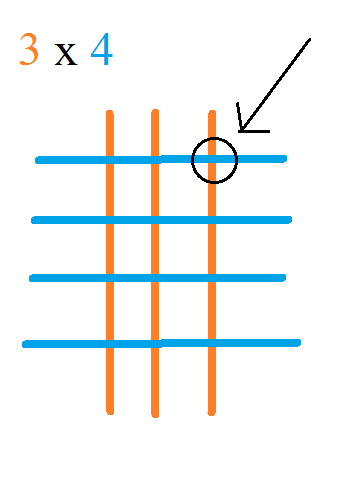
We'll start with multiplying single digits together. We'll do 3x4. I tried to "color code" each number (I'm sorry to those with color blindness, like my husband...the colors won't help a whole lot, I know). 

Start with the first number, 3. Draw 3 vertical lines. 
Next, go to your second number, 4. Draw 4 horizontal lines across the vertical lines you just drew. 

 Now, you are looking for the intersections of the lines (where they cross):
Count all the intersections, and you have your answer: 

So now, what about multiplying numbers with double digits?
Let's look at the problem in the original pin, 13 x 12. 
Start with the first digit of the first number. In this case that's the 1 of the 13. Draw 1 vertical line. 

Now move on to the second digit in the first number. That would be the 3 of the 13. Spaced to the right of your first vertical line, draw 3 vertical lines grouped together.  

Now let's move to 12. Take the first digit of the second number. That would be the 1 of the 12.
Draw 1 horizontal line at the top.  
Then take the second digit of the second number. That's the 2 of the 12. Spaced below your first vertical line, draw 2 vertical lines grouped together.  
 Now, we need to group the intersections. We do this in diagonals from the top left corner, working down to the bottom right corner. Circling the groups helps keep everything all in place in your head. See the graphic below:
Each circle/oval counts as one group.
 Now we count up the intersections for each group we just circled in the previous step. 
Working clockwise around the drawing gives you your answer. Always start at the upper left corner and then follow the numbers in sequence. 1, 5, 6. 13 x 12 = 156

Let's look at another double digit problem. Start by making you vertical lines to represent your first number in the problem. 
Add the horizontal lines for your second number.  
Circle your groups.  
Count up the intersections in each group.  
Now here's where this one changes a little. The answer to 15 x 23 is not 21315. When you run into a problem that produces groups that have intersections in the double digits (like the 13 and the 15 in this problem). You have an extra step you have to take. 

Start with the first double digit grouping in your drawing. In this case that's the 13. You are going to take just the first digit (the 1) and add it to the group directly to the left (the 2). See the brown underline I did in the graphic below. Write the sum of the two numbers above the drawing. I find it easy to draw lines from the numbers to their sum so I know for sure what numbers are referring to. 

 Still working with that 13, we are now going to take the 3 and add it to the first digit of the next number working clockwise around the drawing. So we end up with 3 + 1 (see the numbers I have underlined in purple in the graphics below). 

At this point it may be easy to cross out the numbers you used to add up to your new numbers. Was that clear as mud? Here:

 Now that you have just single digit numbers around your drawing, you have your answer. As before, start with the first number and work clockwise around the drawing: 3, 4, 5.   15 x 23 = 345


And finally I'll show triple digit multiplication. Start by drawing the vertical lines for your first number. 


Draw the horizontal lines for your second number. 

Circle the groups. Remember, you group them together in diagonals. 

Count up the intersections in each group.  

Then starting with the first number and working clockwise you have your answer.  

This method can be used for any whole number multiplication problem. 
3 x 28
11 x 121
1,985,343 x 3,546 (but for that one I'd just recommend getting a calculator)
Just remember the first number gets vertical lines, the second number gets horizontal lines, and group in diagonals. 

I hope this made some sense. If not, let me know and I'll try again to explain it. 

Friday, July 12, 2013

Ogre Snot, Glow Worms, and Tea Lights

In Wednesday's post you got Kendra's awesome owls and a flashback to our early owl cake post. I'll continue with the flashbacks and pull out another post from the early days to go along with 2 submissions we have had for it since.

This is one that so many of my friends have pinned to try with their kids. Those who have tried it haven't been super impressed with the results. It's just not the sparkly beauty the pin makes you dream of. 

The Original Pin
http://organisedchaoswahm.wordpress.com/2012/02/09/fairies-in-a-jar/ 

When I tried it, this is what I got: 

The Pinstrosity
http://pinstrosity.blogspot.com/2012/03/i-do-not-believe-in-fairies.html

It looks more like Ogre Sneeze Juice than it does Fairies in a Jar. How did our two ladies fare with this project? Theirs were slightly more fairyish...but still not what the original picture shows. 

Here is Tonya's run:
"I am so disappointed in this pin that I HAD to share what an epic fail this is.  I am pretty sure the original pin is photoshopped which was hinted by others in the comments.  You are suppose to use diamond glitter and then cut a glow stick into a mason jar - instant fairies.  WRONG.  What you get is creepy, clumped to the sides glitter.  What a waste!"

It doesn't look like the original, but it does look pretty awesome. It reminds me of the Glow Worm's down in New Zealand:
http://i.imgur.com/cYWveEa.jpg
So, they're not fairies in a jar, but glow worms! That's be cooler to tell boys anyway, I don't know many who are interested in fairies...so that works. 


Here is JoJo's run:
"I've been wanting to try the Fairies in a Jar project for awhile.  The following 2 pictures are what are featured online.  So sparkly right?  The instructions are so easy!  Just get a glowstick, crack to activate, then cut the end off and splatter inside a jar and add 'diamond' glitter.  The only info I could glean on diamond glitter is that it's the white & iridescent kind, of which I have plenty.  I also had some glowsticks left over from the 'toilet paper roll eyes' project last Halloween."


"I cracked the blue light stick and shook it out and around this jar, then sprinkled in the glitter.  While it did stick to the jar and was sparkly, it was only so due to the external light source in the kitchen."

"In the kitchen with only one light on over the stove and no flash.  Blue is real pretty, glitter picking up the stove light."

"Looking at the bottom, taken outside at dusk."

"Dusk shot too."

 "After dark, no flash.  Real pretty blue, but the glitter isn't twinkling."

"With flashlight pointing straight down into jar."

"Just flash."

"With a candle inside which had a cool effect but you couldn't see the blue anymore."

"Looking inside with candle light.  That's as close to twinkling fairies as it gets."

"I'd say it only twinkles with a light source that's outside the jar.  It was pretty seeing the blue jar, but the glitter definitely doesn't sparkle like the internet photos show.  The twinkles are obviously photoshopped in the first picture and upon review of the second picture, it looks like the glow in the dark paint was dabbed on in dots; it's possible there is glow in the dark paint that has glitter in it."  

"The ironic thing was that as I was outside taking the pics, there were lots of real fireflies in my yard.  I'd say just use the jars to catch and release actual fireflies, rather than make a mess with this project!!!"


So...still no Fairies in a Jar, but between the three of us we have ogre snot, glow worms, and fun tea lights. That's not too bad, lol.