Showing posts with label For the Wardrobe. Show all posts

Wednesday, September 4, 2013

Bleach Blotches and a Pin Spin Save

What do you do when you see a t-shirt with a cute design, but you don't want to pay 24.99 just for a tee? What do you do when you have a specific image you want on a shirt but you can't find it anywhere? 

DIY

I love making custom shirts. For Girls Camp we did a super-hero theme, so I was trying to have super hero shirts for as many of the days as I could. I decided I wanted some sort of pregger super hero shirt, but I just didn't find anything that I really liked. So I printed off the Incredibles logo onto an iron on transfer, along with "Incrediboy" in a font I liked, and ironed that onto my shirt. It was a huge hit and was really fast, cheap, and easy to make (I don't have any pictures, or I'd show you). Your options with DIY design shirts are endless. Iron-on Transfers, bleach, paint, heat n' bond, etc. You can do just about anything! But...as with all DIY projects, sometimes one method may be more finicky than another. Katie learned this when she was making adorable shirts for her daughters. She ended up with a Pinstrosity at first, but kept persevering and found out how to get the results she wanted using another method. Here's her adventure:

The Original Pin
http://www.sixsistersstuff.com/2012/01/diy-bleach-t-shirt-tutorial-perfect.html
The link I gave with the Original Pin goes to the actual original tutorial by Six Sisters...this isn't the actual pin that Katie used. The pin that Katie had pinned had directions in the caption that she followed. The pin itself didn't actually link back to the correct site...or a site that even had this photo on it. It did however produce some, ahem, lovely pop ups instead. So lesson #1 today...be careful what you repin. Some people pin a picture, change the link to a spammy or dirty site, and then change the caption to make you think all is well...and it's not until 50 repins later that someone finally realizes they've inadvertently pinned a cute and seemingly harmless craft photo that really links back to porn. Check you pins Pinstrosipeeps...don't help spread these spam pins.

The pin she saw on Pinterest had this caption:
"DIY Bleach T-shirt. Put bleach in a spray bottle (70% bleach/30% water), lay your stencil on a shirt with some double sided tape, place cardboard inside the shirt so the bleach doesnt leak through and spray. Could take 20 min for full color effect. Rinse shirt in the sink then wash to get all of the bleach out. :)"

So that's what she set out to do. 

"I wanted to make ladybug tshirts for my two daughters, featuring their ages, for my youngest's first birthday party this weekend. My idea was to cut freezer paper templates (which came out amazingly cute for my lack of skills and a dull exacto knife). I had shirts ready, bleach in a fine spray bottle, and was all set - just had to wait two days for it to stop raining so I could rush outside and spray."


"Well. First, I sprayed and sprayed and the shirt didn't even look wet. So I got closer and sprayed more. Then I realized that the bottle was dripping big wet splotches all over the bottom part of the shirt. I gave up and moved to the 2nd shirt - which worked better, I just think I oversoaked it. I didn't even wait the 20 minutes; I gave the shirts about 8 and then realized that the splotchy drips looked awful, and this was probably going down. I rinsed the bleach out by hand in the tub, and then in the washer three times. The result:"

The Pinstrosity

"I didn't cry. I just laughed and laughed. And went to the craft store. I came home with this:"


Katie started over with her project, simplifying her design and cutting it out again. 

"I ironed the freezer paper soooo carefully, making sure every  single speck of edge was really stuck to the shirt, I sprayed as the can instructed, and ended up with a goopy mess. My husband recommended brushing the goop around a little, so I used a sponge brush and smoothed it out - and dabbed a little, to keep some texture."  

I have used this kind of paint before, and it is goopy and doesn't spray evenly. It's a little finicky to work with. 

"The can said to remove the stencil and then let dry for an hour. I was nervous to touch anything, but after about 3 or 4 minutes the paint started getting tacky, so I used the exacto knife to pick the pieces of my stencil off the shirt. The results were much happier!"

The Pin Spin:
"If I had managed to check the 1 year old's shirt and make sure I painted the design on the FRONT of the shirt, instead of the BACK (facepalm) then I'd be totally ecstatic. Instead, I'm just glad my baby has a chubby neck and no one will know that her shirt's on backwards. :)"

The bleached shirts can be hard to get to work satisfactorily, but we LOVE how the painted shirts turned out. Way to stick to it Katie! If you want some tips on how to make your own bleached shirts, Emilee did a post on that last year with her tips, tricks, and advice. Check it out!

Wednesday, July 24, 2013

T-shirt Skirts and Sewing with Knits

Anyone else love the schedule ahead feature on Blogger? I do. It's made posting all this week possible while I'm at Girls Camp and up north to be with my mom in her 4 week long (we're praying it's not longer) hospital stay. Technology sure is a wonderful thing. Until it doesn't work and then we curse the computer/phone/car as if it is "their" fault. 

Anyway...that really has nothing to do with today's post. I'll get on with it now. 

Sarah sent us in a Pinstrosity she ended up with when she tried to make a cute summer skirt for herself. Here's what she was going for:

The Original Pin
http://sewlikemymom.com/the-shirt-skirt/
Skirts made out of t-shirts! I love it. I'm thinking my growing belly needs one of these. There's still enough warm weather left here to warrant a skirt like this. 

The Pinstrosity
"While searching Pinterest for new project ideas, I saw this pin on turning t-shirts from Goodwill into skirts by cutting off the top of the shirt from the armpit up and shirring around the top. It sounded like a simple enough project, and something that even a chubby lady like me could wear, so I immediately headed down the street to Goodwill to scrounge through their limited supply of men's t-shirts. There were a couple that would have made cute skirts, but none of them were long enough for me. Since the pattern essentially turns the shirt into a tube of fabric, I figured I could just buy some knit fabric, sew it into a tube, and go from there. After all, how hard could it be to make a simple tube?"

"First I figured that, since the length of fabric I bought was the perfect length off the bolt (i.e. the 2 yards I bought, still folded in half from the way it was put on the bolt, was a good length for the skirt I wanted), I could just cut it in half lengthwise. I prewashed it, then cursed when I realized the crease down the middle had now disappeared, and my fabric refused to be folded flat again. My mom suggested just sewing it all into a long skirt, shirring it like I was planning, and then hemming it to the correct length. Which probably would have worked if I knew how to sew with knit fabric. She had to come over and help me, and we both flailed around for a while testing out my new sewing machine. We got the tube sewed to *about* the length I wanted it, then tried to shirr the waistband... only to have the elastic thread bunch up in the back. We ended up with a hole in the fabric from cutting away the snarled elastic. At this point I gave up, and now I've got a pile of violently bright aquamarine knit fabric taking up space in my craft closet."

"No photo, sorry! I didn't really have any good opportunities for pictures, and all you'd see is a pile of fabric anyway."  -Sarah

Sewing with knits can be a pain in the tushy (why do we just say pain in the neck or pain in the butt? Why not "That was a pain in the clavicle!" or "That was a pain in the armpit!"...really?). As a beginning seamstress myself, I haven't had much experience with sewing knits and my usual library of sewing information is sitting in a hospital bed right now, so I don't want to bug her. So I turned to Google for answers and found three really great articles with lots of great tips on sewing knits. They have tips for needles, for stitch types and lengths, for how to cut the fabric, how to wash it, etc. So if you're going to be working with knits and you're not too experienced in that area, check these out before jumping into your project:

http://prudentbaby.com/2011/09/by-craft/how-to-sew-knit-fabrics-sewing-with-jersey-101-2/

http://www.threadsmagazine.com/item/24079/tips-and-tricks-for-sewing-with-knits


http://www.denverfabrics.com/pages/sewinginfo/hsc-sewing-hints/sewing-fabric-knits.htm


Happy sewing!


Tuesday, July 2, 2013

Shrinky-Knives

I may or may not have just crawled out of bed. I'd apologize for my laziness this morning, but I'm not really too sorry, lol. Everyone needs these days every now and then. We spent the day yesterday with my sister, Cameron's brother, and their kid (a set of sisters married a set of brothers...our family tree is interesting) down in Tucson, AZ and had a marvelous time. Why we chose July to go to Tucson, I have no idea. But despite the 113 degree weather, we had a blast. If you ever have the chance to go to the Arizona-Sonora Desert Museum, take it! It's fantastic. Even for those of us desert rats who reside in the desert already, it's fantastic. Just one thing about it though...if you go during the summer hit it early in the morning or go for their evening hours. It was still totally worth it mid-summer-day though. Had we been smart, we would have done what my friend in the Phoenix valley did the other day and left at tray of cookie dough on the dash of the car and had hot, fresh baked cookies to eat when we got done (no joke, she did that and it worked). Or maybe we should have tried today's Pinstrosity in the car...it definitely got plenty hot in the car while we were at the museum. 

The Original Pin:
http://shellesplayschool.wordpress.com/2012/07/
Using the shinky-dink idea, Shelle decided to try using plastic cutlery to make art and ended up figuring out how to make plastic personalize bracelets from plastic knives. If you click on the link captioned in the above photo you can see more of her creations. 

Katrina one day was trying to figure out what to do with all the plastic knives she had kicking around, so she got on Pinterest and finally hit on Shelle's idea above. Seemed perfect! She said, "So my 12yr old daughter and I started markering up all these plastic knives...we took almost 2 hours.....and imagining who we would give them too, if we could sell them at a craft fair....and just thinking how much attention we were going to get for being SO STINKING CREATIVE!!!! We planned some colors on the knives, that would match some outfits we would have!!!!!! LOL "

The Pinstrosity

Rather than curling, their knives mostly just shrunk!  Katrina's daughter worked to salvage the situation by saving some of the now mini-knives to use as cheese or butter spreaders, but there were definitely no bracelets. 

It's hard to say just why there was no curling. First, the website does specify that you need #6 Polystyrene Plastic cutlery for this to work. Not just any plastic will do. Second, you need to make sure that your oven is fully preheated before you stick the knives in so they get a shock of heat immediately when you put them in. 

Since the knives didn't curl up on their own in the oven, one thing the original site suggests is to put on oven mitts and use metal tongs to carefully bend the knives as they are taken out of the oven one by one. Shelle's directions on this matter say, "When the bracelets look to be about the right size for the person who will be wearing them, the grown-up should take them out of the oven quickly using oven mitts.  Then, while they are still hot, the adult can shape the bracelets using the metal tongs.  The bracelets will probably be about the right shape already, but you will want to make sure the opening is big enough to slip a wrist through.  Also, if the edges did not curl in the oven, now is the time to curl them using the tongs." But, having played with melty plastic before, it is still easy to break the knives even as you pull them out of the oven, so be careful. Or on the other side, if the knife is really really melty, then you end up with melted plastic stuck to the tongs and the mitts (but you'd have to leave them in the oven for quite a while for that to happen).

So if you're in need of a some fun and cheap jewelry for you and your kids to sport at the 4th of July parades on Thursday, this may be a really fun craft to try out! Check out Shelle's patriotic bracelets made out of a spoon, a fork, and a knife:
http://shellesplayschool.wordpress.com/2012/07/
Give it a try and let us know how it goes! 


Wednesday, May 29, 2013

Tumultuous Torn T-Shirts

I love creating new things from old things that no longer serve their purpose. Marquette and I were just talking about that Saturday when we had a Pinstrositeers Day (it had been WAY too long). You all will get to see our creations from the weekend in Thursday's post!
I am super excited to show y'all what we made!
 
Well Nikki tried just that, making something new and fabulous out of something old and icky. Hers didn't end well however, check it out!
 
The Original
 
Unfortunately, the website is in German. I don't speak German (although I wish I did, anyone want to online tutor an awkward Irish lady?!). I tried Google translate but there are always going to be some language inconsistencies, the instructions were pretty close to exactly what the picture shows though. I should also add that the original blog had a few variations on this shirt and Nikki's is kind of a combination of them.  Here is Nikki's version!
 
The Pinstrosity
So what happened here?
 
I think the main problem here is that her first cuts weren't long enough, that would be step number 3 on the tutorial picture. Other than that I think it looks a little off center but not so much that I wouldn't wear it. If she were to try this again and correct those two problems I think she would end up with something much closer to the original picture, and hopefully something she would be happy with. With that being said I think this is cute, it's a little detail and she could even wear this without an undershirt because it's not too revealing and I think it would look cool and cute for a fun summer shirt! But that is just my personal opinion.
 
Anyone have any extra tips for Nikki?!
Let us know below!
Happy Wednesday Pinstrosipeeps!
I'm off to work on a special post we have for tomorrow! It's a joint post! I don't think we have done that before so stay tuned!!


Wednesday, April 10, 2013

Octo-Scarf

Many people feel that accessories make the outfit. I am one of those people. When I am having a low self-esteem day and I feel like absolutely nothing fits right I buy accessories instead of clothes, you're never too fat for a pair of earrings. The same goes for scarves.

 
 Hannah is a good big sister and tried to make a scarf she on Pinterest for her scarf loving sister.
This one looked so easy, but somehow it ended up looking like a dead octopus. Check it out!

The Original
 
This doesn't look too difficult and I like the look. The original site even has pictures and written tutorials.
 
First they have you cut straight across the top right before the sleeves start, then you cut tiny strips just under the half way up point, and pull on them slightly. If you are using a regular ole'  cotton t-shirt, they should give a little and lengthen out like seen above. Put over your head and voila!
 
Here is Hannah's take:
 
The Pinstrosity


Well it isn't a total tragedy.
Hannah said it just looked like a dead octopus, which I got a good laugh about!
 The scarf isn't exactly like the original, but I could possibly be fixed.
 
I see two main things here, first her strips aren't small enough. If she cuts them all in half, then pulls on them all a little bit more, she might get more of the look she is going for. Also, I think if she stretched out the part that goes over her neck she might be able to double it up when you put it on, and that too would give more of the final look we are going for.
She might even play with cutting them a little bit longer and seeing if that looks a little more like the original.
Other than that I would just suggest anyone trying this to make sure your strips are small, and that when you put it on your neck you like where it sits, if not stretch it to make it longer, or to be able to wrap it, or cut it and re-sew the seam to where you feel it will look best.
Thanks for your submission Hannah, let us know how the re-do goes!
 
Happy Wednesday Pinstrosipeeps!


Friday, March 15, 2013

A Picture Is Worth A Thousand Words....

**This post might show more skin than some are comfortable with, you see undies, but nothing more than what you would see at the beach. Just a heads up.**


It's Friday!!!
Today's post is of little words, I think sometimes a picture says all it needs to...and well this picture should give you a great Friday giggle :)
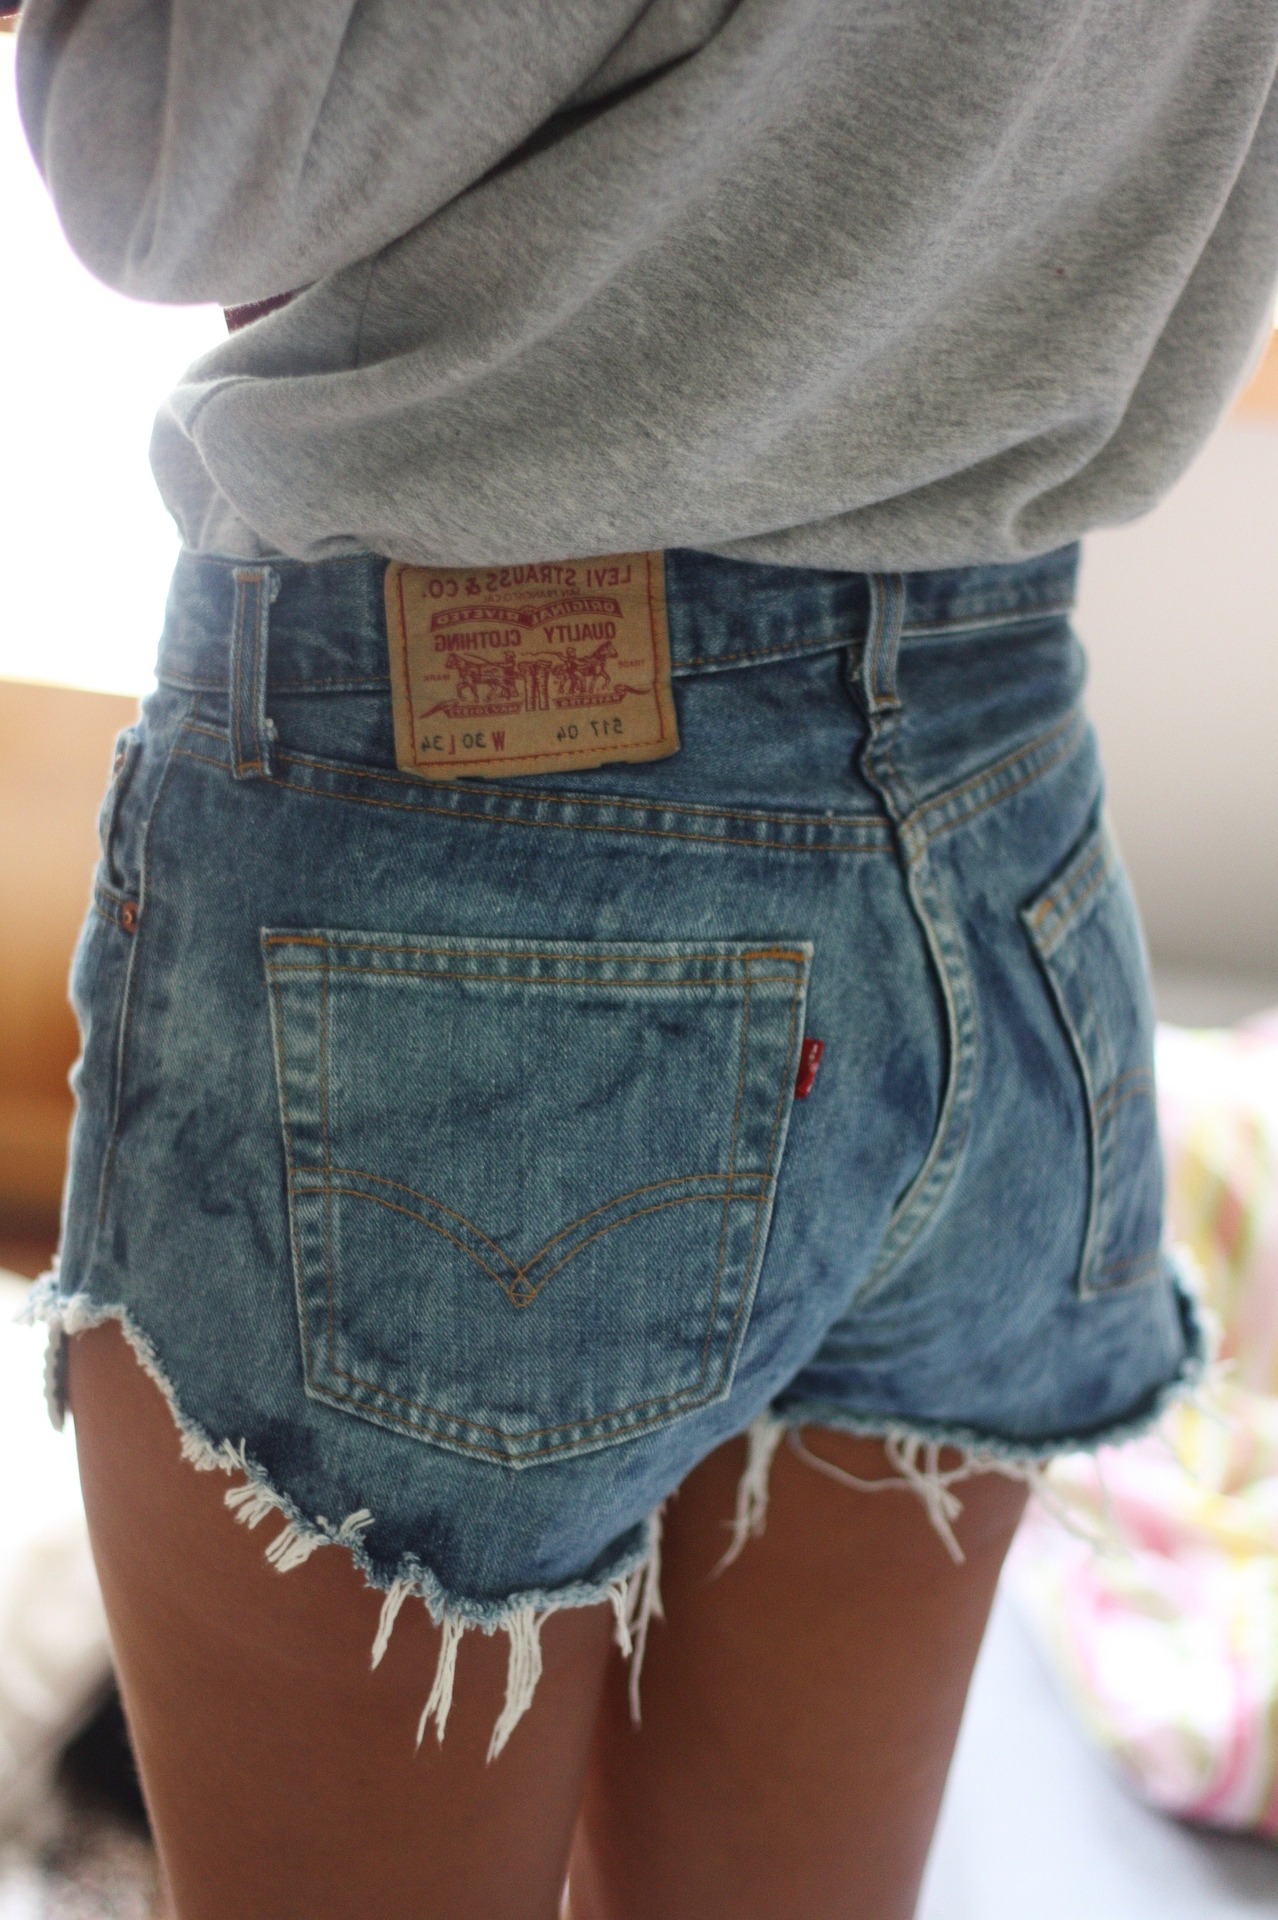
This pin is how to turn "mom jeans" into cute cut off shorts.
Here is what Lexie sent us:


The Original                                The Pinstrosity


Happy Friday Pinstrosipeeps!!


Saturday, March 9, 2013

Tomstrosity: Saving Shoes

Do we have any Toms fans out there? I know Em loves her Toms shoes. She wore a pair she decorated herself for her wedding:
http://marquettephoto.blogspot.com/2011/04/em-chips-wedding-part-1-mesa-arts.html
Toms and knock-off Toms are everywhere right now. Nearly every clothing store I've been in (including Wally World) over the past few months has had some sort of Toms style shoes. Recently we had our first Toms Pinstrosity submission, or as Kristin called it, the first Tomstrosity. Kristin had a pair of highly loved and highly used Toms that she wanted to repair and waterproof. In her search to save her shoes she found the following two pins. 

The Original Pins
 

originally from this blog (which is now longer not available): http://homesteadsurvival.blogspot.com/2012/11/how-to-waterproof-your-canvas-shoes.html
And here is how the combo ended up for Kristin:

The Pinstrosity


Kristin went and read the directions to see what was needed, but with the nearest good fabric store at least 2 hours away she winged it in places (story of my life). Here are her "tweaks" that she made while trying to fix the holes in the shoes:
  • "I didn't have an iron on patch, so I smeared glue on a small square of canvas and patched the hole from the inside."
  • "I didn't have anything with a hem that I was willing to cut apart, so I folded the edge of my canvas and used the glue to make a seam."
  • "I was paying attention to how to glue the fabric on the shoe itself, but the toes were harder than expected."
  • "Even worse was trimming.  Hers is super neat.  I swear I tried, but it just ended up raggedy anyway."
  • "She just glued, no sewing.  I just glued, and it's coming up at the edges now, a couple months later.  I sewed the worst part, but it was really tedious trying to sew through 2-3 layers of canvas with your hand inside a stinky shoe."
"So, I fixed my Toms.  I was happy.  Then it started to snow, and I stopped wearing them.  Then I started bringing them to work, so I could take off my snowboots and wear something comfy while I was just at the desk or walking around inside.  This was nice, until I became too lazy to change my shoes when I was just going to walk a little bit outside.  My feet were getting pretty wet. I saw the waterproofing pin and was like "Genius!"  I mentioned it to my outdoorsy friends and they were all "I use beeswax for waterproofing all the time," and let me use their tube of bee goo.  I'm still not 100% sure what the name of it is, due to the duct tape, but it said it was 100% pure beeswax.  I washed my shoes, getting the dirt off, but they were still pretty stained.  I waited forever for them to dry, then smeared the bee goo on.  My buddy said to use the hairdryer first to warm up the fabric, then smear on the wax.  It worked okay, but it was really slow going to switch between heating and waxing, and I was getting wax on my roommate's hairdryer.  For my second shoe, I smeared the wax on first, then heated it, and that seemed to work just as well."
"The wax definitely discolored my shoes, and left some waxy buildup on the surface of the toes that is just not coming off.  I'm thinking maybe you can't use these two pins on the same shoes, because the wax just didn't soak in very well where the fabric had been glued together."
"As for whether they're functional...they do seem at least waterproof-ish, but it's barely snowed since I waterproofed them.  They also got a significant hole in the back, so water leaks in there quite a bit.  I'm thinking about glueing another canvas patch on the inside, then maybe trying to cover the back." 
"Or maybe just calling it a day.  I'm starting to think the biggest failure of all is getting overly attached to an expensive pair of shoes that falls apart really easily.  (But they're so cute...)"

We all have that pair of shoes that we just don't want to get rid of because they are so comfy or cute or versatile, or our dog dug it up in the neighbors yard and we couldn't bring ourselves to take it back over to them. I've tried to fix dying shoes before and I just didn't have much luck with it. If fact, I'm wearing slippers that has a whole so big between the side and the sole that I can stick my hand through it (but somehow my feet are still warm), yet I don't want to throw them away yet. Shoe repair can be tricky with all the curves, edges, and materials. If you're trying shoe repair for the first time, definitely try getting the materials your directions call for. Then find a time when you have time to sit and carefully work on the project. 

As far as waterproofing goes, if you want a natural waterproofing job, beeswax really is the best bet. If you end up with chunks or funny textures after applying the beeswax you can try throwing them in the dryer for a few minutes to help melt the wax and get it soaked in. If you live somewhere warm (and where your shoes wouldn't magically disappear) you can leave them outside in the sun for a little while (obviously not for long amounts of time of the sun will really discolor your shoes). The more you can get the wax into the fabric of the shoe the better. If you don't care whether your waterproofing job is natural or not, there's a great waterproofing spray in the camping section for spraying down tents and canvases. We've used it on totes, shoes, tents, shade covers, etc. and it works great. Smelly at first, but effective. It may discolor your shoes slightly, but not horribly so. 

Saving your shoes can be fun, but it can be frustrating sometimes...especially if it doesn't work out in the end. Just remember Kristin's words to us, " I'm starting to think the biggest failure of all is getting overly attached to an expensive pair of shoes that falls apart really easily." 


Friday, March 8, 2013

Sharpie Nail Polish?!

Doesn't it seem as adults that we are ALWAYS busy?!
There is always something going on in our lives that makes it impossible to just slow down for a minute. Well that cam often lead to neglecting our nails for months or not getting your hair cut for the better part of a year.
We have all been there.
Yes even I, a hairdresser!!!
Well in an attempt to fix her long overdue need for a manicure Jean tried the "Shaprie Manicure". Now I know Sharpie can fix A LOT of things (it's the new duct tape!), but I'm not sure how it will do with fixing naked nails...let's check it out!
 
The Original
 
 
 This is a cute way to jazz up your normal polish routine that generally everyone has in their junk drawer. I like that the options and creativity with this are endless...Sharpie is ALWAYS coming out with fun new products and colors.
*It has come to my attention that I didn't specify that these are the metallic Sharpie markers, which are different than regular ole' Sharpies...sorry about that. I read the original blog post which specified that but it slipped my mind to mention it here! Thank you commenters for catching me on that!* 
How did Jean's turn out though?!
 
The Pinstrosity
 
 
Well it kind of worked.
 
Here is what Jean had to say about it:
 
"Overdue for a professional manicure, I thought I'd try the sharpie
marker French tip.  Some came out great. Others, not do much.  The
clear coat smudged the sharpie everywhere and in my attempts to
correct it, I ended up with a bumpy smudgy mess!"
 
 
Why did this happen?!
Well for starters I think it is good she started with the Sharpie on top of polish. I think it can be harder to get Sharpie off of your natural nail, and I think it looks better anyways!
 
According to the above tutorial you can get Sharpie off of your nail using rubbing alcohol. This is handy in case you mess it up. Now I'm not sure what Jean used to try to clean up her smudge that made it even more smudgie but I don't think it was rubbing alcohol.
One thing to be sure of is that your Sharpie design has dried completely before you put the top coat on.
Also when putting on the top coat don't rush and just throw it on. Take your time, go slow and don't put too thick of a coat on or it will NEVER dry.
 
Does anyone have any experience with this?! I am not much a nail art with Sharpie person, I generally just use polish or acrylic paints! Let us know!! I am sure we have some Sharpie lovers out there who would be willing to share their wisdom!
Have a bunch of tips and know how? E-mail them to us! We would love to learn more!
 
Happy Friday Pinstrosipeeps!


Saturday, January 26, 2013

Wellies!

I woke up to low gray clouds covering the sky, muted light, and the sound of rain on the roof...and it just made me smile. There are not many days like this where we live. The only thing that would make this better would be if they were big fluffy flakes falling from the sky (I'm not normally a fan of snow after New Years, but we haven't had a single good snow yet...so I'm good with a big snow before everything warms up for good). In honor of the beautifully rainy day, I thought I'd do two posts...a Pin Win and a Pinstrosity. First...the Pin Win. And, I found the perfect one for a rainy day, submitted from England. 

The Original Pin
IMG_5999
Picnik collage
http://www.styleyourlifeblog.com/2011/06/how-to-guest-post-beach-brights.html
Aren't those cute? I love them. I've never owned wellies...or rain boots of any kind. There just isn't much point here. My parents and brother now have them, but they use them when they go down to the barn to feed the calves. 

Deb saw this pin and knew that she needed these in her life. "I already had the wellies & the ribbon so that was ok, then had to borrow the eyelets & things to make the holes from my amazing DIY dad.  Did the borrowing, got the scissors out, realised I have absolutely no strength whatsoever & so had to take the whole lot back to my dads to sort out for me! By the way I'm 29 so clearly should have been able to do this myself!" 

The Pin Win

"I'm so impressed by how they've turned out & I completely love them! I guess though that this should be my dads pin win but I'm claiming it for myself!! Ps. He even had to tie the bows for me!!!"

I love seeing simple ordinary things spiffed up to add personality and character. It just warms my heart. These make me want to go find a puddle and jump in it. Today is going to be a good day, I can just feel it.

Come back later for today's Pinstrosity! And don't forget to check out our Pinstrosiversary Challenge and enter your project in!


Thursday, January 3, 2013

Shrinky Dinks!

Remember the Shrinky Dink fad in the 80's and 90's? 
photo from amazon
I remember. I was so jealous of my friend Jessie when she got a shrinky dink set for her birthday. Those things were the coolest thing ever. Everyone had them on their backpacks and their bracelets and they even made them into earrings. All the cool kids had them. Isn't it funny what is considered cool at the time? I wonder in 20 years what fads we'll be looking back on and laughing about. 

But back to shrinky dinks. They may not be as popular now as they were then...but they are still awesome. Draw on a big piece of weird plasticy paper, bake it, and it shrinks down to an awesome plastic wearable work of art...who wouldn't love that?! 

Elaine found a pin on Pinterest on making DIY Shrinky Dinks and sent us her results. 

The Original Pin
http://thefullmoxie.com/2012/06/11/diy-make-your-own-shrinky-dinks/img_0875/
Can you believe that is made out of this:
http://rustsunshine.blogspot.com/2012/04/shrinky-bracelet.html
Pretty cool, huh?! 

Elaine told us, "I saw this pin on Pinterest and had to try it! I wasn't going to make a bracelet per se but I thought about making key chains or cellphone charms. Overall, the thing worked and I am very pleased with the results but there were a few hiccups."
1. Image drawn in permanent marker before baking.
2. Finished product after baking at 250 degrees.
3. Finished product vs. original image that she traced from.

Elaine had to tweak the project slightly to fit her supplies at home...but we don't think these tweaks changed the outcome too much. She didn't have any Sharpies on hand, so she used some permanent overhead projector film pens she had lying around (I love that she had those handy). Also, she didn't have parchment paper so use found a pin with similar instructions which directed her to make a tray out of aluminum foil.

Here were her hiccups with the project: 
  • She says that rather than taking a few minutes to shrink, it took around 30 minutes to an hour. She says, " I kept checking back to see how it was doing. I can't tell you exactly how long it takes, but the OP is right that once flattens out after curling up and shrinking it should be done." I'm thinking here that if her caption on the photo Elaine sent us is correct, that her oven temperature was low by 100 degrees. The original directions say to bake at 350 and Elaine's caption shows she baked at 250. That would account for the difference in time needed.
  • The left side of her shrinky dink ended up with a funny little wave to it. "Kind of annoying seeing as everything else was straight. I think what happened was that I must have had the most minuscule dip or curve when I cut the original that when it shrank it became more pronounced."
  • She said she forgot to punch holes in the plastic ahead of time. "This wasn't the fault of the pin," she said, "I was just forgetful. Next time I will definitely punch them in ahead." 
  • She wasn't sure how small her art would shrink...she just kinda had to eyeball it. So before you set out to make your final finished product...test out how much shrinkage you'll have by doing a test run. 
Even with her hiccups, Elaine is quite pleased with how her project turned out. She says, "Over all, this is really easy to do. The plastic is actually pretty easy to cut with scissors. Next time I am going to see if I can do one picture, cut it up, and then shrink to make matching cell phone charms for me and my bf."

Thank you so much for sending us your results and tips Elaine! This would have been fun to put ornaments together for my tree for Christmas/New Years...I'll have to pin it for next year. 


Friday, December 28, 2012

Shoe Revamp Tips and Tricks

Not only does Pinterest have a slew of projects to start from scratch, recipes that you need to buy all new ingredients for, and projects that call for extremely precise material, but the projects I enjoy the most are the Revamps. The ones where you have this old table and you create a window seat out of, a shirt that becomes a hand bag, or nasty thrift store pair of shoes that become one of a kind party pumps!
I am all for a deal, and this project is just that.
 If I weren't hoarding new/used shoes that together make up the entirety of my heart and soul, which they do, I am a serious shoe whore, I give all of them a little lovin' I can never stick to just one, anyways if I weren't all of those things I would have (willingly) sacrificed an afternoon and a pair of shoes to test this out. But alas, the hubbs has our one working car at his work today, and I love all my size 7 babies too dearly to put one of them on the chopping block. If I did have the car today though, you could bet your lucky beans that I would be out thrifting for a new pair. 
I look forward to saving this one for another day though.

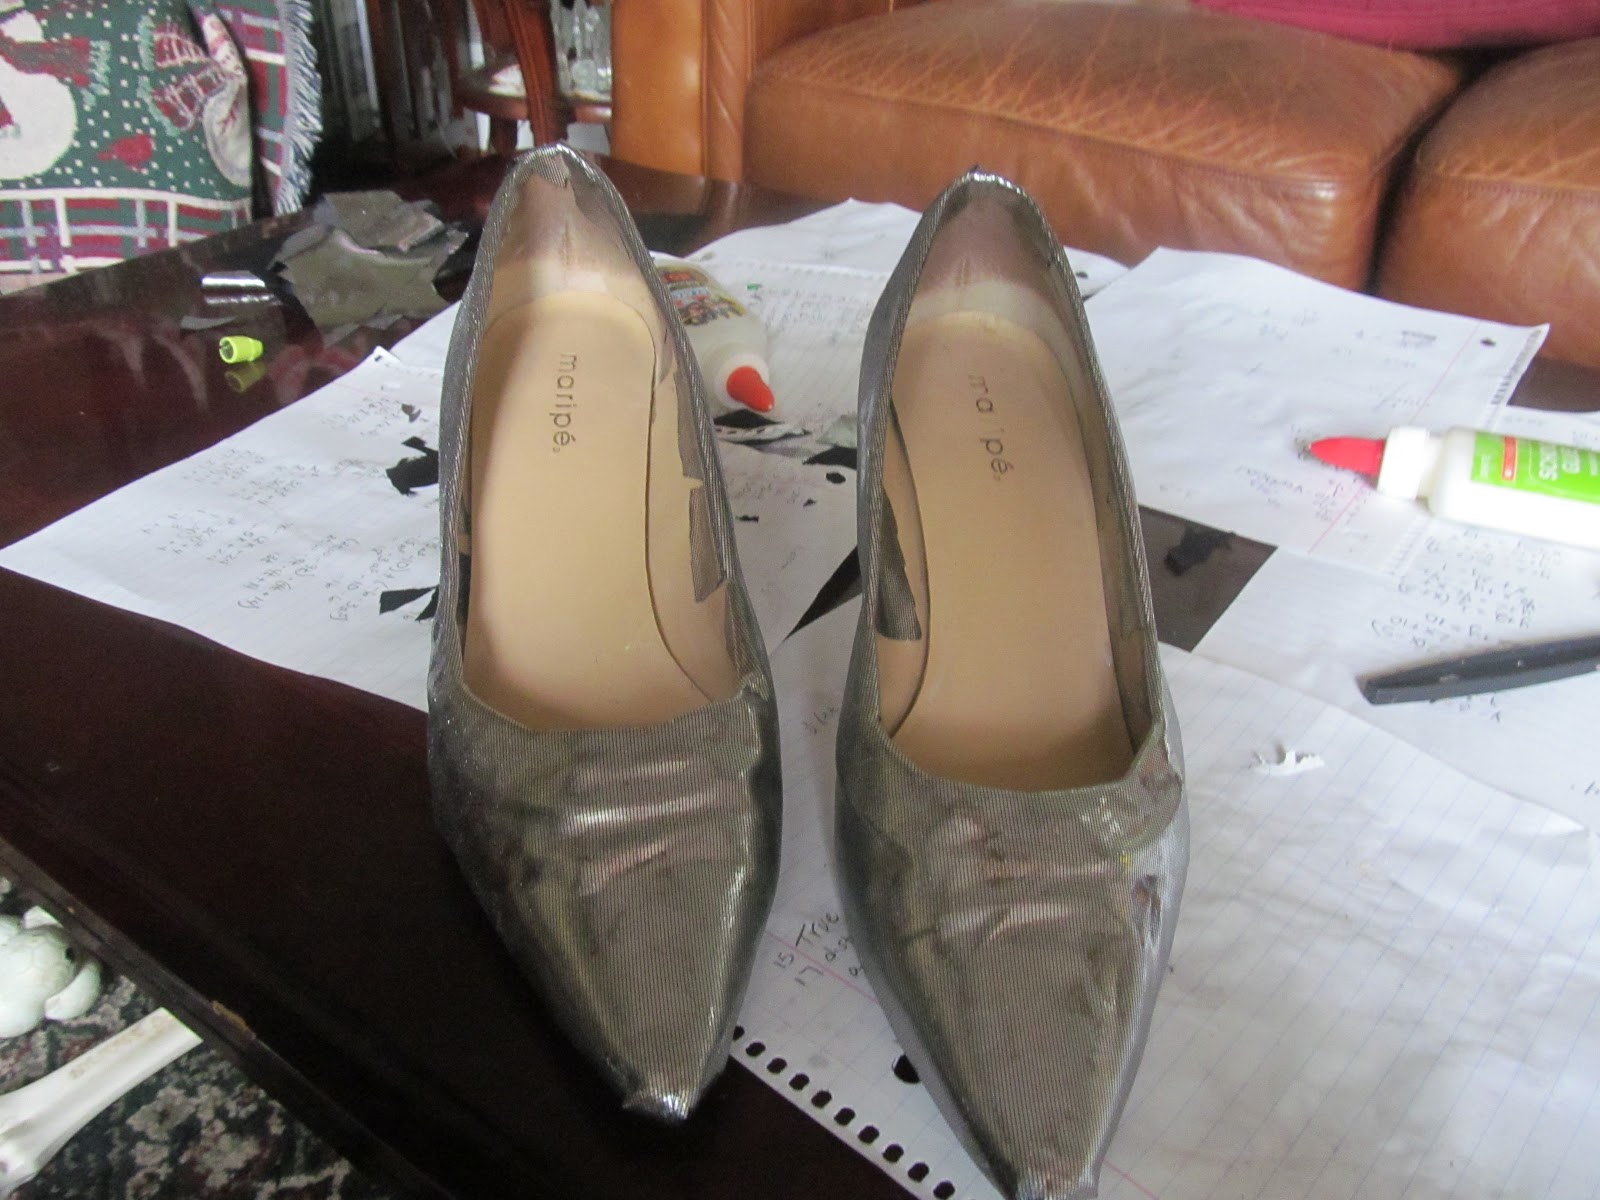
Here is Mandy's attempt at this shoe revamp:

The Original
Turning this...


Into this!
Both photos courtesy of : http://www.lovemaegan.com/2011/11/houndstooth-shoes-diy.html

Awesome right!!! Well Mandy's didn't turn out like she was hoping, and i think there are a few things that contributed to her $1 investements ultimate demise.

The Pinstrosity
The Before:
Can I just add that I love that she used old homework as her backdrop instead of newspaper? Stickin' it to the man!

The After:


So no, not awful, and I highly doubt anyone will be on floor level investigating your shoes for accuracy in the DIY department, however there are a few things to help this go a little smoother.

Fabric choice: The original (which I highly recommend you read through ALL of the directions if you are going to do this, Mandy did, and she still had some hiccups, the Love Maegan original tutorial is very good) blogger used cotton fabric. For any of our sewers out there,  you would recognize this glittery fabric that Mandy used as very difficult to work with because it is slick. It just performs different and can tend to bunch at seams and what not. So that is suggestion number one, use cotton. 

How much fabric: While the original blog doesn't give you an  actual total of amount of fabric that she used, but I would venture that she went ahead an got a good solid yard. That way if something catastrophic happens, you have more on hand right then. Also you aren't scrimpin' for extra if its 11pm, you are wearing the shoes in the morning too a wedding and you are out of fabric and JoAnn's is closed. Hey!Crazier things have happened, have you read this blog?!

Glue: The original calls for Modge Podge and fabric glue, but mostly Modge Podge. This is probably one of those projects where you just can't substitute unfortunately, seems that happens a lot doesn't it?  That may have been another problem that came up for Mandy, she used 50/50 glue and water, not such a good idea, next time hold out for the real stuff, it's easier to work with, it isn't too expensive, and you will know exactly how it will perform. 

I will say that this one looks like it is a bit time consuming (the original says that as well), but if you are really wanting to revamp those old 80's pumps, (which are back in style, so maybe hold out a few years lol) than I hope you have some patience.
Another thing to think about is pattern, if you do mess up on the shoe and need to squeak in a little extra piece here and there, you are going to have a heck of a time matching things up if you are working with say Hounds tooth,  Maegan is a brave and confident woman! So maybe practice before going all out!!! Especially if you REALLY love your one of a kind fabric and it is hard to find. 

Good luck Pinstrosipeeps! Has anyone had luck with this?! Any tips or tricks?!


Tuesday, November 20, 2012

Bungled Butterflies

I can remember my first origami book...it was a kit and book all rolled into one, with the paper, instructions and...well, that's it. What else is there to origami? I folded flowers and birds and weird things that no one could identify. I was on the origami kick for a few months, but then my interests jumped somewhere else. I'm still not highly interested in origami at this point in my life...nevertheless when I opened up Al's email I felt the origami sleuth rise within me (for some reason I don't The Origami Sleuth would ever make it to a super hero movie...or a comic book). Anyway. While I'm not big into origami at this stage in my life, or butterflies really,   Christmas is coming up and this idea could be used for some cute stocking stuffers for little girls. 

The Original Pin
Los vientos de papel tela baratijas mariposa
http://www.duitang.com/people/mblog/45948427/detail/
Al decided to try this out. She said, "I should have known better than to try a pin that wasn't in English, right? But this cute little butterfly looked so sweet, and the photos were so easy to follow! Uhm, at least up until the last step. Where it totally went to *pot*".

The Pinstrosity

"I tried doing it in paper rather than fabric, just to see if it would work (it looks like origami, right?) before chopping in to my fabric stash. I don't think that was the problem, though. Maybe I am just not seeing it, but there seems to be a huge step missing between those last two photos."

When you look at the directions, it really does seem like something is missing...until you stare at it long enough and dissect the picture. One more photo would have really helped to clear up the confusion with how to go from a yurt to a butterfly. So, I decided to break it down and show you how to get all the way through and (hopefully) end up with a butterfly at the end. 

The How To
First off, I found out you have to start with a rectangular piece of paper; a square doesn't work I found out. 
And...in the directions it shows the paper horizontal...you need it vertical to start with. Like this:

Fold your paper in half by folding down the top edge to meet the bottom edge (like my lovely butterfly paper? I didn't know what I was ever going to do with it-it came in a pack-but it worked out great for this). 

Then fold the paper in half again, folding the right edge over to meet the left edge. 

Now you're going to make the top 2 layers into a triangle. I found the easiest way to control this was to put my thumb down in between the first two layers and then have fingers up near the folded point. 

Holding the bottom layers in place with your thumb, push the folded pointer over to the right.

Align the center folds and crease the edges. 

Turn over the paper.

And make another triangle fold on the back. For this one I found it was easiest to again hold the bottom layers with my thumb and then to push the folded edge with my finger. 

And it just opens right up.

Again, align the centers and crease the edges. 

Next, lift the right flap...

...and fold it up. You want the top of this fold to go just slightly past the edge of the back layer (see my back layer peaking out there?). 

Unfold the triangle you just made. Those fold lines will make the next step a little easier, as it will give you a guide of where to fold. 

Using your thumb, push the triangle inward and refold along those lines that you just made with your previous fold. 

Fold along the lines you previously made...

...and then crease the edges. 

You're going to do the same thing with the other side now. 
Fold the flap up the same amount as the other side. 

Unfold. 

Fold the triangle inward. 

Next, take just the top layer on the left side and fold it up. 
Make sure that the corner of the piece you just folded up lies right on the edge of the layer behind it (see where my finger is pointing in the photo below). Crease the edges. 

Do the same thing with the other side. 

And there's your ups-side-down butterfly...

just turn it over and voila!

So Al, you actually just about had it! Hope this helped and didn't just add to the confusion. Happy Tuesday everyone!