Thursday, January 31, 2013

Mirror Mirror, on the Wall...

...who's the fairest of them all?  Not me today. I'm nearly at the point of shoving tissues up my nose, and that is NOT attractive.

I got all snuggled into my comfy chair in front of the computer this morning, all set to get to work; I have my blanket my aunt made me when I went to college wrapped around me, the electric heater at my feet, the phone nearby so I don't have to unwrap and dart across the house if it rings, Pandora serenading me, and my  store brand Dayquil just kicked in (I love when I can feel the exact moment it kicks in...doesn't happen often, but the times it does is fun). Everything seemed set for a warm and comfy sick day at home (if a sick day can be called comfy), and then I realized with horror as my husband drove down the driveway to work...he has my whole big bag of cough drops in the car with him. I guess I'm doing hot honey lemon tea all day today (ew). 

So while many people right now are looking through these pins on Pinterest...


...I am going through these pins:

They just aren't as fun or exciting as all the craft/cooking/clothing/photography/home decor/etc pins...but oh well. 

One thing I can be glad about (I'm reading Pollyanna right now and I'm finding myself thinking up the "glad game" every now and then) with a sick day though, before he left my husband told me I'm not allowed to clean the kitchen or do laundry or anything like that...I'm to "take it easy." Now I can ignore my pile of dishes and full laundry hamper, and I won't feel too guilty when I sit and sew, or sort photos, or whatever I decide to do in-between the detox bath pin I think I'll test and the lovely nap with vapor rub towels on my chest/neck. 

Wow. That turned into a long intro for today's post. Don't you love what your brain comes up with when you're sick? I started into all of that because now that I have a day off and I'm banned from housework, I can work on the projects I've got going on for Valentines Day for Cameron. We don't do much for Valentines Day, it's just never been a huge "holiday" with us. We switch off who is in charge of Valentines Day each year. Last year Cameron made fondue for us for dinner. This year it's my turn and I'd tell you what I've got up my sleeve but Cameron usually reads my posts and I don't want to spoil the surprise. We'll see if I can get it all done and ready in time...I'm starting to run out of time. Jillian, our fantastic submitter for today, has also been working on Valentines Day projects for her sweetheart and ended up having to send one to us (I'm sure you'll see one or two of mine here after Valentines Day as well).

Here's what Jillian was attempting:

The Original Pin
http://www.brassyapple.com/2010/08/cut-it-out-canvas-tutorial.html
While the original website shows instructions for doing the word art on a canvas, the caption on the pin on Pinterest said this: "Buy a mirror. Put letter stickers on it. Paint over the whole thing. Peel off stickers."

Jillian went the route of the Pinterest caption. Here's her story:

"I was trying to be creative and come up with a handmade but not tackily-girly Valentine's gift for my husband.  We're planning a trip to Paris, so when I saw this Mirror Print trick, I assumed I could make it manly enough to be appreciated, but use French song lyrics on it to make it personal."  

"I bought the mirror at the craft store, all of the stickers, and I painstakingly made sure I spelled all the French words right (and put the accents in the right places) as I worked to swirl the words around the mirror.  In the middle was a heart and '2013.'   I used acrylic paint and blotted it on top (with a sponge) so I wasn't dragging the stickers around and getting paint up under them.  I removed several stickers when the paint was still wet, but it didn't work well and it smeared a bit, so I decided to let it dry fully, worrying that when I tried to get the stickers off, the paint might pull up in big sheets and ruin it anyway.  Well, I predicted the future."

The Pinstrosity

Trying to find ways to fix her project, Jillian turned to the internet. "When I search for this, some of the other posts mention using spray paint instead.  Which is something that I did think of, but there was a lady sitting in the aisle in front of the spray paint so I just grabbed what was close.  Oooops!  If I were to try again with spray paint, I assume/hope my result would be more impressive.  Now I need 3 new sheets of stickers too (those French use far too many "u"s and "x"s)."

Spray paint will most likely improve this project and make it a little easier. If you don't have spray paint, or don't like spray paint, you can use an exacto knife to help cut out the letters and peel them up without pulling up all the paint, but it'll be pretty tedious. Whichever paint route you go though (but especially if you use acrylic paint), I'd use a sealer over the top.  

In my head, it seems like of lot of mirror "wasted" under all that paint, but I do like the idea of using a mirror. Now I haven't tried this at all, but I just had an idea...but I'm not completely sure how to make it work just right. It would be neat to use glass etching cream to etch the words into the mirror, and then have the rest of the mirror just be...well, a mirror. My first thought was to put the letter stickers down, spray paint over it, peel the stickers off, spread the etching cream where the letters stickers were, remove the cream, clean the paint off the glass and voila. But that sounds like a lot of work...and getting spray paint off the mirror would be a pain in the tush. Anyone without a sick brain see what I'm getting at and have an easier method? 


Wednesday, January 30, 2013

Upcycled Pinterest Trends

Today all creativity to write completely escapes me! So today I give you a post about my favorite Pinterest Trends as of currently...I know it might seem lame, but there are just days where writers block gets the best of me. My apologies, hopefully I can inspire you for our Pinstrosiversary Challenge which you can read all about in the link above! 
So get craftin' Pinstrosipeeps!
This post is also mostly stuff that you can recycle out of things you already have around, or that require very little to no supplies for you to buy. I love this because being a Environmental Sustainability Major, lately it's all I think about, so this is a great post to think about what you can craft with things you already  have laying around. Which we also talked about in this post

Emilee's Favorite (Current) Pinterest Trends 
(That Happen To Be Upcycled)

First up, Maps!
 My house is COVERED in maps, globes, anything that resembles the aforementioned objects. I LOVE them, currently I have four globes just in my living room, which seems like a lot, but I make it work no worries.
http://www.psbydila.com/sunday-faves-maps

http://homeandgarden.craftgossip.com/9-cool-map-crafts-projects/

http://dishfunctionaldesigns.blogspot.com/2012/01/global-recycling-old-globes-upcycled.html


Next Up: Upcycled Pallets as Furniture
 They are not only cheap but are easy to find, and then they aren't just thrown away. 
Awesomesause. 
http://www.interiorholic.com/decorating/handmade/on-budget-diy-bed-frame-ideas/

The one above gets installed in my house next week, I'm stoked! Pictures will be coming soon!


http://www.twigandthistle.com/blog/2011/05/diy-pallet-headboard/


http://10dollardiy.blogspot.com/2012/02/3-diy-pallet-bookshelf.html

http://ashleyannphotography.com/blog/2009/06/29/diy-pallet-reading-bed-for-the-nursery/

More Furniture out of upcycled wood, this time wood crates.
http://blog.stylizimo.com/search/label/My%20home

I actually had this one (above) in my house before I ever saw it on Pinterest, score! I used to work at a steakhouse and they got their corn in these type of crates, I asked my boss if I could take the empty crates home,which confused her..."You want the garbage?! To decorate your house?!" Hey, one woman's trash is another woman's treasure! And now they are in my living room! Free stuff rocks!


http://diy-vintage-chic.blogspot.com/2012/05/vintage-wine-crate-coffee-table.html

Corks are another recent popular trend... just like Marquette talks about here!
http://www.anthropologie.com/anthro/catalog/productdetail.jsp?id=25821570

I know this one (above) is with wood, but at first I thought it was corks,and I kind of love that idea! I am going to do this one soon too! This one is originally $300 or so bucks from my other lover Anthropologie  but with corks, which I can get here at the antique store for a gallon baggie for $3 I can do it for MUCH cheaper, especially since I would cut the corks into slices.

http://moxandfodder.com/2012/03/10/diy-wine-cork-chandelier/


So is this something you guys like?!
 Or is this just more of the same stuff you see on Pinterest...let us know! We love your feedback!

 Have you taken one of these pins and used it for inspiration like I have?! I LOVE Pinterest as a starting point, I see maybe one idea I like the feel of and then let my brain take off from there! Before you know it my house is covered in maps,pallets, peacocks, nautical themes, and glass bottles ( I don't have kids yet which makes this idea feasible for now) and all of it I either got for free, at thrift stores or at garage sales. I love it! 
**I would also like to mention ALL of these are pins from my personal boards,and I get a little territorial with my pins. I don't like the idea of having the  house next to me look exactly like mine, so the fact that I am sharing this with you means I love you all very much. Now that I think of it however, it feels stupid to feel that way in the first place, because it is on Pinterest and literally hundreds of other people have the same things on their boards. Sigh, time to let that worry go Emilee. You have more important things to worry about than silly Pinterest. Isn't it funny the things we can get caught up in?!**

I hope you all had a great Wednesday Pinstrosipeeps! Today was crazy for me which is why I am posting so late, but I should have one up Friday morning no problem! 
Don't forget to watch for Marquette's post tomorrow!

Tuesday, January 29, 2013

Lemon Puddle Cookies

Is there anyone out there who doesn't like cookies? Okay, that one person that raised your hand...you, there in the back...really? There's not a single cookie you like? There has to be one. For me...if it says cookie, I like it. Well...as long as it's not crunchy...then I like it. But give me a glass of milk for the crunchy cookies and I'm all set to go. I love finding new yummy cookie recipes, it makes me excited. We love cookies so much in fact that we don't hardly ever make popcorn for movies...we make a bowl of cookie dough and eat half of that and bake the other half into cookies. Mmmmm. (Yes, I'm well aware that we could get sick from raw dough, but I've got 25+ years of successful dough eating under my belt, I'm not too worried...it's worth the risk to me). 

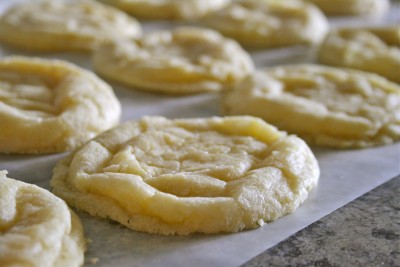
So one night we went to make our go-to Peanut Butter Cookie recipe, and we discovered we were out of PB. I had just created my Pinterest account and said, "Hey! I saw some cookies today that looked really good, I'll try pulling them up." So I found the pin for Lemon Crinkle Cookies, whipped them together, and threw them in the oven. When we pulled them out, they definitely did not look like this:

The Original Pin:
http://www.laurenslatest.com/lemon-crinkle-cookies/
But they tasted oh so yummy. Most of the time when I try something I found on Pinterest, I try to move the original pin to my "Pin There, Done That" board, and I give a little blurb about whether or not we liked it, and if it worked. Here's what I said about these cookies: "These are so dang good. So light and yummy. I'm sitting here eating them right now. Ours look different, but they taste great." This was pre-Pinstrosity days, so I didn't even think about taking a picture. There weren't pretty, and they didn't resemble the original cookies by any means, but they did taste good. 

So with that story...I was excited when we received an email from Ruby, who also tried these cookies out, and, just like ours, they didn't turn out quite like the original pin either. 

Ruby explained that the adventure didn't start off real strong as they had trouble with the butter. "We don't have a microwave in our new house, so to soften the butter for creaming in the first stage I put the bowl in a sink of warm water. It sorta melted more than softened, and refused to be 'light and fluffy', rather sad and a bit puddly." She forged on ahead though, being sure to follow the instructions as carefully and closely as she could. She got the dough all mixed up, but her concoction was less doughy and more...goopy.  She said, "It got to the end, and the mixture was fairly wet, not so much like cookie dough should be. My mum came in and said that it looked like it needed more flour, but me being quite stubborn I insisted that I'd followed the recipe and that they'd be fine! So voila, my crepe type biscuits which spread out completely." 

The Pinstrosity

"There are only a couple left though, because they're delicious despite looking like they've been sat on by an elephant!" 

We don't have a photo of how our cookies turned out...but they did look pretty close to what Ruby had there in her photo. Since these were just for eating at home, I wasn't too worried about how they looked, I was more worried about how they tasted and they were awesome. 

I'd love to take these to a party or deliver goodies or something sometime, so I went back through the comments to see if I could gather any great tips on what went wrong and what to do differently. I'm pretty sure the butter was the deal with ours (and maybe Ruby's). 

Real butter is my nemesis. It's either frozen solid, or a melted puddle. I can't ever get it room temperature. I've even sat and played on the computer for half and hour with a wrapped stick of butter under my arm to try and warm it up and it just doesn't (hey...we all do weird things when we're in the comfort of our own homes)! So I put it in the microwave and zap it for 4.3 seconds and it's a boiling puddle of burnt butter. So I use margarine a lot. I know, real butter is better to bake with usually, but we aren't speaking to each other right now. It sounds like Ruby had similar issues with getting the butter just right. When I made these I used margarine, and that was probably my biggest downfall with this, as I found out in the comments. 
http://www.laurenslatest.com/lemon-crinkle-cookies/

It's actually a little funny that Ruby and I had trouble with the cookies spreading too much, because most of the people who commented with troubles had the opposite problem (theirs wouldn't flatten at all). Ruby and I are just awesome like that. We're forming a club. Okay, maybe it's just an imaginary club, but it's a cool one. 

So I'm thinking the key here to pretty cookies (along with the awesome taste it already has) is to have your butter "just right"...too melted and it doesn't work, too frozen and it doesn't blend well. Too fake and it just doesn't work. Does anyone else have butter issues? I'm sure I'm not the only one. But if so, that's okay...everyone has to have a food nemesis of some sort, right? 

I think next time I try to make these, I'll plan way ahead (I never plan ahead with cookies...planning even 5 hours in advance is planning way ahead...we're just spontaneous cookie people) and leave the real butter out on the counter for a day before trying to mix these up. We'll see if that works. I'm also learning to do test batches (just baking 3-4 cookies before putting in a whole pan) so I can see if I need to try adding flour, changing the temperature, singing to my cranky oven, or anything like that. It does take an extra 6-14 minutes (depending on cookie cooking times), but I'm finding it to be well worth the time. I'm ending up with fewer wasted ingredients, fewer goofy batches, and more happy cookies! 

So give these a whirl, they really are tasty tasty tasty! 


Monday, January 28, 2013

Need Motivation?

Need some extra motivation to actually do all those awesome pins you have been saving away for months on your boards? Check out The Pinstrosiversary Challenge. You do projects (recipes, crafts, cleaning, organization, etc), link up your results, and you get entered in the drawing for some fun prizes. The more pins you try, the more entries you get in the drawing. I like this plan, don't you? 

Saturday, January 26, 2013

Cork Monogram Troubles

As promised earlier, here is today's Pinstrosity. But this isn't just any normal Pinstrosity...you get a tutorial as well. Well...sorta. You'll see. 

So corks are all the rage right now. Cork boards, cork birdhouses, cork trivets, cork earring holders (I even made one of those for a bridal shower once), but especially big right now are the cork monograms. Kristen found one on Pinterest that she wanted to try out and had some issues with it. 

Here's how she starts her story: "I decided today was a good day to shirk my housewifely/ mommy duties and get crafty! I have been looking for months at all those cute wine cork projects out there and narrowed down all my wine-o pins to this one.  It was simple, to the point and would probably take me as long to "craft" as the baby had left to sleep. PERFECT!! I wanted mine to be a little larger than the idea shown because, I just recently scored a cute black iron frame at a thrift shop that I wanted the monogram to be framed in on the wall. So I gathered my wine corks, hot glue, computer and camera (something told me it wasn't going to be as easy as I thought) and got started! First I clicked on the picture to get the "how to's and what for's", well all I got was a picture."  Sadly...that's all too common on Pinterest. You see a lovely pin, click on the picture and the link is dead. Great. Here's the photo she found:

The Original Pin
http://winerefrigeratornow.com/blog/wine-cork-letter/
So what do you do if that happens? Can you find the original source? Sometimes. Let me share what I do when I find a pin on Pinstrosity that does not link back to any site. Because of all the different types of computers and operating systems, this might be slightly different for yours...but here's what I do on my computer (I'll give you two ways to do this):

Method 1:
1. Pull up the photo you want to find the source for. 
2. Right click on the photo. Click "Copy Image URL". 
3. Open up Google Images (I have it pinned to my toolbar). 
4. You see that camera icon in the search bar? Click on it. 
5. Right click in the search bar and select paste (or just ctrl+v in the search bar). 
6. Click the "Search by Image" button. This is the screen you will see next:

7. You can click on the sites it brings up where it thinks the photo may have originated from, or you can click "All sizes" up there by the top photo. This brings up a new page with all the instances of that photo online, and usually the first photo on the list is the original. Now...this doesn't work 100% of the time, but it does pretty good. 

If you don't want to deal with copying and pasting the photo's url, you can drag and drop the photo straight into google images. Here's how:
1. In two separate windows (not tabs...tabs won't work), open Google Images, and the photo you are trying to find the source for. Have them open side by side. 
2. Drag and drop the photo you want to find onto the search bar. 


So, that's what I did to find the link to the photo that Kristen had pinned. Hope that helps someone out there. 

Okay, back to the story. 

Kristen took a look at her linkless photo and decided, "No problemo this is easy-peasy!" Oh how these crafts taunt us sometimes. She continues her story: "I started arranging the corks and even got a thumbs up on the 1st draft from the hubby! So jazzed! Then I started to think about how I was going to glue each individual cork together and still have it keep this awesome and completely symmetrical shape. Insert awake baby here. Coincidentally, here is where the project started to nose dive. I started gluing my heart out in between cries for hugs and cheerios. Lesson #1 Hot Glue and the actual cork corks do not mix. They do not hold AT ALL. The plastic corks did ok, but the overall shape wasn't doing well so I took it apart. So after nap #2 started I re-configured the letter onto a piece of cardboard, traced around it so I could glue the corks together AND to the cardboard for strength, took all the corks off (again...) found my industrial strength glue aaaaaand............... Quit. Folded, threw in the towel, flat gave up. Rather than potentially waste years of good wine drinking evidence, I stopped. There was no way this project would hold together on the wall. I have seen other variations where they used a wooden letter from a craft store, that would be better for a more consistent shape. We live 2 hrs away from the nearest craft tore, so maybe I will look into a wooden letter for next time."

The Pinstrosity

It's so frustrating to see the finished product in your head and not be able to get there. I decided to try this one out to see what I could come up with. I still had a bag of corks (which I found at our awesome Antique Mall) left over from making the cork earring holder for my cousin, and I've needed something to do with them. This was perfect. I pulled them out and got to work. I read through the instructions on the page I found and set to making my awesome monogram. Only there were a few bumps in the road. I'll show you what I did and how I finally ended up with the finished monogram. 

I save cardboard like crazy. It comes in so handy when crafting. This made step one easy: Find a piece of cardboard and draw the letter/symbol you want on it. Done. 

From there I arranged the corks over the top of my M. I was picky with the corks I used. I wanted them to all be the same height and I didn't want any of the red stained sides to show. 

After all the corks are arranged, start gluing them one by one. I know Kristen had trouble with the hot glue not sticking to the corks, but I thought I'd try what the instructions said first and go from there...so I used hot glue. 

Seemed to work just fine...at first. 

Keep gluing the corks in place, one by one. 

I got my corks all glued together and let them dry for 15 or so minutes and then figured I could move the monogram just long enough to hold it against the wall to see what it looked like. It crumbled. 

So I reglued all the pieces back together, but I knew it would just crumble again...so I had to figure out how to secure them. Here was my first idea:

 Over a year ago I saw this in the craft aisle and saw it was on sale and thought I could come up with some cool project for it. Well...I haven't come up with anything yet...so it was still sitting in my craft drawer. I thought I could make it work for backing for the corks. 

So I took out the center part, mixed three of my paints, and painted it turquoise/muted robin's egg/no-clue-what-color-that-is. 

I almost just glued the monogram straight to the painted board, but thought I should take a step back and see if I liked it first. 

Nope. I did not. Back to the drawing board. One of the many perks to being the daughter of a general contractor is that he gives us scraps from his construction sites for us to use in our crafting. A little while back he gave us a wad of wire in all shapes and sizes...I figured I could make this work. So I cut pieces to size and bent them into shape. I tried bending it into shape while pressing it down onto the corks and ended up having to reglue corks back together. Finally I got it all in the shapes I wanted:


I then ran a thick line of hot glue all along the back of the monogram and gently pushed the wire into the glue-stream. After it stuck, I went back with the glue gun and spread more glue along the sides of the wire, securing it more firmly to the corks. 


And it worked! I could then hang it on the wall without it crumbling! 
I even found a cork with 2006 printed on it...the year Cameron and I got married! I love happy accidents like that. 
 So there it is, by our entryway display (which isn't all that beautiful, I know...but I'm happy with it). 
If you read out last post, you might be wondering why we have 3 umbrellas when we live where it doesn't rain. I like umbrellas. And I used them for photography props once upon a time. For anyone interested, instructions to make your own watercolor portrait like the one we have hanging can be found at: http://growcreative.blogspot.com/2012/09/easy-watercolor-portrait-tutorial.html. It truly is an easy project, even if you aren't a painter at all. 
It took more work than I anticipated at first, but it wasn't too bad. I think had I done a thicker letter/arrangement, it would have held together a little better, but I didn't want a chunky letter. What methods do you use? Anyone have a better glue to suggest? 

Wellies!

I woke up to low gray clouds covering the sky, muted light, and the sound of rain on the roof...and it just made me smile. There are not many days like this where we live. The only thing that would make this better would be if they were big fluffy flakes falling from the sky (I'm not normally a fan of snow after New Years, but we haven't had a single good snow yet...so I'm good with a big snow before everything warms up for good). In honor of the beautifully rainy day, I thought I'd do two posts...a Pin Win and a Pinstrosity. First...the Pin Win. And, I found the perfect one for a rainy day, submitted from England. 

The Original Pin
IMG_5999
Picnik collage
http://www.styleyourlifeblog.com/2011/06/how-to-guest-post-beach-brights.html
Aren't those cute? I love them. I've never owned wellies...or rain boots of any kind. There just isn't much point here. My parents and brother now have them, but they use them when they go down to the barn to feed the calves. 

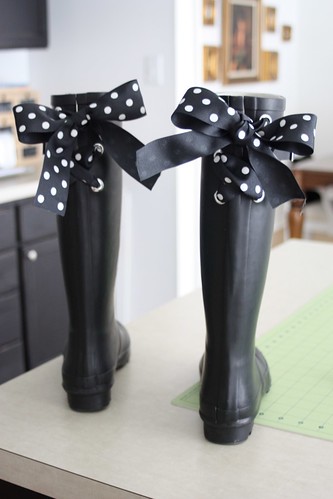
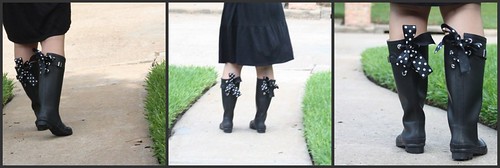
Deb saw this pin and knew that she needed these in her life. "I already had the wellies & the ribbon so that was ok, then had to borrow the eyelets & things to make the holes from my amazing DIY dad.  Did the borrowing, got the scissors out, realised I have absolutely no strength whatsoever & so had to take the whole lot back to my dads to sort out for me! By the way I'm 29 so clearly should have been able to do this myself!" 

The Pin Win

"I'm so impressed by how they've turned out & I completely love them! I guess though that this should be my dads pin win but I'm claiming it for myself!! Ps. He even had to tie the bows for me!!!"

I love seeing simple ordinary things spiffed up to add personality and character. It just warms my heart. These make me want to go find a puddle and jump in it. Today is going to be a good day, I can just feel it.

Come back later for today's Pinstrosity! And don't forget to check out our Pinstrosiversary Challenge and enter your project in!


Friday, January 25, 2013

I'm Not Laughing Taffy...

Does anyone love Laffy Taffy as much as I do?! I LOVE Laffy Taffy, it's one of those foods where I say "Oh i just want one...", and then I end up eating every single one, minus banana. Anyone want my leftover untouched banana Taffys?! Gross. 

Maribeth seems to like taffy as well and she decided to try a recipe she saw on Pinterest (Famous last words... "I saw this on Pinterest!"). 

Here is her Pinstrosity!

The Original
http://www.dvo.com/newsletter/monthly/2012/august/funtimes.html?CID=aug_news12

That looks sooooo good right now! Of course I don't have any on hand, so I will just have to salivate over virtual taffy instead. Bahumbug.

Here is Maribeth's version:

The Pinstrosity
Here is how it started, so far so good...

Then this...

Then this...

Here is her bleeding heart Taffy. :(
It really does kind of look like a heart! 

So no it didn't work...and why not? Let's break it down.

According to the directions, you are to use a candy thermometer, however Maribeth didn't have one, so she used a meat thermometer instead. This would definitely have something to do with her sad taffy. She also said because it was a meat thermometer, she feels that she was unable to read the temperature as accurately. 
She then explains that it also cooked too long, and ended up looking like glass.
as soon as she touched it it turned to gunk, (the second picture), and she was unable to pull it. 

Let's start at the thermometer. There is a difference between a meat thermometer and a candy thermometer. One intended for meat is metal, and will range from 0-220 degrees (Farenheit). Whereas a candy thermometer is glass and will range from 40-440 degrees, quite a difference huh?!
The boiling point of candies is usually higher than 220 degrees (Fahrenheit), therefore a meat thermometer really won't do the job, especially for this recipe where if you cook the Taffy too long it ruins it. 

There is always a chance also that even if you are using a candy thermometer it could be inaccurate. To test this follow the directions seen here. It might be good to test your candy thermometers every once in while so you don't ruin Grandmas famous divinity right before a big family event...yes let's avoid that please!

One thing to remember when making candies, or fudges caramels anything like that is that the temperature is key. Any deviation at all will almost always end in a mess, I think that is exactly what happened here. 

Based on the comments from the original site, it looks like this is a really hard one to get just right. A lot of people had trouble with this.
 Growing up on the side of a mountain had its drawbacks with candy making, where we lived we had an elevation of 7,300 feet. The elevation has some weird effects on candy making, like divinity or caramels. The weather can also play a part, which sounds strange but is true!
If the air is too dry, or too humid is can really take a toll on your foods, so that is another thing to consider in this Pinstrosity. 

Has anyone had success with this recipe?! Or have any ideas for Maribeth?! I think it was a valiant attempt  but I would suggest next time, watching that timer, and the candy thermometer closely for better results!
Happy Friday Pinstrosipeeps!


Thursday, January 24, 2013

Houdini Yarn

Does anyone else ever go in crafting/project phases? I'll be really into sewing for a while, then I'll go to bird watching, then painting, then to card making, then to shooting glitter cans, then to underwater basket weaving, etc. I'll usually revisit crafts and projects later...but sometimes it takes a while to circle back. There are so many unfinished projects around my house. A recentish phase was the crochet phase. I have a drawer stuffed full of yarn. I started off buying the really cheap yarn...but I found quick that I didn't really like it. But it's cheap...so I  bought it anyway. So now I have a drawer full of yarn I don't like that I have to figure out what to do with (especially now that I'm entering into a knitting phase...never thought I'd ever in my life say that). This Pinstrosity submission was right on time...only I hope things go a little different for me. 

The Original Pin
http://agirlandherneedle.blogspot.ca/2012/03/soften-scratchy-yarn.html
Genius, right?! I'm definitely going to give this a try. Takami saw this and decided to give it a go (way back in September...that seems so long ago now) so she'd be ready to crank out the Christmas gifts. Luckily she found yarn on sale and grabbed it up and ran home. She says, "I quickly scoured the house for some laundry bags, shoved the yarn inside, and put it in the washer. About 25 minutes later I opened up the top to find this:"

The Pinstrosity

"I have no idea what happened, the zipper broke on one of the bags but I still have no idea what happened to the other bag or how the yarn managed to push its way out. I wasn't too worried since I only spent a couple bucks on it so my sister and I decided to have fun with it."


One could argue that the yarn is still usable if it is untangled...and they would be right. Unless my life depended on it (or if the yarn was made of gold or something like that), I probably would just chuck it out (or maybe stuff a pillow with it?) and start over again. But...the yarn definitely looks soft and fluffy...so that part worked. 

I've had issues with those lingerie laundry bags and their zippers before. They don't work fantastically well. I started safety pinning it closed with a giant safety pin (almost the size of a diaper pin, but not quite). This keeps the zipper from opening. Now...how the other skein did its Houdini act...that beats me, but it's funny. I'm so glad you girls have a great sense of humor!