Wednesday, May 29, 2013

Pintester Movement

Emilee and Marquette here! Duo post, yea!!! Earlier this month we got an awesome email inviting us to join in the first ever Pintester Movement. What is the Pintester Movement you ask? Sonja asked us each to find "a Pinterest pin or some kind of project you've had on your Someday list for a while. Maybe it's slightly beyond your skill level, or maybe it involves a power tool you're scared of, or maybe it's a recipe that uses the dreaded candy thermometer...", but the idea was to finally do something we've had pinned. We were all over that. Why? Because that's kinda what we're all about! We're always telling you to get out and try your pins...and now there's a movement you can join to do just that. 

So we jumped on this right away. We knew it was going to be an adventure (any crafting/cooking experience in our lives turns into an adventure). We both turned to our Pinterest boards to find the project we each wanted to do. Emilee narrowed it down to 4 pins:

Marquette got it down to four as well...fourteen that is (making decisions isn't quite her forte):

Comparing boards we saw there were some similarish pins, so we thought we'd make an awesome girls day/crafting extravaganza. We'd each do our lamp shade pin, our panel painting pin, and then have a yummy Pinterest inspired meal to end the day. It was going to be epic, awesome, and uber productive. But, as Emilee describes it, "these escapades hardly go as planned". We spent the morning perusing thrift stores and Walmart for our final supplies, took our sweet time with a nice sit down lunch, and meandered back to Em's place to whip together our projects. We weren't in a hurry. How long could these take? Oh boy.

Em's Saga:
I decided to start with my lamp shade pin. You see the lampshade we currently have in our house is in desperate need of some help...
Water stained from when our house flooded, and cracked from the move...I LOVE the base (it was my grandmothers) and so I have just been waiting for the right opportunity to spruce it up, and this seemed like the perfect time!! Well Marquette and I took a trip to our good ole' local Wally World and I found absolutely NO fabric or paper that I liked to redo this lamp shade (which means a trip to Hobby Lobby and JoAnn's is inevitable in my future...oh darn). When I researched the original lampshade pin, I found out it was an art piece made solely of paper! No instructions or anything like that were included, so it was probably best that I didn't attempt that pin that day. 

So I moved to the next project on my board that spoke to me, the peacock canvases! Love these!!

 I did find what I needed at Wal-Mart, however they only had two canvases of the size I liked, but I was sure I had one of that size at home...I am a bit of a canvas hoarder.
These are only some of them...I have an addiction.

So I get to looking at the sizes and realize I don't have what I need. So Marquette and I start brainstorming, because another trip to Wal-Mart is out of the question and I had bought the last two of that size anyways. *le sigh* 
I end up having three matching canvases of the XXL size but I'm not sure I want a single peacock feather to be 3 1/2 feet tall, I just don't have enough duct tape sheets for that!

If you are wondering what I mean by that let me explain my improvising. The original peacock canvases were made using a vinyl cutout machine, like a Cricut or a Silhouette. The vinyl sticker is laid on the canvas, painted over, then the sticker is removed and voila! But I unfortunately don't have one of those so I had to get creative. Fortunately Wal-Mart sells duct take sheets now which are 8x11 inches and which were perfect for this! I figured I would attach them together, draw my image on the back, cut it out and voila! My very own custom peacock feather!

I did not however have enough sheets to make a 3 1/2 foot tall peacock feather (although looking back now that would have been amazing!).  So I decided to make three canvases, using the same peacock "stencil" on each and paint them each one of the following colors: dark purple, navy blue, then teal for a ombre effect. This way they all look cohesive, I only have to draw and cut out one stencil, and I don't have to worry about a gorilla sized peacock feather.

But this meant I would have to salvage a board I had used for another project.
(The above picture was a project I did around Christmas, with the two below being my inspiration for the project.  We ended up updating the room with a  giant map tapestry and I haven't decided what to do with all the canvases yet, so they have been stuck in a  corner for six months till now!!)

I used my large center canvas ( the C G E one), repainted over it white, and got down to the nitty gritty. I gathered my materials, and combined my duct tape sheets...

Next I painstakingly happily drew my peacock on the back of my combined duct tape sheets...
...and cut it out on a cutting board using an Ex-Acto Knife.

Here is what it looked like all cut out! Remember whatever you draw on the back will be backwards when you flip and stick!! At this point I had already put my base glitter gold spray paint (a shout out to my sweet husband who ran to Wal-Mart after work to get me more glitter spray paint!)on the canvases and had let it dry. This will be the color that the actual feather will be when it was all said and done.
  
I placed the stencil on the glitterific canvas after pulling the paper backing off my cut out stencil:

And then sprayed my over color on top!

Then when it is all dry you slowly peel the sticker off. Looking back I would have split the sticker into three or four sections and then pieced them together on the canvas. Getting the original backing from the duct tape off was a nightmare and I spent a good hour un-sticking the duct tape from itself.  By the time I got to the third canvas I had split the sticker into four pieces, and upon removal from the previous canvas I put the pieces on wax paper to keep it flat and untangled. I HIGHLY recommend this from the get go! See below!

Here is the final result!:
All three just finished. Hello toes!
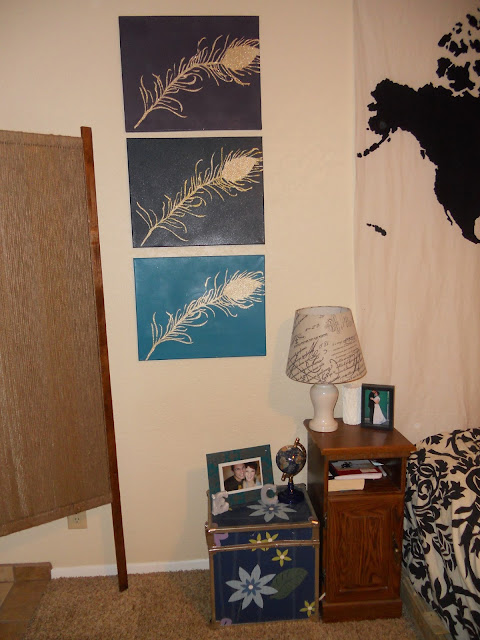
In their final place! I love them!! They match the style of our room perfect and were just the right size for the space!
And here is what I looked like after 8+ hours of Pinterest Crafting...

 So there you have it! I stared off needing a new lampshade and ended up with three peacock canvases that look nothing like the original pin. Such is the story of Pinterest!

Marquette's Saga:
For my first project that day (oh I had grand and deluded plans for the day) I decided I wanted to tackle the lamp shade pin from mymistermischief.blogspot.com that I have had on my board for forever (I figured I'd have time to whip this out and then start on my panel painting idea, as well as try the new recipe): 
Before, I didn't really have anywhere in the house to put a lamp shade like this (even though I love it!), but now that I get to set up a kid's room I knew this would be perfect!

 I already have a bag of orange and blue fabrics and fabric remnants, all I needed was a lamp shade. Unfortunately, all the lampshades I have are round and only have 2 or 3 support rods, which would make for a really weird looking rag lamp shade. So I knew I'd have to find something else. Rats...that means a trip to the thrift shops and antique stores down town. Oh it's a rough life. The first store we came to had the perfect lampshade..and it was only $5. Major score!
I almost felt bad when the lady at the register said, "Isn't that beautiful?! That'll make any room elegant." I didn't have the heart to tell her I was taking it home to tear it up. I think the most fun part of the whole project was the 5 minutes it took me to go from the above picture, to the one below:

Little did I know I still had roughly 7 hours to go on this project. Although the original pin had the fabric scraps in no particular order, I knew I wanted to have alternating "panels" of orange and blue. I thought it would look cool to have the fabric strips running vertically instead of horizontally, but then I knew I'd lose some of the shape. So I tied a horizontal framework of fabric to hold the vertical strips in shape...
And it looked awful. I didn't take into account that the top section is way smaller than the bottom section and that I'd have to either super crowd the top or way space out the bottom. Not to mention I didn't realize I'd have to weave some of the strips to get the shape I wanted. I wasn't happy. So I cut the framework off and went on to plan B: doing the pin how the original tutorial suggested. 

But I didn't like that either. I didn't get a picture of this...but because there are so many "sides" to this lamp shade, as opposed to the 4 in the original pin, the tied ends ended up dominating the lamp shade and making it look way more messy than I wanted. It just wasn't it. So I had to come up with plan C, and this one finally worked. 

I wrapped the top wire in an orange fabric strip to hide the metal, and then I attached a fabric strip to the top of each wire post (alternating between orange and blue). 

The idea of the project here is to wrap the fabric strips back and forth, zig zagging down the side of the lamp shade. I found it was easiest to work in rows, rather than columns. If you want your fabric to look like it's all interwoven, here's the easiest way I found (but this isn't easy to figure out how to describe it...I hope this makes sense). Take your first fabric strip and wrap it once around the wire post to the right of it, going from back to front, and secure it to the top wire with a clip. Do the same with the next fabric strip to the right of the one you just wrapped. Continue until you have done your first wrap with each fabric strip. Then, you start with your first fabric strip and wrap it back around the post to the left (the first post it was attached to), and clip it to the top. Do the same with each fabric strip. Continue zig-zagging the fabric strips back and forth. Tie on extra strips as more length is needed. 
Clear as mud? Yeah...it was kinda a pain in the butt to figure out, but that's how it ended up working the best. 

So I sat there and wrapped fabric strips over and over and over again, while Emilee sat and peeled duct tape off of everything:

Finally though...after nearly 8 hours of working and reworking the project I ended up with this:


I wasn't sure I liked it at first...but never judge a project at 11 o'clock at night. It looked way better in the morning and it's really come to grow on me. I love the huge splash of color it adds to the room. I did try putting the shade on a white base, but the orange base truly does look better. Good thing I LOVE orange! 

Needless to say that was the end of the day. While we only got 2 of the 5 intended projects for the day done, we still see it as a huge success. These projects took FOR-E-VER, and we had to struggle through them, and even though they didn't turn out like the originals, we love them. Best of all...we now each get to move a pin off our regular boards and onto our "Pin There, Done That" boards...and that was the whole point of this! 

So now it's your turn! Get out there pinners! Try something you have been putting off! We finally got off our butts and we LOVE the results of the projects. When you finish your projects send them our way and we can do a compilation post! Good or bad, finish your pin and let us know how it went!

Be sure to head over to Pintester.com to see all the great projects linked up for the Pintester Movement!

Tumultuous Torn T-Shirts

I love creating new things from old things that no longer serve their purpose. Marquette and I were just talking about that Saturday when we had a Pinstrositeers Day (it had been WAY too long). You all will get to see our creations from the weekend in Thursday's post!
I am super excited to show y'all what we made!
 
Well Nikki tried just that, making something new and fabulous out of something old and icky. Hers didn't end well however, check it out!
 
The Original
 
Unfortunately, the website is in German. I don't speak German (although I wish I did, anyone want to online tutor an awkward Irish lady?!). I tried Google translate but there are always going to be some language inconsistencies, the instructions were pretty close to exactly what the picture shows though. I should also add that the original blog had a few variations on this shirt and Nikki's is kind of a combination of them.  Here is Nikki's version!
 
The Pinstrosity
So what happened here?
 
I think the main problem here is that her first cuts weren't long enough, that would be step number 3 on the tutorial picture. Other than that I think it looks a little off center but not so much that I wouldn't wear it. If she were to try this again and correct those two problems I think she would end up with something much closer to the original picture, and hopefully something she would be happy with. With that being said I think this is cute, it's a little detail and she could even wear this without an undershirt because it's not too revealing and I think it would look cool and cute for a fun summer shirt! But that is just my personal opinion.
 
Anyone have any extra tips for Nikki?!
Let us know below!
Happy Wednesday Pinstrosipeeps!
I'm off to work on a special post we have for tomorrow! It's a joint post! I don't think we have done that before so stay tuned!!


Tuesday, May 28, 2013

Ointment Straws

Don't you love going on vacation and reaching in your bag to pull out your hairbrush only to find that you are now the proud owner of an over sized, pre-pasted toothbrush? Not to mention the clothes that are now soaked in shampoo. How about those hikes when you reach in your bag to pull out your awesome sandwich you've made for lunch only to find it slathered in first aid ointment...even when the ointment and sandwich were in two separate ziplock sealed baggies. That's always a happy discovery. Blech. 

Sarah was thinking ahead and decided to prepare for their travel adventure and set out to fix the problem. She found a pin all about preparing one-time-use packs of ointment, toothpaste, or whatever. 

The Original Pin
(I'll get to the source of this photo in a minute...it's part of the Pinstrosity, so keep reading). 

The caption on the pin she found said this, "Use straws to bring small amounts of toothpaste or lotion with you on a trip. Cut and burn the edges to make tiny sealed containers for things you may not need a lot of."

Sarah thought this was genius and got working. She said, "This seemed like a really cool idea for travel! The instructions didn't specify how long to cut the straws, whether or not to hold the straw in the actual flame or not, or if you had to pinch the ends of the straw first. So I thought, "Hey, this seems easy enough, I bet I can figure it out!" I cut the straws about 2 inches long, and started to burn the ends together."

The Pinstrosity

"I held the straw directly above the flame, but instead of the ends sealing together, they started to open! Basically what I ended up with was half melted, still open straws. I didn't even attempt to put any toothpaste inside, but I'm sure it would have been even more pinstrosity-er."

Not so helpful for not making messes. 

But this had to have worked for someone, right? So I set out looking. The pin led to a blog with the same vague instructions that didn't help Sarah out so well. It was a post of various camping ideas this person had found, but they didn't include any sources to where they found the ideas or pulled the photos, so I turned to my good pal, Google Image Search. The first link it pulled up was perfect. How perfect? It was the original site that the photo originated from...and it even had the guy's watermark (which was missing from the photo pinned on Pinterest):

Finding the original post made all the difference with the instructions. Brian gives an excellent tutorial on how to successfully and correctly make these ointment packs. He suggests using clear straws, using pliers to pinch the ends together while you burn/melt the edges, and then cutting the straws as you fill them. For his excellent instructions, head over to Brian's Backpacking Blog. 

So one of the morals of the story...if you re-blog someone's idea and/or photo...please give them credit. It helps acknowledge their work, it helps people find the original instructions (rather than the watered down or condensed versions), and it makes our job a lot easier when we're trying to track down how to actually do a certain project. 

What great tricks do you use to keep things from becoming a mess during camping, hiking, or travel? 

Monday, May 27, 2013

Mix It Up Monday: Memorial Day

I find it only fitting to pay tribute this day to our great country and the brave men and women who have fought to make it that way.
 
Thank you does not seem to suffice for all that has been done for our country, but I will say it anyways.
 
Thank you, from the bottom of our hearts to the brave men and women who have, and are currently serving our country.
Also thank you to the many loved ones of our service men and women who have also sacrificed that our great country might be free.
 
May God bless this great country.
Please everyone have a great day with family and friends and be safe!
 
Love, The Pinstrositeers
 
P.S. If anyone is interested in writing to our soldiers, here is a link to a website that specializes in just that. I have participated in the program and would highly recommend it. I am sure these letters are really meaningful and welcome to those who are currently serving away from home.


Saturday, May 25, 2013

Orange you Glad!

After weeks of school, utter exhaustion, vacations, and life getting in the way...Emilee and I are finally getting to hang out and have a Pinterest/Pinstrosity day! We're pretty excited about this and we have some fun projects in the works that we'll show you in a few days.
 
 
With summer rolling in I've been trying to find summery and cheap ways to liven up the décor and to add some fun summer pizzazz to the house. I love having the windows open, the breeze blowing in, and all the summer smells sifting around. I have been trying to think of things I could leave on the windowsill to pretty things up and maybe add some nice summer scent. I hadn't gone as far as looking on Pinterest yet...wasn't that motivated yet, but one nice thing about this blog is that sometimes ideas come to us in forms of submissions. Sarah-Jane sent us a Pinstrosity she had on her windowsill and, this may seem odd since it didn't work so well for her...but I think I'm going to try it.
 
The Original Pin:
 
Sarah-Jane says, "The idea is to peel an orange in one continuous piece and then use the peel to make cute orange-scented decorative flowers or roses by rolling them up and letting them dry out."
"Attached are my versions. In the first picture you might notice the 'orange roses' are on a plate full of crumbs, that's not where I was keeping them after I made them (they were on my windowsill) but I put them there when I realised what was happening..."
"First of all I was quite pleased with the result and even as the peel dried a bit, the edges became more crinkled and petal-like. However, I started to notice an ant crawling around on my window sill. Now, I'm a very clean person and never leave food lying around. I had a closer look at the orange-roses doing their job prettifying my window sill, and noticed something else starting to bloom in the middle of the orange-rose peel..."
 
The Pinstrosity
 
Mold!


Sarah-Jane definitely didn't like the direction these took. "I don't really know what other conditions I could have put them in so that they would dry out without going mouldy but this was definitely becoming a health hazard, especially if ants were being attracted to my room. The orange-roses were destined for only one place - the compost heap!"
 
I'm so sad that these didn't turn out! I love how the original ones look in the Pin. Here are my thoughts on this. If you're leaving these out in the open to dry out, your climate will make a huge difference. My sister just moved from Mississippi and she said that if her little boy spilled water (or drooled) on his shirt and they just threw it in the hamper, the next morning it would be stained with mold. Humid climates will not allow an orange peel to dry out completely. Out here in the Southwest, I think these would work great. In fact I know they would because I've left orange peels out on the counter (I wish I could say I was as clean as Sarah-Jane) and they've dried out almost within hours. You may be able to dry these out in the oven (lowest temp possible!)...but that's just a guess...never tried it before. If you do live in a humid climate, you'll need to dry these out before setting them out, or they will most likely mold.
 
I think I need to get me some oranges and try this out, because I love how those look! Thanks Sarah-Jane for sending this in. I'm sorry yours didn't work out...but I'm glad to have the idea now!
 
I hope you all have a great Saturday! We're off to rummage sales to find the perfect touches for our projects. Have a most wonderful Memorial Day weekend!


Thursday, May 23, 2013

Cacaphony of Cakes

Why do people say, "Oh, it's a piece of cake!" or "That's a cakewalk!" when they are referring to something easy? Cakes are not easy. I have never attempted a big fancy cake before because I'm pretty sure it'll turn out like the Fairy's cake on Sleeping Beauty. 

I'm sure someday though my kid will say, "Mom, I want a cake that looks like that!" and I'll give it a try. For now, until I get brave enough to try a big cake, I have some courageous cake makers and their cakes to show you. Starting with this one that Liz sent us. 

The Original Pin
http://whipperberry.com/2013/03/cake-decorating-made-easy.html
Looks like "a piece of cake", but Liz found out it wasn't. 

The Pinstrosity
"I'm making a smash cake for my sons birthday so I wanted blue poofs and I wanted them a bit bigger, minus the balls. Well, I made them too big and too far apart. So I tried to do a big one in the center. It has been referred to as 'a forest' and 'smurf turds'."  -Liz

Let's go to our 2nd cake. 

The Original Pin
http://www.bakerella.com/fourteen-for-the-fourteenth/
A fourteen layer cake. That's amazing. 

Here's Christina's try at it:

The Pinstrosity
"I followed the blog photos and ideas pretty much to the letter, except that I wasn't so great at spreading such thin layers of cake mix around on the parchment paper sort-of-circles - I kept picking the paper up with my spatula. So I gave up on that, and assumed it would spread on it's own - it didn't, because there wasn't enough "weight" to spread itself."

"The pourable icing from the Smith Family recipe was wonderful, but I must have done something wrong because it didn't thicken at all, and was even runnier than the stuff in Bakerella's photos, but it sure was yummy! So anyway, once the 14 cakes were cooled, I started stacking them and pouring the amazing
icing on them. After the 3rd layer, I realized my mistake in not spending more time spreading that cake batter evenly. Of course they were thicker in the middle than the edges! I tried slicing the top-middle off of one of the layers to make it more even, which didn't work at all because the layers are so thin. So I gave up on that, and just went with the flow, with my cake really starting to look like a hill, and the layers sliding all over the place on the icing."

"I ended up using 12 layers for the cake, and the last two layers I tore into strips and stuffed around the inside edges of the 12 layers, to try and prop up the sides! That didn't work too well, as you can see from the photo. (Also note the major drippage of the icing!)"

"Bakerella's buttercream frosting was to die for, but I only glopped it on the top of the whole thing because frosting down the sides of a cake with 12 layers flopping and sliding around was just impossible for me. My whole cake tasted spectacular, but was a huge fail in the looks department :D"
-Christina


And then there are the 1 layer cakes that seem like we can't hardly get them wrong (I know from experience how easy it is to mess up even a 1 layer cake). Gina found a cake, gave it a try, and then sent us an email. 

The Original Pin
http://www.threeforkscakes.com/Baby-Shower-Cakes.html
"For my baby's 1st b'day I became obsessed with the onesie cakes I'd been seeing on Pinterest.
It looked SO easy!  Until my cake split in two and I tried to ice over it.  Then it became a onesie
with a very full diaper." -Gina

The Pinstrosity


And then for the final cake...the graduation cake Laura sent in. 

The Original Pin
http://karmascakes.blogspot.com/2010/08/tarta-graduacion.html

Laura said, "A couple of weeks ago, one of my friends made the last exam of the university degree he was studying. The rest of his friends wanted to celebrate a big party, with costumes and everything. And I had an amazing idea: 'Why don't we make a cake with the shape of a graduation hat?' Bad idea..."

"I surfed the internet looking for recipes and tips, and I met the world of fondant and other types of frosting (there are so many!). I read blog after blog without reaching a conclusion because all of them were written for people who already knew how to work with them. In the end, I realized I could buy the fondant instead of making it myself. "Good" - I thought- "one less thing I can spoil". And I asked the shopkeeper for advice. He told me that I could shape the fondant as I wanted and the following day it would be rigid enough so that it wouldn't lose its shape. He lied! After a whole afternoon (until 11pm) baking and shaping, the following day the fondant was as soft as always. When we tried to cover the cake, it lost its shape and we had to start molding again."

"Besides, I made another kind of pastry to make the string, but I mixed the wrong proportion of jelly and sugar and it was another mess: it was impossible to shape it and, when I finally got a string, I accidentally broke it!"

"Later that day (the party day), I was told that my friend had done a horrible exam, and he probably would not finish his degree. So I shaped a [poop] with the remaining fondant and, at the party, I told my friend: 'As you have made a [mess] of an exam, you deserve a [mess] of a cake'. And I gave him both things."

The Pinstrosity

So there you have it. Pieces of cake that weren't a piece of cake. Do you have cakes you tried to make off of Pinterest that just didn't turn out? Send them our direction! 


Wednesday, May 22, 2013

No-Sew Pet Bed

Schools out. Check!
Back from vacation. Check!
Summer is here. Check!
 
You know what this means?!
I'M BACK!!!!
 
And it is good to be back.
Today I was going through emails and this one just totally made me chuckle, for those of us who are cat people ( I am animal people, I love them ALL) this will ring especially true. I just had to share.
 
The Original
 
No-sew pet bed. If my hedgehog would use it I would be ALL over that. However she is a diva and would just stick her nose up at me (literally).
Well Mary Beth tried this out for her feisty feline....and this is how it turned out, check it out!
The Pinstrosity
 
Why is it that you lovingly make things/buy things for your pet and they refuse to follow through with a proper thank you and use it. Because they know we will still love them that's why.
 
Here is what Mary Beth had to say about it, and I thought this was a funny story so enjoy!
 
"Way back in February, we added Ikea's Hemnes 5-drawer chest to our bedroom for additional storage.  It's a little over 4' tall, and Weasley likes to climb on top of it, stretch out and sleep.
 
Let me preface this next part with the fact that I've been watching a significant amount of My Cat from Hell on Animal Planet lately.  If you haven't seen it, it's like the dog whisperer for cats.  This tatto-ed, convertible-driving, guitar-carrying guy named Jackson Galaxy (Yes, Jackson Galaxy.  I can't make this up.) visits people with problem cats, and after weeks of therapy, the problem cats become beloved family pets.  90% of the time, the cat's bad behavior seems to boil down to the fact that the cat feels confined and limited, and giving it more space to play and explore turns things around completely.    There was this one episode in particular where a couple had their cat confined to one room and it would hide and scratch and bite and pee all over everything, but when they let it out into the rest of the house and built a series of steps so it could roam around on high shelves, all their problems were solved.
 
Obviously, in the wake of viewing that episode, I decided that the best way to stop Weasley from annoying the crap out of us every morning by batting incessantly at the blinds was to make it nice and cozy for him to sleep up high on top of the chest of drawers.
 
Now, I'm looking extra silly because that link clearly provides easy-to-follow directions for making one of these correctly.  You'll just have to believe me when I say I could only find a picture (not directions) when I decided to undertake this project a few weeks ago.
 
Directions or not, it seemed pretty simple.  I found tons of ideas for making no-sew fleece blankets on Pinterest using two pieces of fleece, so I figured I'd just do that and stuff batting between the two layers before finishing off the final side...
So, back to my pet bed.  What went wrong?
  1. My method was easy and successful enough, but obviously, I didn't size this correctly.  My intention was to make a pillow that was the same size as the chest of drawers, so I started by laying my material on the top of the chest and cutting a rectangle of the same size.  What I didn't realize is that I should have added 3-4" on each side for the fringe, which wouldn't add dimension to the pillow once it was stuffed.  The result?  Instead of a cat bed specially made to fit  on top of the chest of drawers, I wound up with something more like a mini throw pillow.  But even if I'd made it the correct dimensions, this still would have been a failure, which brings me to point #2 . . .
  2. Cats are butt holes.  They do what they want.  And obviously Weasley does not want to sleep on top of the cozy, snuggly cat bed I made especially for him.
Witness Weasley precariously positioning himself so close to the edge of the chest that two of his legs are falling off just so he doesn't have to touch the offensive cat bed."
 
 
Did I mention how much I laughed when she said cats are butt holes? Probably too much, but I have had lots of cats and that just fit too purrrfectly. ;)
 
This just goes to show, if you make it, they may or may not come depending on their mood that day/hour.
Happy Wednesday Pinstrosipeeps!!!
 
Also if you missed Marquette's Mix It Up Monday I think you will thoroughly enjoy it. It's a big and little announcement for one the Pinstrositeers! Check it out!!