Wednesday, January 23, 2013

The Baconator!!

Every once in a while we come a reader who is bound and determined to make a pin work despite all the odds being against them. 
Today is one of those days. 
Kathy sent us this recipe for some awesome bacon chicken combo that didn't have near enough info to be feasible, with a  little stick-to-it-ive-ness  and a turkey baster there is nothing this woman can't do!
Check it out!


The Original

http://diaryofarecipeaddict.blogspot.com/2011/07/sweet-spicy-bacon-chicken.html


Chicken+Bacon...does life get any better? I submit that it does not. Anyone know who that is from?!

Here is Kathy's version, and how she got here:


The Pinstrosity


"I love to try new Pinterest recipes and was truly excited to try the recipe for Sweet & Spicy Bacon Chicken The picture looked amazing and who doesn't love bacon?!
Well, first of all, there were no measurements included in this recipe, just a list of ingredients, not specifying how much of each. But, no problem, after reading follow-up comments, I seasoned it according to my family's taste. I also pounded the chicken pieces first, because the chicken pieces were too thick to cook evenly (another tip I picked up from follow-up comments, as recipe did not include this procedure). I planned on baking this, as specified in the posted recipe (bake at 400 deg. F), although the blogger did mention that she prefers to grill it. After prepping as specified, I put it in the oven and was anxious to see the results.  About 10 min. before the chicken was supposed to be done, I checked on it (mainly to see if bacon was crisping). The[picture attached] will show you what I saw. All the chicken pieces were sitting in a huge puddle of grease (from both the bacon & chicken combined). I knew the bacon would never crisp sitting in a pool of grease like that and I didn't want the chicken to soak up all that grease either; so I used a turkey baster and bowl to remove the majority of the grease from the pan.  Three bowls later, the pan was mostly dry and ready to return to oven. I cooked it for an additional 10 min (which would have been 40 min. in total) but bacon was still not crisp enough. Since I didn't want the chicken to dry out like a hockey puck, I turned on the broiler for a few minutes and bacon finally crisped up the way it should. After transferring the chicken to a clean serving platter, the final result did closely resemble what the finished dish was supposed to look like.
Summary:  The [original picture], shows this recipe being baked on a cookie sheet. With that much grease accumulating during the cooking process, that would have been an oven-cleaning nightmare. The blogger said that she cooks this recipe on the grill. I can only imagine how many flame flare-ups that would cause with all the dripping grease. I'm certain we would have had a visit from the local fire department if we even attempted to grill this. After all is said and done, I will admit the flavor was not bad (but everything tastes better with bacon). I may even make it again; but I will retype the recipe to include "de-greasing" the pan during the cooking process."

I give major props to Kathy for fixing the recipe to her liking, and NOT having the fire department called! Not that the original had this problem, but at my house grease plus heat usually equals an emergency of some sort.

There is definitely something to be said for a woman on a mission, and it doesn't hurt that this mission included bacon at the end. This wasn't so much a case of a recipe being a Pinstrosity as it was a recipe that had a little tweak and turned out great. This just goes to show that a little ingenuity and some elbow grease (literally) can go a long way!

Well done Kathy! It looks delicious! My hubby and I will probably try this one out this week!
Does anyone have any bacon+chicken recipes that will rock our socks?! Let us know! we love your feedback!!

Happy Wednesday Pinstrosipeeps!


Tuesday, January 22, 2013

Shooting Stars and Glitter

This past Friday I was working on a big project and things were going okay for the most part. Actually, half of the project was going great and the other half...well, not so much. Friday night I posted this on our Facebook page:

"Welp...today's project turned out halfway a Pinstrosity and halfway a blast of a success. I'll give you a hint...it includes glitter, guns, stars, and glue. I've got pictures...but you'll have to wait until Tuesday to see! Why do you have to wait until then? The real test is to see if I can pull off the image in my head for the decorations at the actual dance. Stay tuned."

So Saturday was the big dance, and then Sunday and Monday we left town and spent 2 wonderful days with my family for my grandfather's funeral. While we wish the reason for getting together was different, it was so wonderful to see all my cousins and aunts and uncles (and there are a ton of us). It was fun to have some of them come up to me and ask what I was working on and wanting to know the scoop ahead of time. And...I'm slightly partial to my cousins, so I did give them the scoop. But now I get to share this with all of you. 

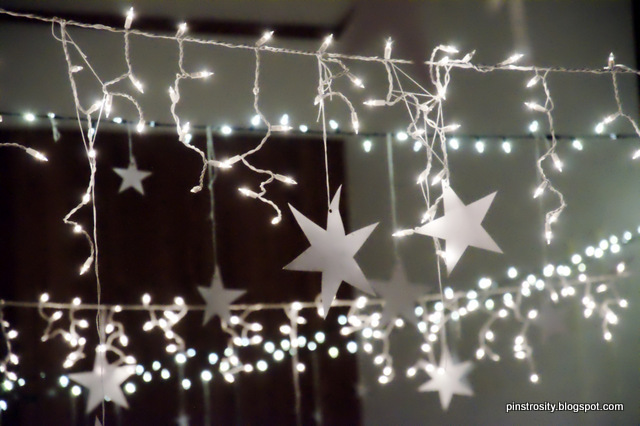
I work with the youth at our church and our group was assigned to be in charge of the dance for all the youth in the surrounding area. We talked to the kids and they wanted to have a nice dressy/formal dance and have the theme be "Under the Stars". So we set out to get that accomplished. I had the idea to cut out tons of stars, hang Christmas lights across the room, and then hang the stars from the lights. Luckily I have a friend with a Cricut and a Silhouette machine and we were able to pump out 250+ stars in only about 2-3 hours. 

Then came the Pinstrosity part. 

I decided that it would really dress things up if the stars were glittery and were able to reflect some of the light. This ended up taking multiple attempts. 

Attempt #1: 
I bought a can of diamond dust glitter spray paint and set to work spraying 5 stars at a time. But I wasn't liking the results too much. The glitter was working, but it just didn't stand out much. I didn't want to waste the can of glitter spray, so I decided to just keep going. I got 15 stars done and the can quit working. There was nothing coming out of that can...it just sat and mocked me. Having a nearly full can of glitter spray that I didn't want to waste, I sat thinking how I could make it work and dug deep into my roots and came up with a solution. I gathered up my stars, grabbed the can of glitter spray, pulled out our .22 rifle, and headed outside. 

Here's what I posted shortly after:

We live where what I did was perfectly legal and safe, don't worry. 
Disclaimer: I'm not saying this should be the new painting method. I'm not suggesting to go out and start shooting spray paint cans at every opportunity. If you do try this out, please use your head and stay safe. Painting anything isn't worth getting hurt or hurting someone else over. When in doubt, don't. 

And here's how it turned out:

I was feeling pretty good about my redneck ingenuity, and it worked for the most part, but the stars on the outer edge of my circle did not get much glitter on them. I decided to try something I'd seen a few different pins for...

Attempt #2:
I'd seen a number of pins about adding glitter to clear paint or to glue, and then painting it on your object. I hadn't pinned those pins because I just didn't ever see myself needing to paint on glitter...so of course when I went back to look for them I couldn't find the pins. So...I went off of memory. (I can almost feel everyone cringing at that phrase). I went in my craft supply and found my glitter and clear gel craft glue and figured that would work best. So I squeezed out a glop of glue onto the plate, added glitter and tried to mix. No bueno.
 It turned into this lump of unspreadable glittery snot. So I washed off the paintbrush and threw that plate away.

Attempt #3:
I then pulled out my Elmer's School Glue, but I couldn't get the cap open at all. That left me with mod podge. I have glossy mod podge and matte mod podge, and after a bit of thought I decided to use the glossy because I wasn't sure if the matte would lessen the glitter shine at all. I poured mod podge in a cup, slowly added glitter (so I didn't get too much all at once) and mixed it. But I think my mod podge was old or a little dry because it was really really thick. I added some water to thin it out, and that made it spreadable...but it definitely wasn't pretty:

It was drying in clumps and the stars were curling up from the moisture. It looked awful. So into the trash went the glittery cup of mod podge.

Attempt #4:
I finally just painted on thinned out mod podge and sprinkled glitter over the top. That worked...but I got 15 stars in and decided I was done. They didn't need glitter stars anyway...and the ones that were glittery would surely work out...right? That was the hope at least.


The Outcome:

Saturday comes around and I pack all the supplies into town for the dance and we get decorating. I was a little nervous that it wouldn't  pull together but it all worked out in the end. I did learn though that you can't string too many strands of lights together in one long chain because then it blows a fuse. But luckily we got that taken care of and all went well.

The glitter on the stars didn't end up showing up at all (not one bit), so that part remained a bit of a Pinstrosity, but it didn't end up mattering. I still am quite pleased with how the decorations turned out.


Friday, January 18, 2013

The Upcoming Pinstrosiversary

Our 1st Blogiversary is coming up...or as we like to say, our 1st Pinstrosiversary. Okay, we haven't really said that out loud (other than just now when I had to sound it out to type it). But I like that term. We can't believe how much the blog has grown and changed since then. The response we have had from everyone has been so fun and exciting. Thank you, thank you, thank you for your submissions, your comments, your suggestions, your laughs, and your awesomeness.  You've made this such a great year here on Pinstrosity. 

We've been putting our heads together to try and figure out just what we wanted to do in celebration of the "big day". We're always encouraging you to get out there and to actually do what you have pinned...so we thought we'd give you extra incentive. How about this...you actually do something you have pinned and that enters you in a drawing for a cool prize? I like that idea. Don't you? 

Here's how this is going to work:
  1. Go to your Pinterest and pick any project you have pinned (or find a new project to pin).
  2. Do it! Cook up that recipe. Mod Podge that frame. Sew that bag. Paint those rocks. Curl that head of hair. Decorate that room. As Nike says, "Just do it!". 
  3. Whether it turned out as a Pin Win, or a Pinstrosity, take a picture! Stories are fun, but pictures make them phenomenal and memorable. 
  4. Type up the story. Blog about it. If you don't have a blog, type it up in a Word document and save it. BE SURE to include the link to the original pin. Any entries without the link to the original pin will be discarded. Give credit where credit is due. 
  5. Either link your blog up at the end of this post with the Simply Linked widget, or email your Word document over to us and we'll link it up on a side blog. 
    1. If you email your submission to us, we will post it up on the side blog so it will still be visible to everyone. 
  6. On February 20th we will draw out a project at random, and that will be our winner. I should say random.org will pick a number for us and that will be the winner. 
Now...here are the rules and fine print:
  1. The projects must be completed between January 19th and February 19th. No submissions of projects you completed before these dates will be accepted. The point of this is to get out there and to finally do what you have pinned. You can have started the project before Jan. 19th (because some projects are big and just take time and we realize that), but you have to complete it between the two dates.
    1. The opening date is now (12:01 am MST). 
    2. The deadline is 11:59 pm (MST) on February 19th. 
  2. You can enter in as many projects as you want. This ups your chance of your name/project being drawn as the winner. 
  3. READ THIS: If you are emailing us your submission, please put it in a word processing document and attach the document in your email to us. If it is not in a word processing document we will assume you are just submitting your project as a normal blog submission and it will not be entered into the challenge. 
  4. If you link up your submission and we find it contains vulgarity, nudity, hateful language, or anything of that sort, we reserve the right to delete the link and exclude it from the drawing. We will monitor every link posted to make sure there is no spam or inappropriate links posted. Please remember that we have readers of every age, ethnicity, religion, etc. Keep your submissions clean. 
  5. Where you live doesn't matter...this is open to the whole globe. And Jupiter. But not Neptune. 
  6. You can submit Pinstrosities or Pin Wins. Obviously we hope you all have smashing success and everything turns out as a Pin Win...but we have to be honest with ourselves...Pinstrosities happen to everyone. Try your best though and let us know how it goes. Just remember to keep it fun and safe...we want everyone to come out of this with all their fingers and toes...and eyebrows. 
I'm sure you're wondering what the lucky winner will win...


  • We'll do a full post on the winning project, including an interview with the winner. 
  • We'll send the winner something awesome. Or two awesome things in fact. We'll have a list of 10 items and the winner will get to choose 2 items of the list. Items on the list of prizes will be a $15 dollar gift certificate to Amazon, an apron (a manly one for a dude, a pretty/cute one for a gal), a cute bib necklace, a hand-carved wooden crochet hook, and other fun prizes. Other than the Amazon card, the prizes on the list will be handmade by either of us, or someone in our family. 


I'm a firm believer in "Don't ask someone to do something you yourself aren't willing to do", so we will be linking up our Pinterest projects that we do as well. But...if one of our projects is drawn as the winning project in the end we'll redraw and make sure someone else wins (because that wouldn't be cool of us to run a competition and give ourselves the prize...lame-o!). This is motivating us to actually do the pins we have pinned as well. It'll just be a big Pinterest party!

So get going through your boards, find something to try out, and give it a whirl. We're excited to see what you all end up doing. And, if you need ideas on how to organize your Pinterest boards to help you actually get things done, check out Em's awesome post about that very subject. 


Pinstrosity Is Now On Instagram!

Pinstrosity is now on Instagram, our username is Pinstrosity! We would love to have you follow us!

You Had Me At Hedgehog

Em here, so I am hoping by now you get the feel that I am a huge animal fan. I love them, all of them, and that is probably the reason I am in the Biology field. 
I am also hoping by now you get the gist that I have a hedgehog. Her name is Gypsy, and besides my sweet husband, she is my whole world. 
That girl is spoiled rotten...crazy hedgehog. 
For those of you saying "What the heck is a hedgehog?!" (much like my friends an family), here is a picture!


Sweet Gypsy, I never forgo an opportunity to show her off ;)
So there you have it, a hedgehog, these were taken a few days after she came to live with us, she was about 8 weeks old. She is much bigger now, and well very  moody, but that is a common hedgie trait so it is just one of those things you just have to take in stride.

When Melodie sent us this Pinstrosity I was instantly in love, and while she thinks it turned out awful I think it's adorable!Check it out!

The Original
http://maker-land.blogspot.com.au/2012/07/hedgehog-pincushion-tutorial.html

Adorable right?! I love the texture of the fabric she used, and I love that she made a cute little girl hedgehog with a bow :) Here is Melodies take on this Hedgehog pin cushion!

The Pinstrosity

I think that is super cute! I love all the multicolored pins that are the "quills", I think it is simply adorable! Here is what Melodie had to say about it though:

"...Honestly, 2/3rds into making [this], I couldn't stop laughing because I could see how much of a FAIL this was becoming.
And now I love my Pinstrosity because it's so ugly and ridiculous-looking! The original was so cute....

I absolutely wanted to make this really cute hedgehog pincushion to replace my old, boring square-shaped pincushion. How hard could it be, with the right instructions ? Well...
First, she advises to use faux fur or towelling. I used and old brown towel thinking "It's going to be fine and cute, no problem".
But I wanted a bigger pincushion than this one... and I didn't have a printer to print the pattern. You see where this is going ?
I put a sheet of paper onto my screen to trace the original pattern, then made it bigger using the well-known "that's probably about right" method. I could see I had already lost some of the shapes, but I still thought "it's going to be just fine".

For the rest... I think the picture speaks for itself. I think the worst (and funniest) part was choosing the eyes and nose that were the least creepy given the very limited choice of beads I had.
Yes, yes i know, it's still pretty creepy. It looks at me with its empty eyes while I sew, crying "I want to die now". But I still like it because it reminds me of all the terrible Pinstrosities I've seen on your website..."


I think that her creation is unique and very cute! Considering that she made this without a pattern on hand, and then adjusted it to the size she wanted I think she did awesome! 
There are a few things that I think would have perhaps helped her out besides the obvious printing out the pattern, and having it be the same size as the pattern.
-Eyes and Nose, I know the original used small beads but I think she could have gotten away with just using black thread to create eyes and a nose. 
-Ears, physically speaking, hedgehog ears are pretty small compared to their body (baby hedgehogs are the exception to this, they have to grow into their ears). Melodies ears are a little big considering the rest of the body size, but I think it just adds to the charm here.
-I know she didn't like the towelling she used, but I think that the pins being the quills is fun and quarky, in fact she has kind of created her own pin on this one, and I might just follow suite and make one based off her  alterations. I will keep you posted on that
Thanks Melodie!
I do have to say that this little guy reminds me of a cartoon character but I can't quite put my finger on who it is...anyone have any clue? First person to figure it out gets a metaphorical Shiny Nickle (A real honor in my family). 
So give it your best shot! Also, has anyone made some fun hedgehog crafts?! I am always up for hedgie crafts of ANY sort. I would love to hear/see them! 
Happy Friday Pinstrosipeeps!


Thursday, January 17, 2013

Finger Burning Valentines

Valentines Day is coming up. Are you ready? I know, so many people don't like Valentines Day. "It's Single Awareness Day." "So-and-so thinks that's the only day they have to be lovey-dovey." "I don't like pink or hearts." I for one love Valentines Day. I always have. I loved handing out Valentines at the school party. I love seeing the pretty flowers around. I loved helping roommates (or boyfriends of roommates) plan fun surprises for their beaus. I loved getting a big group together of single college kids to play croquet, or do a bonfire, or to watch a movie out on the trampoline. I love coming up with surprises for Cameron. I just love it. Cameron and I switch off each year who is "in charge" of Valentines Day. This makes it so that we don't both plan something and end up with the plans conflicting with each other, and it makes it so that we don't both not plan anything because we think the other's planning something and we don't want to get in the way. And it just makes it fun. This year is my year and I'm excited for the day to get here (that's assuming I can get everything done and that I don't have too major of a Pinstrosity in the mean time). 

Anyway...all that to say, Valentines Day is coming up! We received a submission, which is actually a repeat to a project we already posted, but we thought it'd be great for the upcoming "day of love". 

The Original Pin
http://notsoidlehands.blogspot.com/2011/02/got-candy-canes.html
who actually got their idea from:
http://www.theidearoom.net/2010/02/heart-suckers-and-heart-candies.html
Aileen tried these out for Christmas and had a devil of a time getting them to work. She sent us her story from her blog. Here it is, in her own words:

The Pinstrosity

In my desire to over-achieve the crap out of Christmas this year, I prepared Jonathan’s to-Afghanistan holiday care package with both the sweet and the sentimental. So, naturally, I had to prepare an element that melded the two ideas, while also oozing Christmas spirit. Which sounds kind of gross, but I promise it’s not.
I found these chocolate candy cane hearts on Not So Idle Hands, and I should have been more aware that this was a craft blog and not an anybody-can-do-this-go-ahead-and-try! blog. Because, as much as I like crafts and baking, I will easily admit that I’m not actually that good at crafts and baking. Which is evidenced by the fact that I can only crochet things that basically go in a straight line, and I think I’ve given more than enough proof on this blog that I can even mess up a simple brownie recipe, so I’m not going to elaborate.
But what I lack in skill I make up for in intense neurotics and an extreme fear of total failure.
This task required a lot of room, so I waited until a weekend when I could take advantage of my parents’ huge (pink) kitchen, and also of my mom’s willingness to help despite my aforementioned neurotics. The process itself looked easy enough:
1. Unwrap the candy canes and arrange them on a baking sheet with lollipop sticks.
Beautiful. This is easy.
WRONG. It should have been a sign of things to come that the very first step (unwrapping the candy canes) took about an hour longer than I expected it to. Can you recall the last time you unwrapped a candy cane from it’s DELIGHTFUL cellophane packaging? Can you recall the last time you unwrapped a candy cane from its NOT-AT-ALL-IMPOSSIBLE cellophane packaging without breaking the candy cane? Can you recall the last time you unwrapped a candy cane from its APOCALYPTIC cellophane packaging without that cellophane packaging clinging for dear life to your hands, and then to your shirt, and then to your arm, and then to your hands again, but NEVER TO THE TRASH CAN?
It was about at this point that the F word became the only word I was capable of saying out loud. Which usually upsets my mom, but I think she was with me on this one.
2. Stick the baking sheet of cane pops into the oven for a few minutes, being careful to remove them just as the candy is melting to the stick.
Wow! This looks like it was pretty easy too!
WRONG AGAIN. See, the great thing about parchment paper is that it prevents your baked goods from sticking to the pan. But the inconvenient thing about parchment paper is that it doesn’t prevent a smooth, glossy piece of candy from sliding all over the place. Especially when you need it to remain purposefully touching the rounded edges of a lollipop stick in several places.
I remedied this by walking the pan over from the counter and into the oven as slowly as was humanly possible for me to move. Then when the candy canes all slid around anyway, I just stuck my face and the upper half of my body into the oven to fix it. Which is also what Babe from Crimes of the Heart did when she wanted to murder herself. So try not to read too far into this.
3. Working quickly, remove the candy cane pops from the oven before they melt into a pool of peppermint-flavored corn syrup, and carefully press the ends to secure them to the lollipop stick.
Hmmm, now that part sounds a little tricky.
SOUNDS TRICKY? YOU ARE CORRECT. Even though I’d stuck my head into the oven to make sure the candy canes were touching the lollipop sticks properly, most of them decided to freak out when I closed the oven, and flee from their sticks. So I got into the habit of opening up the oven every 30 seconds, sticking most of my body back in, and attempting to move the candy back onto the stick while it was melting.
When I took them out of the oven completely, I at first tried using the rounded ends of two table knives to gently press the melty candy to the lollipop sticks. But I quickly realized that the utensils were too heavy for this delicate task, and pretty much just squashed the candy cane ends into misshapen, flat little failures. But since the candy hardens again extremely quickly, I had to think on my feet.
Or, more accurately, on my fingertips, all of which I spent the next few hours burning so badly that I could probably apply to be a Men in Black agent now.
At this point, I think my mom asked if I wanted a drink.
4. Let the candy cane heart pops cool. Meanwhile, prepare your toppings.
This part actually was easy, because my mom offered to do it. Which I think was partially because she was still pissed about how many candy canes we broke while attempting to unwrap them, and needed to channel her rage appropriately.
5. Melt your chocolate, fill the pops, and add your toppings!
The instructions indicate that this part is actually a bit difficult; while the melted chocolate (or candy melts, which I used) will dry quickly once poured, if you add the toppings too soon they will weigh down the chocolate and create a sunken effect.
If you’d like an example of that incorrect sunken effect, please see all the above photos.
(If you see any that do not appear sunken, it’s because my mom did those ones.)
What the directions do not indicate is that, after you’ve applied maybe 70 candy canes to the lollipop sticks, burned off your fingerprints, and waited for them to harden again before filling them with melted chocolate, probably half of those candy canes will decide, once hardened and dry again, that they no longer feel like staying on the lollipop sticks. You will find this out when you pick up one of the finished pops, and it crashes to the beautiful pink floor in your parents’ kitchen, dusting a three-foot radius with your shattered, minty dreams.
The rest won’t be nearly as dramatic, but they will prompt you to furiously stick them back in the oven in an attempt to re-melt them to the sticks, which works a couple of times, but mostly just seems to piss off the candy canes more. 
6. Allow to cool, then package.
Wow. I know that was a lot of hard work, but the finished product is beautiful! And look at how nicely you tied that bow!
(The bow looks good because, obviously, my mom tied it.) As you can see, the candy bags I chose didn’t quite fit the massive heart pops. So my mom and I formed an assembly line, in which I would tape the bags to the pops while doing everything in my power to prevent them from snapping off the sticks, and she would tie them beautifully into a selection of ribbons I got from a holiday ribbon display at Michael’s. Some of which my mom said were perfectly fine to work with. Others, like the one seen above, coated her hands in cheap blue glitter.
Happy holidays.
7. Realize you’ve only made about half the pops you need for various care packages and holiday gifts. It’s 9:00 at night, and you’ve gotten nothing else accomplished today. Go get a drink with your friend Becky. Say you’ll make the rest later.
Clearly that does not happen. You cut your losses and use the extra materials to make candy cane bark. It is delicious. Punch yourself repeatedly in the face for not just making candy cane bark in the first place.
8. Transport them back to your apartment.
Luckily your mom has some bubble wrap that you layer between the layers of pops, and there are minimal casualties.
9. Prepare for shipping. Realize they are traveling via USPS to Afghanistan, and you could barely keep them from breaking just from picking them up and putting them back down. Rethink your future as an army wife.
10. When Jonathan receives the package and informs you that the chocolate candy cane heart pops arrived intact, pretend it’s not that big of a deal, but secretly celebrate for the rest of the day.
11. Move onto the three gifts still left for Jonathan’s care package.

Thought you would all enjoy that. I know I did. Happy Thursday everyone! 

Wednesday, January 16, 2013

Erupting Hot Cocoa

Those of you that know me know that peacocks, the color orange (yes I too love the color orange, yet another reason Marquette and I are best friends!), hedgehogs, and glitter are all on my list of favorite things on the planet earth. Anyone who compiled this list would also know that something is missing, well a lot of things actually, I say "Favorite thing on the planet earth" at least eight times a day, and always about something different, I am a very passionate person. 
That missing thing I am referring to today though is,  hot cocoa. 

The second the end of September hits I am on that train like nobody's business. I can't WAIT for hot cocoa time, which is ironic because I hate cold weather, but that is besides the point. On most days of "winter" I have hot cocoa twice a day. I pop cocoa like Tick-Taks people. I may or may not need a 12 Step Program. I am a serious addict. 
The Original
http://realmomkitchen.com/654/classic-hot-cocoa-and-a-hot-cocoa-bar/

The Pinstrosity


http://www.thekitchn.com/fact-or-fiction-exploding-wate-109388


However when it comes to making cocoa I have found the fastest way to do so is to boil the water in the microwave in my ceramic tea kettle. I have been doing this for years! Not until recently have I experienced the phenomenon that I had never even heard of happening before though. 
I was at my parents house over Christmas, making my hot cocoa per usual, and I put a ceramic mug into the microwave for 2.5 minutes (something I have done a million times before). When it was done I took the cup out, and poured the cocoa mix in.
I usually have a kettle to warm the water in but my parents don't so I improvised.
I poured the cocoa into the water, and it exploded! All over my hands, all over the kitchen counters, the floor and what was the last of the coca mix was gone forever.
Now I am one of the lucky ones in this instance because I didn't get hurt. The water didn't burn my hands and it didn't go up into my face, but what the heck had happened?!
 This had never happened before! 
Fast forward a month and I am at home, I wake up, go into the kitchen fill up the kettle, put it in the microwave for 3.5 minutes (it's bigger than a mug, and this is the amount of time I have always done), and when it is done I take it out.
I have a mug with cocoa powder mix already in it, all ready to go, and I pour the water in. 
It explodes again!!!! 
This time, all over the counter and the flour, but thankfully not my hands because it was much hotter this time,and probably would have burned me. 

What is going on here?!
 I went into research mode. 
Now perhaps I am one of the only people left on earth that didn't know about this. But in case I am not, I thought it might be wise to share the warning. Especially if there are children microwaving water who could potentially get hurt. 

I found this awesome video from an episode of Mythbusters. 
It explains some things, and then they have some exploding stuff, a must watch:


So what I can get  from here is that I was accidentally super heated the water. I was heating it past the boiling point, and as soon as something interferes with the water ( it could be anything from putting something into the water like above, to moving the cup I have read), it will explode if it has been super heated. 

So let this be a warning!
 Please be careful! I now only warm my water for about 2 minutes in the kettle and if I feel like I need it warmer I put back in the microwave for short periods at a time to make sure I don't over do it and cause an explosion. 

Another suggestion was to put a wooden stirring stick into the water to prevent it from boiling. If you usually use an open mug to heat your water, you might start using a kettle just in case. 

I also read that the exploding phenomenon is very rare, and the fact that it happened to me twice is beyond me ( does that mean I am at a larger risk of being struck by lightening ), did I mention I was using tap water in both instances?
As for all of you thinking "But the Mythbusters just said that tap water can't explode?". I did some more research and found that if the tap waters dissolved minerals aren't large enough to act as nucleation sites for the bubbles, it too can boil (Where I found that info). 

I hope that this can prevent anyone from being hurt and maybe even you learned something today!
 I know I did! 
Has anyone ever had this happen to them?! Tell us about it! We love to hear your feedback!
Happy Wednesday Pinstrosipeeps!