Wednesday, April 25, 2012

Useless Ice

Scrolling through people's boards to find pins to test for when we are out of submissions (nudge nudge...we could use some Pinstrosity submissions...) I found the following:

The Original Pin
http://9gag.com/gag/2503324


Cool, no? I had to try it.

The Pinstrosity


Ok, this one's not technically a Pinstrosity, because it worked just like the instructions said it would...but once it was formed up...this was the most ridiculous cup. It held such a small amount of liquid...more like a large shot glass, it made my hand really cold, and then the heat from my hand melted the "glass" faster and I had water running down to my elbow and it made the cup super slippery. So I thought, I'll just stick it back in the mug and use it as a cool ice cube...well that worked, but it was kinda lame too since you just can't get much liquid in there anyway. So...you get an ice cup, just like the directions indicate, but it's kinda pointless and it makes such a mess as it melts! Regular ice cubes are way easier and much more practical. But if I were a kid, I probably would have thought this was the coolest thing ever.
                                                                                                    

Monday, April 23, 2012

Cocoa Syrup

Chocolate syrup runs a little on the pricey edge (for the good stuff), so I thought I'd see how this homemade chocolate syrup recipe someone pinned adds up against the store bought bottled stuff. 


The Original Pin

http://www.onegoodthingbyjillee.com/2012/03/homemade-chocolate-syrup.html#more
I followed the directions, using all the right measurements and times. I allowed the syrup to cool, then dipped me out a spoonful....


The Pinstrosity

It's okay. Not the best. Definitely not the bottled syrup you get from the store. It has a bit of a bitter aftertaste from the cocoa. So I knew I probably wouldn't be putting it over ice cream. But the site suggested using the syrup for chocolate milk or milkshakes. So I used the suggested syrup to milk ratio and it was kinda gross. So then I added more syrup and that helped some, but there was still that cocoa bitterness to it. And then the aftertaste was weird and it left my mouth feeling fuzzy. I'm not a fan. It's not bad syrup, and I might like it more as I get used to it, but right off the bat it doesn't really measure up to the bottled stuff one bit. Now that I have a jar of it though I don't want to waste it, so I'm going to try putting it in cookies and cakes...we'll see how that works out. In it's favor though...it doesn't have the high fructose corn syrup.

Friday, April 20, 2012

Crummy Curls

I've seen a ton of cute hair ideas and tricks pinned all over. It makes me miss my long hair...there's just so much you can do with short hair. Anyway...the sock curls and the head band curls have gone around quite a bit and I knew sometime we'd have a Pinstrosity on our hands, and finally today we got one.

The Original Pin
http://thepapermama.com/2011/07/hair-tutorial-no-heat-curl-html.html

Carolyn decided to give this pin a test last night/this morning in preparation for a photo shoot, and it didn't turn out quite as she had hoped. Ok, not at all like she had hoped. After staying up late just to let her hair dry enough after her shower, this Pinstrosity was an extra disappointment. She tells us, "I waited until my hair was only slightly damp, and got to work with twisting it into the headband.  I them climbed into bed and fell asleep (it actually isn't that uncomfortable, I was able to sleep very well with it up like that.)  I got up this morning and started to take my hair down.  I saw the front curls first and thought, "Oh goodness, I am going to be Shirley Temple... again!" And this girl can pull of some great Shirley Temple curls. Well...all looked good at first, but as she kept unrolling the headband, disappointment struck.

The Pinstrosity


She's not sure exactly what went wrong here...and since Em and I both have short hair we can't really test it out. Here's what Carolyn guesses might have gone wrong:
  • The back may have dried out too much before she wrapped the hair in the headband.
  • The back curls may have not been wrapped tight enough.
  • The front curls may need to be a little more dry or loose to match the back curls.
  • Perhaps a larger headband is needed (the one she used is below).


Has anyone else had success with this? Do you have any insights as to how to make this work better next time? Or have you had the same issues (or different issues) with this?

Wednesday, April 18, 2012

Ooey Gooey Cookie Creamy

All you have to say is "Cookies and Cream" and I'm in. Even after seeing the trouble Anita had with this Pinstrosity, I still want to try it out. Mmmmm.

The Original Pin
http://picky-palate.com/2011/03/17/no-bake-chewy-cookies-and-cream-bars/
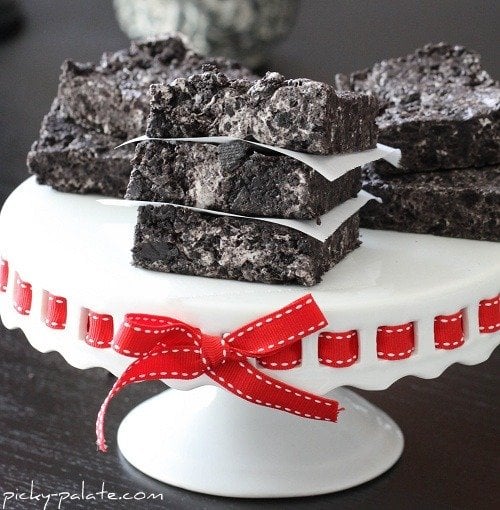
No Bake Chewy Cookies and Cream Bars, using three of the best ingredients invented...Oreos, marshmallows and butter (which would probable make this Paula Deen approved). They sound amazing, which is what Anita thought as she jumped into this project. Although hers had some...issues.

The Pinstrosity

Let me just share what Anita has to say about her adventure:


"The first problem I had was trying to mix the Oreo cookie crumbs with the melted marshmallows and butter - what a thick, sticky mess, very hard to mix! The marshmallow goo kept getting really thick, - almost hard - before I had it all mixed in, so I had to keep sticking the whole thing back into the microwave to try to remelt it - "try" being the operative word."


"I finally felt like I had achieved reasonable success with mixing... Then came trying to get the mess into the pan.  It was so thick and sticky that I could hardly get it out of the bowl, and tore the foil in a couple of places trying to spread it all out."


"I finally got as much as I was going to get in the pan, into the pan. It looked gross, grey and unappetizing, so I sprinkled it with powdered sugar to disguise it."


"I left it to set, but it didn't; it just stayed gooey, so I refrigerated it.  Then it hardened up so much it was like a solid brick, and was completely stuck to the foil! Double checking the recipe, I saw no mention of buttering the foil first, and I couldn't get it off the "bars." I left it back out a while to see if it would soften up enough to get the foil off, but it only got gooey again and the foil was still stuck on like it was glued on."


"I finally gave up, but covered it and put it in our laundry room fridge till I could figure out a way to salvage it, and figure it out I did, a couple of weeks later."


"I was finishing another Pinterest project that required the oven, so I stuck in my Oreo brick so it would soften a bit again, then went at the foil. I finally managed to tear and scrape it all off (with plenty of "bar" along with it,) then cut it all into small bite-sized pieces and dipped them in melted chocolate. They were great! They were nice and soft in the middle, with a lovely chocolate coating.  I brought them to church for after the service, and they all went in no time!"


So what went wrong? I haven't tested this one out yet to know for sure, but here are some theories I will be testing when I do. 

-If you look at the original picture, their oreos are blended in thoroughly, but you can still see large chunks and veins of white marshmallows. So you do want to mix the oreos all the way through, but you don't want to over mix it. I don't know if this had anything to do with them not setting up completely or not, but it could be worth a try. I know you can stretch and melt a marshmallow a bit and have it set back up, but a marshmallow can only take so much and after too much messing with, it's going to stay very gooey and sticky and messy (oddly I learned that one from playing pranks in college). I'm imagining these to be an oreo version of rice crispy treats...so they will still be slightly sticky, but they shouldn't be insanely gooey. 
-Most of the time I try to use tin foil, it turns out like Anita's adventure...it just doesn't want to work for me. When I try these I'll probably either use parchment paper, wax paper, or just really butter the heck out of my pan before putting the goop in it. I've had way better success from those methods than with tin foil. 


Monday, April 16, 2012

Reindeer Regrets

Martha is wonderful...so many great ideas and pretty things that make us think "I can do that" and then we can't...hey, kinda like Pinterest! Hahaha. What is it about those two? Maybe it's because Martha and Pinterest make everything seem so easy. Anyway, Susan found these adorable reindeer cookies and decided to give them a try. 
The Original Pin
http://www.marthastewart.com/275359/holiday-cookies-for-santa/@center/307035/santas-workshop#/272371
Susan tells us, "Tried to make these cute reindeer cookies ... but they came out not quite so cute!"

The Pinstrosity

This is the reindeer we never hear about, the one Santa sends down the chimney first to make sure the fireplace isn't lit. Maybe he's just the black sheep of the family. 

Honestly, I don't think those cookies are all that bad, but as far as looking like the original pin there is a bit of a difference. 
  • Martha appears to have used gingerbread and it looks like Susan used sugar cookies. This difference caused the difference in shapes of the reindeer. It looks like they both used a gingerbread man cookie cutter shape (see...it's an up-side-down man), but Susan's sugar cookies filled in more as the cookie baked (and/or maybe her cookie cutter man was a little more squat than Martha's). 
  • I'm not quite sure what happened with the icing, and why Susan's is black. Last icing color in the house? But even with the black icing, it's not all that bad. 
So it didn't quite turn out as hoped, but it still looks like a reindeer to me, and even better...it still looks like a cookie to me. I'm sure her family didn't even care that these weren't twins to Martha's reindeer. 

Saturday, April 14, 2012

We Need Your Pinstrosities!


It's a rainy day here (which is rare for us), and of course I have my day full with outdoor appointments (family photos, event photos, etc)...this should be interesting. So I'm gearing up for an adventure filled day. Maybe I'll hop over to Pinterest and see if there are any really great rainy day pins. Or you could hop over to Pinterest and see if there are any great rainy day pins and try them out and let us know how it goes!

Friday, April 13, 2012

Don't Count on this to Float Your Boat

Or your balloon. 

This pin went around boards very quickly. Most of the pins I saw had a caption that ran something like this:
"No helium needed to fill balloons for parties." People saw it, pinned it, and saved it for later...many thinking that this trick would make filled floating balloons. 

The Original Pin
http://www.momto2poshlildivas.com/2012/01/blow-it-up-exploring-gas-with-balloons.html
I pinned it to my "To Test" board so I wouldn't forget it for later. I didn't even look at the original source until days later to see what gas they were creating and how. When I finally did open up the blog and read the ingredients...I knew someone somewhere along the line hadn't read the post completely when they pinned it as an alternative to Helium. This was a science experiment for kids to learn about gasses, not a development of a alternative to Helium. The gas created is Carbon Dioxide...which doesn't make balloons float.

The blog author states this in her post:
** Due to lots of comments left below I feel the need to add (for clarity) that this does NOT produce helium. Carbon Dioxide gas will inflate the balloons but they do not "fly" like helium inflated balloons as it is not the same kind of gas. This is meant to be a fun science experiment/demonstration. **

So I knew that this pin would work perfectly as described in the original blog post, but it wouldn't work at all with the description I saw on so many pins. Here...I'll show you.

The Pinstrosity

There's the set up. The bottle with the vinegar, and the balloon with the baking soda. 

Tip the balloon upright to dump the baking soda in the vinegar and Carbon Dioxide gas is produced, which does indeed fill the balloon:

And that was the point of the original post...to show the formation and properties of gas. But a pinner tweaked it and people pinned it to their boards thinking the balloons would float. 

They don't float. CO2 is heavier than the air we breathe. 


So the moral of this story? There's a few. 

  • As Mom to 2 Posh Lil Divas stated...CO2 will be formed, but it DOES NOT float. 
  • Read. Read. Read. I think we're all conditioning ourselves to text messages, tweets, statuses, etc. and anything longer we just blow off. Don't be afraid of reading. It's great stuff!
  • Don't take the descriptions on every pin as the gospel truth. Check into things before you get too excited. 
So I'm rating this a Level 4 on the GCT Scale since it failed as to the pin description, but if we were rating it by how it worked according to the original source, it'd be a perfect piece of toast with raspberry jam.