Showing posts with label Show-and-Tell Saturday. Show all posts

Saturday, September 28, 2013

Show-And-Tell Saturday: Ten Pin Plan Report

If you remember back to the 16th of this month (or look back if you have to), I came up with my 10 Pin Plan. This was a list of 10 pins I was going to test over two weeks and then I'd report to you today on the successes, failures, and in-betweens. I've been working hard to get all the pins done and I'm excited to share the results with you! 

So, in the order that these pins got done, I give you my Ten Pin Report: 

Pin Report #1:
http://www.the-girl-who-ate-everything.com/2009/07/crockpot-italian-chicken.html
My friend made this recipe way before I did and said that it was so salty that they had to throw it away. It sounded so good from the recipe though that I still wanted to give it a try. So I did. The recipe calls for 1-2 cans of cream of chicken soup. I figured that was where a good amount of the sodium was coming from, so I did half Cream of Chicken and half Cream of Mushroom soup (I don't find Cream of Mushroom to be as salty as Cream of Chicken). I knew that would change up the flavor some, but if it made it so we could eat it, that was fine. I do know that some brands of Cream of Chicken soup have a higher sodium content than others as well, so when you're making this, take that into consideration. Another thing we did, following a tip in the recipe, to cut back on the salt and to thin the sauce/gravy down to a more preferable consistency was to add some milk.
In the end, the flavor was good and it wasn't unedibly salty. You definitely didn't need to add salt, but it wasn't inedible. It reminded us of a mix between the gravy for Hawaiian Haystacks and cheap alfredo sauce. It really wasn't a bad meal at all, just not one of our uber favorites.
I thought about taking a picture, and I probably should have...but really it looked about like the picture (only we had ours on rice, not pasta). It's just a cream sauce with chicken. Another picture would kinda be overkill. That's how it looks. 

Pin Report #2:
http://www.onegoodthingbyjillee.com/2012/04/how-to-clean-your-top-loader-washing.html
Again...I didn't take a photo. Partly...I didn't think to take a before shot, so it doesn't do much good to show you the after shot as you won't know the drastic improvement. But...this works fantastically. It's not uncommon for me to forget a load in the washer and have to rewash it because it went sour. After enough times of doing this, along with the general grime build up, my washer looked and smelled less than pleasant. Not something you want to put clothes in to try and get them clean. Now, my washer smells so nice and fresh, the clothes came out smelling fresher than they have for a while, and it looks so clean and wonderful! This was really easy to do and it's made a difference in my washer and laundry. I'd recommend it!

Pin Report #3
http://www.ohnuts.com/blog/cinnamon-bun-pecan-pie-recipe/
This one I do have pictures for. I decided that I wanted to do the apple pie in the cinnamon roll crust because apples were on sale and it just sounded yummy. I had this pinned to test the crust out anyway. So I followed the directions to put the cinnamon roll style crust together. The directions said you can use pre-made crust, or make your own from scratch, so I turned to my trusty pie crust recipe (it really is simple and really yummy). I did a double batch of pie crust dough for the bottom so I would be sure to have enough and it ended up being perfect. It really was easy to put the crust together, the directions are simple. Here's what my crust looked like after getting it in the pan:

Then, this is the recipe I used for the pie. I'm not normally a huge apple pie fan, but I love this recipe and it's so easy. Cut up the apples, put the lattice top on, and then you make a caramel sauce and pour it through the lattice. SOOOOOoooo yummy and easy. For the lattice top I rolled out the plain dough, then spread some melted butter, cinnamon, and sugar on top. I then smooshed the dough back together gently (because you don't want to mix it too well), and rolled it out again to get a sort of cinnamon/sugar marbled effect going on. Then I cut my lattice strips and put the top on. Here's the pie right before going into the oven:

And here's the finished product!

So we know it looks cool, but what about the taste? Let's just say that I will forever do my apple pie crusts like this now. It's adds such a subtle but yummy yumm yummy flavor to the pie. And I apparently didn't get the bottom crust flattened as thin as I thought so I ended up with a thicker crust (which I LOVE) that is extra yummy to eat because of the cinnamon in it and the pie filling soaked in. This one is WELL worth the time it takes to make it. MMMmmmmmmm.


Pin Report #4
http://www.dumpaday.com/random-pictures/funny-pictures/funny-picture-dump-of-the-day-54-pics/

This one was hilarious. I drew the eyebrows on my nephew right before my baby shower started and then let him ham it up during the shower. His facial expressions were hilarious. But anytime I pulled out the camera, I got this face:


My sister and I tried and tried to get a good reaction when I had the camera out and he just wasn't going for it. But it was hilarious just watching him during the baby shower. Here are the 5 best shots I got of him during the day:
So this one is hilarious...but catching the hilarity "on film" may be another issue.


Pin Report #5
http://www.thesmallthingsblog.com/2012/10/casual-half-up-hair-tutorial-polka-dots.html
I have been waiting since last August to have my hair long enough to pin up, pull up, ponytail, leave down, etc., and finally it is reaching a doable length. But now that it's long enough to put up...I just don't know what to do with it. I've had this hairstyle pinned for a while now. Most half-up, half down do's make me look like I'm 11, but this one looked like a more grown up version of the half up/down do so I thought I'd give it a try. It looked simple enough. After getting the layering and texturizing my thick head of hair needed (thanks Em!), I knew it was time to try this out. From bed head to this do it took me about 20 minutes. That's brushing out my hair, giving it a light curling job, and then following her instructions. Here's what I ended up with this morning:


It really did go up pretty simple. I think I have thicker hair than Kate (the lady from the pin), but I was able to make it work and my layers were just long enough for this. Because I have a ton of hair, I ended up using about 8 bobby pins in the back to hold the hair in place. So the actual assembly of this do was pretty simple and doable. Then I decided I wanted to see how it held up during a day of laundry, dishes and sewing (don't you love the days where you get to play catch up because you've been gone all day every preceding day of the week?). Here's how it looked at 4 pm (6 1/2 hours later):

It's held up remarkable well. I don't know how it'd do out on a super windy or rainy day, but not many hair styles withstand that very well. But, for shopping, social events, church, etc., this would work out great! Yea for a new do!

Pin Report #6
http://www.sevenelles.com/tutorials/day-3-the-coolest-spot-in-the-house-just-became-even-cooler-fridge-coasters-tutorial/
So I've had this pinned to do for forever. I thought it looked genius. I was hoping to just use what I already had at home to keep this cheap. I didn't have placemats, but I did have non-adhesive shelf liner. But when I pulled that out this past week, I realized it wouldn't work. It wasn't smooth top liner, it has built in holes. Like this:

So I could put that down on the shelves, but any liquid or anything would just flow through the holes to the shelf and then I'd have the liner and the shelf to clean. No thanks. Luckily I thought ahead and then measured the shelves before I want to Wally World. My fridge is the normal upright kind with the freezer on top and the fridge on bottom. Which means the shelves in the fridge are wide. Wide enough that they don't make placemats that big. I thought about doing a few placemats side by side, but I imagined them shifting around, spills going in the cracks and under the mats and then stinking. It just wasn't going to cut it. So then I thought about a tablecloth, but to get one that would work well was more than I wanted to spend on fridge mats. So I scrapped this project. I did try, but it just isn't really all that feasible in my fridge. If I had a side-by-side fridge with more narrow shelves, this would work just fine I'm sure. 

Pin Report #7
http://www.agirlandagluegun.com/2012/03/oh-walti-love-you-aka-disney-printables.html
It took me a while to figure out how I wanted to do this, and then I came up with an idea I loved. I have this ceramic "canister" on the kitchen window sill above the sink. We use it to hold our scrub brush. It's handy, but it's not the most beautiful thing:

So I thought I'd paint it with that ceramic paint I used on my mug garden project (update on that...it's going great! One succulent died. That's when I realized I'd forgotten to water them for a while...oops), but the other 3, including the bamboo, are thriving. I got out my light blue and started painting away. After 2 coats of paint, and not enough paint left in the bottle for a third coat, the canister looked like this:

That wasn't going to cut it. I just couldn't get the paint smooth with any kind of brush/sponge, and there wasn't enough paint to give it a thick enough coat that the original color didn't show through. So...that idea had to be scrapped. Luckily that paint washes off super easy before you bake it so I was able to just wash off the blue paint and restore the ceramic back to the gold/brown it originally was. 

But that left me still with an unfinished project, and I was bound and determined to make this one work somehow. I rummaged through my art supplies and found a 5x7 scratchboard that I hadn't used yet and decided that was it. So I got on the computer and played with fonts until I found what I wanted. I ended up with this "picture":

I printed it, covered the back in graphite, taped it to my scratchboard, and used a pencil to trace the letters and transfer the graphite to the scratchboard. Then I scratched away and this is what I ended up with:

I figured since it looks chalkboard-ish I'd put it by the awesome chalkboard piggy Em and Camille got me for my Birthday. And, it's right at the entryway to my kitchen which is where some of my least favorite chores happen (and I carry the laundry through there to get to the utility room...so I'll see it when I do laundry too). Plus, it helps hide our internet box, so that's happy too!


Pin Report #8
http://theseamery.wordpress.com/2010/08/23/fit-to-a-t-baby-romper-tutorial-part-2-making-the-pattern-and-cutting/
I went through my t-shirts, picked out the 5 I wanted to use, and came in eagerly to read the directions before jumping into this project. As the only garment of clothing I've ever made is a simple skirt, I wasn't sure what some of the terms meant and, I'll be honest, I was a little intimidated by the tutorial. So I looked around on Pinterest and found a similar idea that seemed much more along my confidence lines (perhaps doing one of these more simple patterns will give me the confidence to try this romper pattern). 
So, here's the pin that I switched to:
http://thismamamakesstuff.com/tutorial-rockin-baby-gown-t-shirt-refashion/
Their instructions were decently easy to follow, just pay attention to the words and the pictures. Here's what I ended up with after about 2 hours of work on it. That includes printing the pattern, cutting the fabric, sewing, a snack break, and running back and forth between the dining room table where my sewing stuff was set up and the living room where the computer is to read the directions. Now that I know how it works I'm sure these'll be super quick and easy to pump out. 


Pin Report #9
http://askannamoseley.com/2012/02/getting-rid-of-that-boy-smell-in-the-bathroom/
Well, I did this. My bathroom doesn't smell lemony at all. It just now smells like vinegar and pee. Maybe I'm missing somewhere else where the pee smell is coming from? I scrubbed the toilet, I got the floor all around the toilet. I got the wall/cabinet by the toilet. And I still just smell pee. Where else could little girls get pee?!

Someone commented on my Mix-It-Up Monday post when I said I was going to do this that "Lemon juice and vinegar are both acids, so soda should fizzle when you mix it with the lemon juice; when the reaction is finished, there is no way for it to re-fizzle when you add more acid." The baking soda did fizzle when I added the lemon juice, but I was able to get it into a pancake batter-esque consistency, so I figured I'd just keep going. I let it sit for the 15 minutes it required, and then sprayed vinegar on it. It did fizzle again when I sprayed the vinegar on, so there was enough soda left in the paste to still do the work with the vinegar. But my bathroom still smells like pee. Either this didn't work or I've got some other pee problem area. Blech. 

Pin Report #10
http://www.thecampuscompanion.com/party-lab/2011/10/21/aurora-drink/#.UjdiOcaTiqg
I'm sure this is the one you've been waiting for. And I saved it for last, bwahahahaha. We had some nasty-gram comments (which we didn't publish because of the profanity content, as the disclaimer in our comment box says) saying we were dumb for thinking that galaxies would show up. I know the galaxies are photoshopped into the picture. But that's part of what we're showing. The directions of the pin do say this though: "it is a drink that is pink in natural light, but glows aqua-marine in black-light." So, the idea of testing this pin was to show that, yes, the galaxies are shopped in, and to see if the color change happens with the pinned caption containing the non-alcoholic drink (someone else will have to test the alcoholic version). 

I mixed up the drink (doing 1/9th of the recipe because it's just the two of us and if it was nasty I didn't want to have gallons of this on hand). So what did we find out? 

The mixed up drink under normal light:
Pretty and delicious looking!

The mixed up drink under a black light:
No galaxies. No aqua-marine glow. 

The taste? Kinda weird. Not one we'll be remaking. 

So I don't know if we need a more powerful or high-tech black light, if it was the non-alcoholic version that just didn't work, or if this never actually works...but it definitely didn't work for us. 


So there you have it! My 10-Pin Report. I actually didn't know if I'd get through all of them, so I'm feeling rather proud of myself right now. It helped that I knew I was going to have to report to you all...so thanks for that pressure! I hope you all have a great final September weekend! Hooray for Fall!!

Saturday, September 14, 2013

Show-and-Tell Saturday: Lewe the Ewe Quilt Pattern

In our Schedule Tab, we describe Show-and-Tell Saturdays like this: 

"Each Saturday we will be showing you a project we did from Pinterest. The idea here is to show you techniques we learned, pins we tested, store knock-off projects we did, and to share our "marvelous" ideas on Pin Spins. Now...we'd love to say that we're crafting/cooking/handyman/beauty/gardening gurus...but we're not. We're pretty average 20-something year olds, so these projects most likely won't be magazine worthy...but that's not what we're going for. We just want to create, enjoy the process, and help you be motivated to get out and try something. Life isn't Pinterest-perfect, and that's perfectly okay!"

Emilee and I switch off each week with who has what posting days, so that we alternate who has Show and Tell Saturday each week. Some weeks I know well in advance what I'm going to do, some weeks it hits Friday and I realize I have to figure out a Show and Tell post pronto. With all this glorious rain, family coming to visit, food from the garden to can and freeze (anyone need bags of green beans? holy molies), and the first "baby shower" (they're calling it a BaBy-cue...men and children invited) this week, I just wasn't sure what pin I was going to showcase for today's post. And then it all just fell together while I was at work this week. 

I work at a local quilt store in town called Aunt Judy's Attic. It's a dangerous place for someone who likes color, fabric, crafts, and Pinterest. It took a few weeks to come home with a full paycheck instead of a partial paycheck and some fun fabric/craft goodies. I have thoroughly enjoyed the store and have learned so much there. This past week Judy had me build a pattern for her blog from a quilt top one of the quilters in the store came up with. She wanted the pattern to be printable, but also so we could post it up on the store blog and get it ready for Pinterest. It took me all day measuring the quilt pieces, mentally deconstructing and reconstructing the quilt, coming up with the order the pieces had to be sewn together, and getting everything written up. It was so much fun...the ultimate puzzle featuring math, fitting pieces together, and fabric. Finally I finished it up and we posted it and got it up on the blog and Pinterest. I excitedly pinned it to my boards for a future project. I figured I'd do it someday in the future. I thought I was done. But then I worried all night long that I'd messed up somewhere and told people to cut their fabric wrong, or had them sew something in the wrong order. So I decided I had to test it out myself so that I could hopefully catch any goofs I made. And then it hit me that it would be perfect for today's post. I got to help create a pinnable tutorial, and then I get to test it and let you all know if it works or not. Let's just say it was a good thing I ran through it as there were a few things that needed fixing. But now I think I can say that it is good to go and ready for the blog and Pinterest. 

This pattern features Susybee's Lewe the Ewe panel, and the Lewe the Ewe print fabric. My in-laws run a herd of sheep (complete with working Border Collies to help...I feel like I'm watching a scene from "Babe" every time I watch my Father in Law run the sheep), so I fell in love with this fabric the moment I saw it. I love the design that Nancy came up with for the fabric. 
http://auntjudysattic.blogspot.com/2013/09/lewe-ewe-quilt-pattern.html

So after re-writing some of the instructions, realizing I measured/cut one of my pieces wrong (because I wasn't paying attention to the directions or I was just lazy or went crosseyed or something), jimmy-rigging the mis-cut piece to make it work, picking out a row 4 times (it was late...I shouldn't sew when it's late), and grumbling over it...here is what I ended up with:

This pattern really is easy...if you cut your pieces right. Cutting quilt pieces apparently is not my strong point. Nor is sewing late at night. There are goofs in the sewing, but I like how it turned out overall. And now that I've tested the pattern from start to finish, I think it's good (just make sure you measure right...I apparently had problems with this today when I was cutting out my fabric). Of course I say that and someone will send us an email saying they're confused or that the pieces don't match up. But hopefully not. So, if you're looking for a fun pattern (that hopefully now has the kinks worked out of it), check out the pattern up on the Aunt Judy's Attic site. 

Saturday, September 7, 2013

Show-and-Tell Saturday: Pillow Power

Today is was in a sewing mood...last time that happened was 1996. No seriously. My poor mother tried so hard to have a little quilter on her hands and it just didn't happen.
There is one execption to that and it was about a month ago when I made today's Show-and-Tell Saturday!
 
Show-and-Tell Saturday!
 
Pillow Power!


So I didn't iron them because I was just too excited to get them on the couch and see how they all looked! I love them!! I don't have a cutting board or a rotary cutter so it took me a while to get everything cut out and make sure they were cut straight but that was THE hardest part of this project.
 
Seriously go check it out, easiest tutorial ever!
 
I used the three pillows that came with my couch, and then I bought a few at a garage sale so I had a few pillow forms to choose from. I bought the chevron, the word fabric and the mustard/neon yellow damask at Hobby Lobby all with coupons. The blue fabric seen in the third photo is from Wal-Mart that I had in my stash. Over all I think I spent $20 on all four pillows and fabric which is pretty awesome!! I think they go well in my living room and they are all slip covers so they can be taken off and washed which is awesome!!
 
Have any awesome DIY projects?! Send them our way!
Happy Saturday!


Saturday, August 31, 2013

Show and Tell Saturday: Cheap and Easy Decor

We love to decorate for the Holidays, but store bought decorations can be so expensive! DIY supplies can be expensive! We went a few years without really decorating much because we couldn't afford it. Or that's what we thought. The past few years we have decided that we are going to find ways to decorate the house for various holidays without having to shell out a ton of dough. Will you ever see our house in a magazine because of our decorations? Heavens, no. Are some of the decorations slightly cheesy? Yes. But we found it is way more fun to have cheap and cheesy decorations and to add some festivity to the house than it is to just wallow in our poor pity and not do anything at all. So...I know the major holiday season is still a little ways off, but it'll come fast. I'll show you some of the things we've done for each season around the house, and some of our plans for future cheap seasonal decor.

Autumn:
Our biggest "trick" when decorating for Autumn is to try and incorporate nature into our decor. Autumn is so full of great colors and textures. Take a walk in your neighborhood and see what you have around you. This can work in rural or urban surroundings. Pick up leaves, nuts,dry and dead flowers, grass, twigs, rocks, etc. You can put these in bowls, vases, on wreaths, topiaries, etc. With the rocks you can even pick up boring ol' gravel pieces and paint them (solid colors or designs) to fill a vase or bowl. A few years ago I went out in my front yard to gather acorns to put in a bowl and found that the animals had beat me to them. But, there were still a ton of the acorn "shell" tops left, so I gathered those up, along with a bucket full of yucca pods. Luckily I already had 2 Styrofoam balls on hand (I don't remember why), and so I glued the acorn shells and the yucca pods to the balls to make a topiary and a yucca ball. I love the color and naturey touch they add to the house, especially during the fall.  

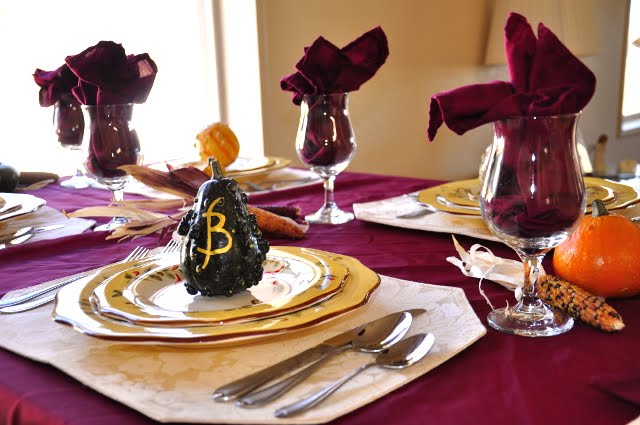
Use nature items (gourds, leaves, rocks, etc.) as name "cards" for a fun autumny dinner. 


Halloween:
My husband's favorite holiday is Halloween. I'm not a huge fan of gruesome Halloween decorations, or the overly cheesy Walmart decorations, so the past 2 years I've worked hard to come up with our own style of Halloween decor. 
 From bottom to top:
Bloody Candles: Pinspired Project (see next picture).
Dried Corn: WalMart
Troll (by the corn): Gift from my brother-in-law from his time in Norway.
 Black and White Photos: Photos my Great-Grandfather (Em's Grandfather) took.
Quidditch Photo: Personal photo project. 
Boots: From a local thrift/antique/consignment store. 
Framed Leaf: Melted Crayon Project
Yucca Ball: DIY
Metal Kaleidoscope: Gift from a friend. 

To make these we lit a red taper candle and let it drip on the white candle, turning the white candle as needed.  

I found these boots at a local thrift/antique/consignment shop and had to have them as they were only $10. They are way to small for my feet but I knew they'd make a fun fall/Halloween centerpiece and/or decoration. 

 From left to right:
Witch's wreath (there hanging on the wall on the left of the piano...click the link to see it better...it was made from items we all usually throw away): DIY from previous year 
Mummy head topiary and Ghost: DIY from previous year 
Necktie Garland: DIY from previous year
Leaves: Walmart. I put them in an orange vase we found in the house when we moved in. The vase is being held up in a bowl we got for our wedding by 4 dried ears of corn. 
Halloween Silhouettes hung on a ribbon with clothes pins: DIY from previous year. These always get comments from visitors and they were so much fun and so easy to make! We keep these in a folder during the year so they don't get munched in the Halloween box. 

And then last year in the Dining Room was my Batmobile. Hehe...I'm so punny. 

Thanksgiving:
We actually haven't really done anything specific for Thanksgiving yet. I want to. Maybe this year? These are a few ideas I have on my Thanksgiving Pinterest board:
http://www.freshlychopped.blogspot.com/
I love the look of the leaves and clothespins. This would work great for just regular fall/autumn decor as well. To make it Thanksgiving decor each leaf could have things we're thankful for written on them in gold or black ink.

http://www.flickr.com/photos/yourhomebasedmom/8173548067/in/photostream
I like the quote more than the decor in this one. This could be written on a table runner, a chalk board, done up in a cool font in Word and printed out, etc.

Christmas/Winter
Our Christmas and Winter decor is all the same thing in our house. I always feel like we have a ton of Christmas decor, but then when we go to pull it out I find that we don't. Most of it is from my single days and our first year of marriage...so most of it is kinda corny and cheap. I've been working on getting a few more items made, but I haven't gotten very far yet this year (my goal was to make 5 decorations by September...I have one last one to finish up today to reach that goal). 

Tin Can Luminaries:
http://madebymarquette.blogspot.com/2011/08/tin-can-luminaries.html (this link shows step by step how I made these). 
I made about 10 of these for our 5th Anniversary dance that we held. I still have most of them kicking around. At the time I made them I used ribbons in our wedding colors to decorate the cans with, and I've just used them like that for Christmas decor, but I think this year I'm going to pull those off and use some Christmas ribbon, maybe some burlap (small amounts...I'm not a burlap-a-holic), maybe some mistletoe or pine clippings. We fill these with beans or rice for sturdiness and then add a candle (real or battery operated). We have a drawer in our kitchen where we store extra cans to use for projects like this.

Christmas/winter nature decor:
The blog this originated from is no longer online. 
We go and cut our own Christmas tree each year (we live where it's free to get a permit and the National Forest is just down the road), and it always needs a little bit of trimming up once we bring it home. Before we've just chucked the trimmed branches out in the yard but this year I think I'll save one or two and do something like this.

Wood bucket Christmas Tree stand:
We happened on this tradition completely by accident (you can read about that here). We needed to improvise a tree stand and after looking around the yard found these wood planter buckets that previous tenants had left. With the help of bricks, a no. 10 tin can, and gravel, we were able to rig up our own free tree stand. It's now tradition to use that bucket. Okay...we've only done it for 2 years now, but as long as that bucket holds up...we're going to use it as our tree stand. 

DIY paper ornaments:
http://madebymarquette.blogspot.com/2012/12/new-years-tree.html
We made these for New Years with metallic wrapping paper we bought in the after Christmas sales. But I remember making these as kids for our Christmas tree. My grandparents made these out of newspaper for their Christmas tree when they were newlyweds and broke. These look neat out of pretty paper, regular paper, newspaper, etc.

The Rest of the Year:
I'm really bad about doing any special decorations for the rest of the year. My house stays pretty much the same from when we take down the Christmas decor (anywhere from January to the end of March, lol) until we pull out the Autumn decor. I don't know why I don't decorate the rest of the year...it would be fun. I guess the rest of the year I usually just work on "regular" stuff for the house. Even during the "rest of the year" though, we keep our decorating as simple and cheap as we can. Most of what we have in our house are things that friends or family were giving away, things we found super cheap at the thrift store, and things we made. You don't have to spend a ton of money to be able to decorate. You don't have to be super artsy or crafty to create things for your living space. Don't know where to start? Start with pictures and photos. Hang them on your wall, put them on your book shelves, set them on your tables. Hang snapshots next to "formal" portraits. Find art pieces you like at your local thrift store (you can find gems amid the tigers painted on velvet, adorned with glitter and rabbit paws). Print photos your grandparents took. Write or print out a favorite quote or verse and frame it (we have some super cheap frames that I put around the house that we switch out contents when I find a new verse that inspires me, or something that I find beautiful). Don't worry about having the magazine or Pinterest perfect home. Use magazines and Pinterest as idea starters if you want, but don't think that your home has to look like that or it's not a home. Those rooms in those "manufactured" pictures were most likely only that way for as long as it took to take the picture. What makes a room feel light and loved is you. Live in it. Let it be yours. Let it have a pile of clutter...most of us do. Don't feel like you have to be Martha Stewart or a Kardashian in order to create or afford a beautiful home. It's your home, not theirs after all.


Saturday, August 24, 2013

Show-and-Tell Saturday: Gift Baskets!

When I think gift baskets I think of the saran wrapped huge Easter baskets filled with everything from giant chocolate bunnies and fake eggs, to the school raffle baskets that have themed prizes like a basketball with a mini hoop and basketball gummy candies. And when I think of these things I cringe.
 
A gift basket can be SO much more!!
 
Recently I have been into the "basket" theme for gifts that I have given to friends. Here are a few of the baskets I have made recently.
 
I will share some of my tips and tricks that make the baskets more aesthetically pleasing and super easy to put together!
 
Show-and-Tell Saturday: Gift Baskets
 
Haha Yes that is my hubbie playing cards behind the basket. I needed to moral support lol
 
For this basket one of my sweet friends was having a hard few weeks and was about to go on a camping trip that wouldn't be as relaxing as you would think. Everything ended up going awesome that weekend, but I thought I would make her a little "Weekend Survival Kit". Here is what was in her basket:
Running Socks (She is a big time runner, and I put a note that said "In case you just need a weekend jog."
Tissues (It had been a ROUGH week)
Gum
Nail Polish in her favorite colros
Nutella To-Go Cup (Duh!)
Some caramel candies
Some fitness Magazines
A Drinking Cup ( The nice Plastic kind witht he straw that you can wash and reuse)
A dog bone ( for her pooch, with a little sign that says "A happy Chief is a happy (insert friends name here)"
And her hubbies favorite candy with the same sign as before only with his name.
 
For this I picked a little basket I found int he basket section next to the laundry things at Wal-Mart. It was like $2 and a cute print so that she can use it in her house after. I stuffed the bottom with lots of tissue paper and then put tissue paper all around the edges so it looked nice and full, ( it was REALLY full actually, I had a hard time fitting everything in there!). Then I arranged everything so that it would 1) Be visable and 2) Help everything sit up right and fit tightly in the basket.
I think it looked great, and she absolutely loved it :) Success!


This basket was for Marquette for her birthday!! My friend Camille and I went on it together and I think is so fun!!
Marquette LOVES pigs so we found this chalk board piggy bank that was just too cute to pass up.
In her basket was:
Chalkboard Pig
Colored Chalk
Her favorite lotion
and her favorite fudge from our local Fudge Shop!
And we wrote happy Birthday on the Pig!
 
For this one I stuffed the whole caddy with tissue paper to prop up all the little pieces and the pig just fit in nice without much padding. The Happy Birthday Streamer tie I thought was just a nice little add in :)


This is a basket I made for my best friends wedding present. The theme I did for the basket was things people forget to give you at your wedding, or things newlyweds need in their new place. Here's what I put in her basket:
Scentsy Warmer and lots of wax scents
Dish towels
Candle Sticks and Candles
Champagne Glasses
Some bubbly!
Tea Light Candles
Thank You Cards
A Ceramic Party Tray (For sides and Appetizers)
And a  Lazy Susan.
The basket I put it all in was HUGE and would be perfect for dirty laundry, or blankets etc.
 
I had some tiny old boxes that I put on the bottom of the basket,  then covered them in tissue paper and put all the gift item on top of all that. This created a stair stepper type of look for all the items and made it easy to display everything. I also put her wedding colored bows ALL over the basket.
 
 
A few tips for gift baskets I have learned ( I have done a  bunch but only had pictures of these three).
 
-Put the largest or bulkiest items in the back of the basket.
 
-Pick a basket or caddy that the person you are giving the gift to will be able to use again, that is kind of the best part of these. When all the gifts inside the basket have been put away you now have a new laundry basket, magazine caddy, makeup box etc.
 
-Use tissue paper, boxes, packing peanuts bubble wrap etc. to boost up the items so you can see everything.
 
-There are a million themes for baskets and they are good for any occasion. Get Creative! Camille did one for her hubby for the start of his College Football Training Camp (She put Pedi -lite, Sports Pre-Wrap, Sunscreen, Chapstick, and a few other things and put them all in a new sports draw string bag...he LOVED it!
(i.e. The persons favorite colors, sports, candy, an event like baby shower or wedding, an essentials basket for any number of things etc.
 
-You can include items for people in that persons family (Like candy for the kids or spouse, or pets even!)
 
-Use ribbons, bows or tissue paper to decorate around or in the baskets, sometimes it can make it look more put together.
 
-Write them a little note, maybe tell them why you picked that theme, maybe why you picked certain things to put in there or just a note of encouragement or love is always good :)
 
-Have fun with it, I loved putting all these together and even more so I loved how much the people I gave them to enjoyed them :)
 
Happy Saturday!